
Have you just found this address on the back of your router under ‘’default gateway’’ and now don’t know how to use it? Do you have a router or an access point with this IP address and need some instructions on how to change your network name and password, or how to change some other settings? You’ve come to the right place! We are here to tell you everything you need to know about 192.168.15.1. Let’s start with some basic information.
CONTENTS
Is 192.168.15.1 Public or Private IP Address?
This is an IPv4 address. It comes from the block of Class-C private addresses (all 192.168.x.x IP addresses belong to this block). So, it is a private address. But what does that mean?
Private addresses are those that can’t be routed over the internet. They are only used inside private networks (LANs). Every device on your home wi-fi network has a private IP address. Your router also has a private address. Your devices use these addresses to communicate with each other. When they want to access the internet, they send the request to your router and your router then uses a public IP address (assigned by your ISP) to contact the DNS server and get the necessary information. Once it gets the feedback from the server, the router then sends data/info to your devices.
Inside a single LAN, there can be only one device using one IP address. That address is unique for that device, but only inside that network. Some other device on some other network (any other LAN) can have the exact same address assigned to it. The problem only appears when two devices on the same network have the same IP address. That problem is known as IP conflict.
192.168.15.1 is more often used as a default gateway than as a host address (you will hardly have a device connected to your home network with this address assigned to it).
What can I Do with This Address?
Well, if it’s not your default gateway and is not one of the addresses in your DHCP pool, then nothing.
If it is your default gateway, then 192.168.15.1 is the key that you can use to unlock all kinds of network settings and adjustments. You can adjust/change various aspects of your network, starting with the basic settings (change SSID and password). You can adjust sharing settings, parental control settings, assign static addresses to your devices, enable port forwarding, and perform other advanced adjustments.
What Routers Use This Address as a Default Gateway?
192.168.15.1 is not a popular choice when it comes to default gateway addresses. Some other addresses (192.168.1.1, 192.168.1.2) are far more popular. However, there’re a few older routers and access points that use it as a default gateway. The most renowned manufacturers using this address are Linksys and D-Link. Here’re some of the models with 192.168.15.1 gateway.
D-Link: VWR-VRB1 (wireless router), VWR-VR rev B1 (wireless router)
Linksys: WRP400, WRT54GP2A-ATv1, WRTP54G, WRT54GP2A-AT, WRT54GP2
CyberTAN: WGV614-A3
Is 192.168.15.1 My Default Gateway?
If you don’t know your default gateway or are not sure, you may want to check out the label on your router or the instruction manual that came with it.
If there’s no label and you don’t want to look for the manual, you can find it easily, in just a few steps, by using the exact same device that you’re using to read this article. It doesn’t matter if it’s running on macOS, Windows, Linux, iOS, or Android. You can find your default gateway and your device’s IP address in less than a minute.
Windows users just have to open the Command Prompt, type in a single command, and press enter. The command is ipconfig. Scroll down and find Default Gateway.
Linux users can open the Terminal use the command route -n.
macOS users can also use the Terminal and type in the command netstat -nr.
Android users can do it in a few steps with their phone/tablet. Here’s how the process should look like:
Connect your phone/tablet to your wi-fi network. Open the wi-fi settings and tap and hold your network name. From the dropdown menu, select ‘’Modify’’. Tap on ‘’Show advanced options’’. Then scroll down to IP settings. Tap on it and select ‘’Static’’ instead of DHCP. Your router’s IP address will be under the ‘’Default Gateway’’.
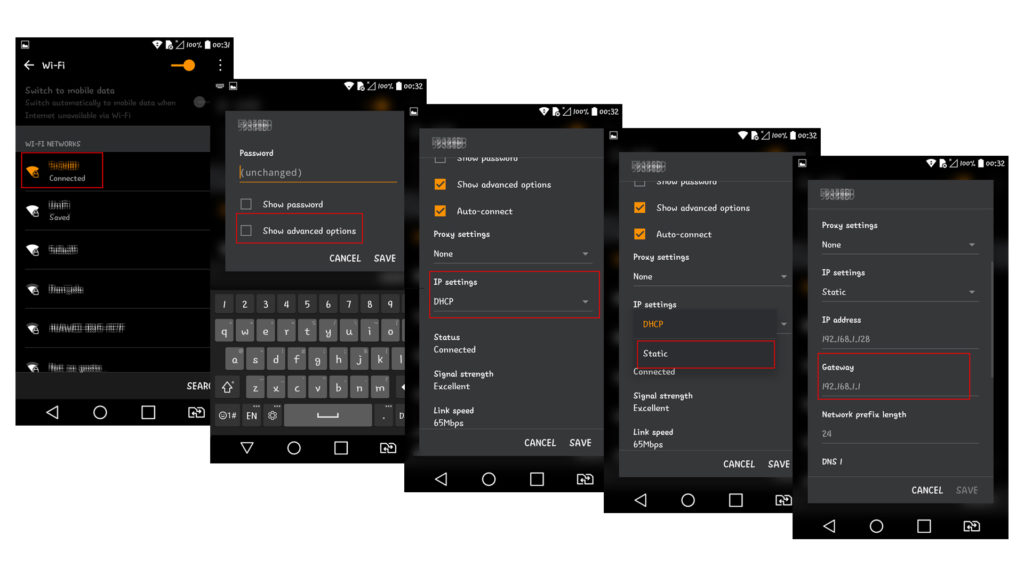
Step by Step – How to find your default gateway using your Android device
iOS users also have to enter the wi-fi settings and tap the ‘’i’’ letter standing next to your network name. Scroll down and look for ‘’Router’’.
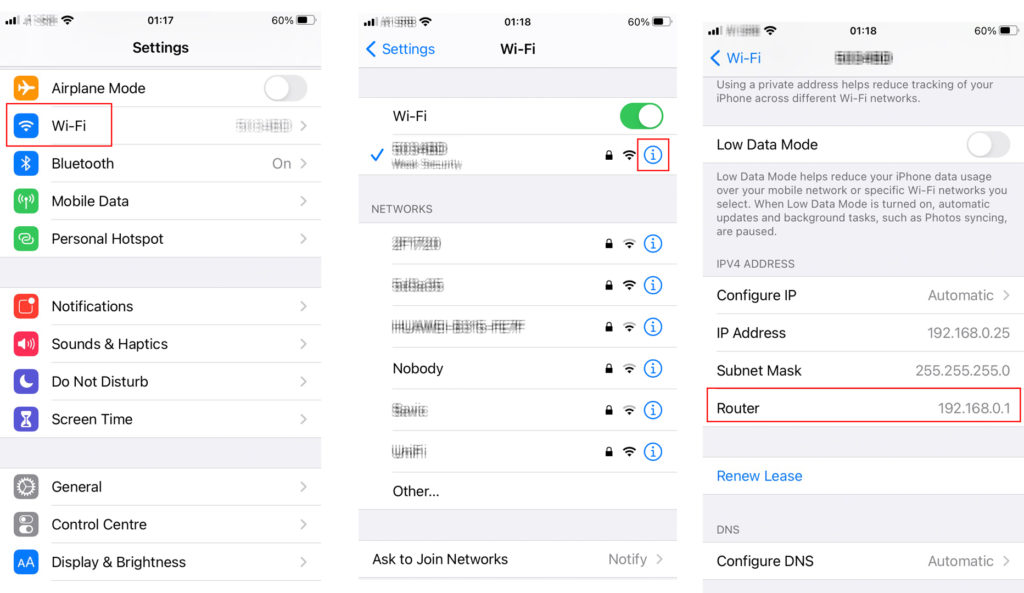
Step by step – How to find your default gateway using your iOS device
How to Use 192.168.15.1 as a Default Gateway?
Access router settings
Accessing the settings, once you know your default gateway, should be fairly easy – there are only two steps.
Note: For the purposes of this article, we used D-Link VWR-VRB1, but the process is similar for every router.
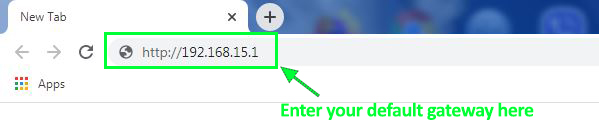
STEP 1: Open the browser and type in the default IP address. Type it in your address bar.
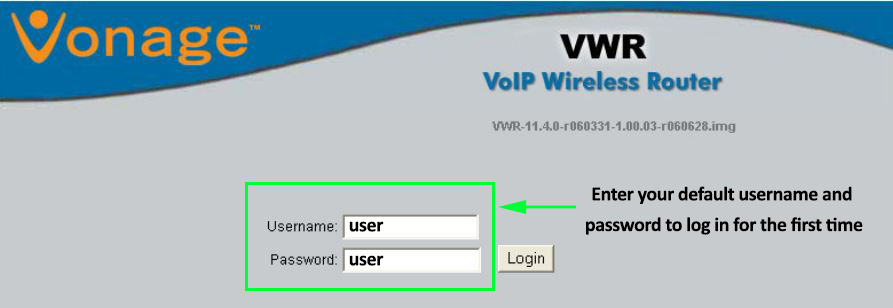
STEP 2: When the login window appears, enter your credentials. If you are accessing the settings for the first time, use the default username and password (usually printed on the label). You can also find the default credentials in the manual. If you’ve been accessing the router settings in the past and changed the default username and password, but now can’t remember them, you will probably have to reset your router – press the reset button for 10sec.
Change SSID and password
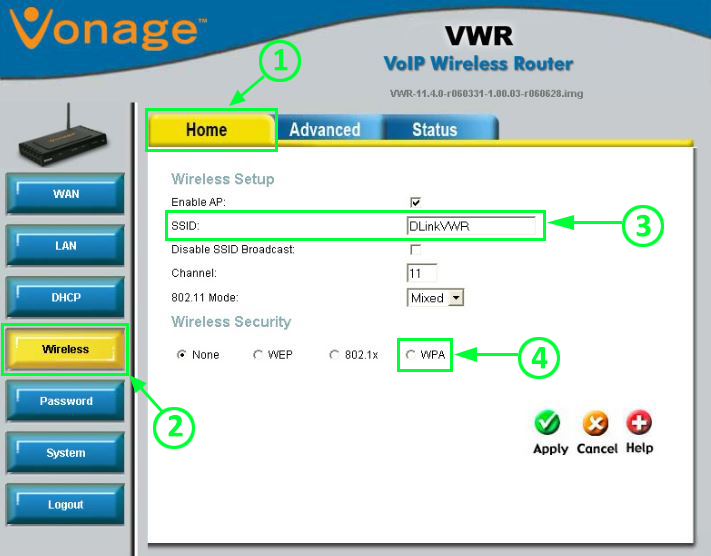
Once you enter the settings, you can change all kinds of wi-fi network parameters. One thing people often do to protect their wi-fi and prevent others from connecting to it is changing wi-fi name and password. Here’s what you have to do if you are using the router from our example (D-Link VWR-VRB1).
Select Home, then go to the Wireless tab. In the SSID field enter the network name. It can be whatever you want. It doesn’t matter if it’s long or short. Then, under wireless security, select WPA.
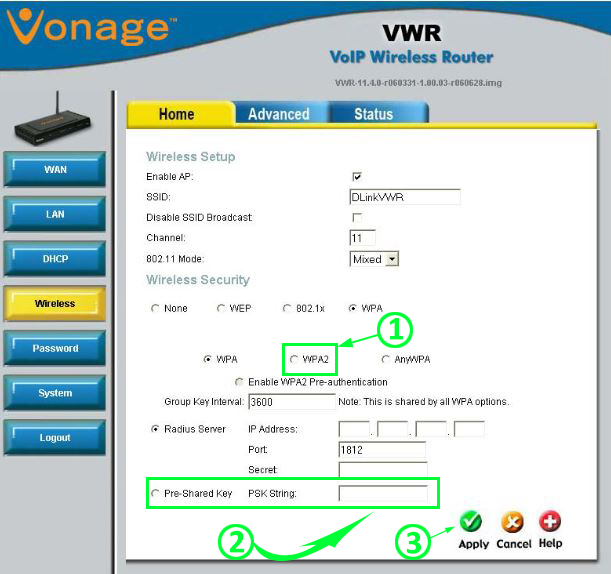
Once you select WPA, another menu will appear. You should select WPA2, as this is a more secure wireless protocol.
Then, select Pre-Shared Key and enter your password. Password should be alphanumerical and should be fairly strong. Finally, click on Apply.
Log out and see if the changes have taken effect. If you can’t see your wi-fi network name, try restarting the router.
Assign static IP to your PC or any other device on your network
This one is also fairly easy. Once you open the settings, go to Home and select the DHCP tab.
In this window, you will see two sections – DHCP configuration and LAN clients.

The DHCP configuration shows you the scope of available IP addresses (DHCP pool). Before assigning a static IP address to one of your devices make sure to exclude it from the DHCP pool. If you don’t do that, your router may assign that same address to some other device.
Now, you can move to the LAN clients. You’re supposed to enter the IP address that you want to assign to your device in the first box. You should also enter your device’s hostname and MAC address. Once you enter all the required info, you can click on Apply and log out.
Similar Articles:
- 192.168.1.254 – How To Access The Router Admin Console
- 192.168.10.1 login
- 192.168.100.1 – A Quick Guide for Beginners
The easier way to make a reservation would be to find your device at the end of the page, mark that box under Reserve, and exclude this address from the DHCP pool. This method can be tricky if the address you want to assign to your device is somewhere in the middle of the DHCP pool. Our advice is to use the addresses from the beginning or from the end of the pool (like 192.168.15.2/.3/.4 or 192.168.15.252/.253/.254).
Can 192.168.15.1 Be a Host IP Address?
192.168.15.1 is the first available IP address in a 192.168.15.1/24 subnet (a subnet with a 255.255.255.0 subnet mask), so it’ll be automatically assigned to your router and it can’t be a host address (it can’t be assigned to your PC, phone, or any other device).
However, in a larger network (for example 192.168.15.1/23), 192.158.15.1 could be one of the available host IP address in the DHCP pool.
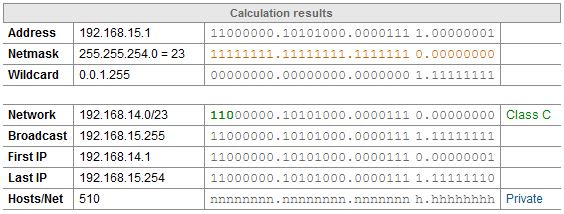
As you can see from the image above, using a different subnet mask (255.255.254.0 instead of 255.255.255.0) will increase the number of available host addresses (from 254 to 510), and one of the addresses inside the DHCP pool can be the address from our title. This will never happen on a small home network, but it is a possibility on a larger corporate network.
I’m having Issues with 192.168.15.1 – Troubleshooting
Accessing the settings dashboard is not always hassle-free. Here’re some of the most common issues.
I can’t access the login page
If accessing the login page takes too long, then you’re probably using the wrong IP address. Check your default gateway once again – use the instructions we’ve given you a minute ago.
It is unlikely, but it is also possible that the device that you’re using to access the settings and your router have the same IP address (that you’ve, by mistake, assigned the wrong static IP address to your device). In this case, you have to release your IP address, wait for the router to assign you a different IP address from the DHCP pool, and then try to access the settings.
Logging in takes too long – I can’t access the dashboard
You’re using the wrong username and/or password. If there have been no typing mistakes, then you have two options: try to remember the username and password or do a factory reset (press and hold the reset button for 10sec).

Hey, I’m Jeremy Clifford. I hold a bachelor’s degree in information systems, and I’m a certified network specialist. I worked for several internet providers in LA, San Francisco, Sacramento, and Seattle over the past 21 years.
I worked as a customer service operator, field technician, network engineer, and network specialist. During my career in networking, I’ve come across numerous modems, gateways, routers, and other networking hardware. I’ve installed network equipment, fixed it, designed and administrated networks, etc.
Networking is my passion, and I’m eager to share everything I know with you. On this website, you can read my modem and router reviews, as well as various how-to guides designed to help you solve your network problems. I want to liberate you from the fear that most users feel when they have to deal with modem and router settings.
My favorite free-time activities are gaming, movie-watching, and cooking. I also enjoy fishing, although I’m not good at it. What I’m good at is annoying David when we are fishing together. Apparently, you’re not supposed to talk or laugh while fishing – it scares the fishes.