
People rarely pay attention to IP addresses, their purpose, and their meaning. The only situation when they become important is when you want to change your wi-fi network’s name and password or, on rare occasions, when you have to make some other changes to your network to improve the performance or enable some feature.
Depending on the router (or gateway) you use, 192.168.254.254 might be the address that will give you access to your router’s settings. But what kind of address is that? How to use it? What routers have this address assigned to them? What to do after you log in? In this article, you will find all the answers you’ve been looking for.
CONTENTS
192.168.254.254 – What Kind of an IP Address is This?
192.168.254.254 is a private IPv4 address. It’s part of the block of private addresses within class C (192.168.0.0-192.168.255.255). It can either be your default IP address (your default gateway) or a client/host address (static or dynamic IP address).
The fact that the address is private means that it can’t be routed online – it’s only used within your local area network (LAN) allowing your devices (PCs, phones, laptops, router) to communicate with each other and to access the internet. This exact IP address, just like any other IP address can be used an unlimited number of times within separate local area networks.
So, your router may have this IP address assigned to it, but your neighbor’s router (or maybe some device on your neighbor’s LAN) can have this same address assigned to it. As long as they are on separate LANs, there’s no problem. However, within a single LAN, only one device can use this address. Other devices will have different addresses assigned to them.
Recommended reading:
Private addresses, like 192.168.254.254 can only be used and seen within private networks (LANs). So, if a router has this address assigned to it (by the router manufacturer), the router will use it to communicate with other devices connected to the same network. When you send a request from your phone to visit some webpage (like youtube.com) to your router, your router gets this request from your device through a private IP address, but then uses public IP address (assigned to it by your ISP) to access the internet. When the router gets feedback from a DNS server (through its public IP), it forwards it to the device that sent the request in the first place (but this time, it uses a private IP address). That’s the whole difference between private and public IP addresses.

192.168.254.254 as a Default Gateway – What Routers Use This IP Address?
If 192.168.254.254 was assigned to your router by the router manufacturer, then it’s commonly known as the default IP address or default gateway. Your router will use this address to communicate with all the devices on your LAN (laptops, PCs, phones, speakers, and other smart devices). All of your devices will send requests to this address and will receive feedback from this address.
In case you’re not sure if your router uses this or some other IP address as its default gateway, there’re a few ways to identify your default gateway.
For starters, you can check the label on your router. It’s usually located on the bottom. If you want to be sure, you can also check it directly from your PC, laptop, or phone.
Windows users
Open cmd prompt and type in ipconfig. Look for the line named Default Gateway.
Mac users
Open the Terminal and type in the following command – netstat -rn. If you are not familiar with Terminal, you can find your default gateway through system preferences. Go to Network → select Wi-Fi → click Advanced → select TCP/IP. In this tab, you will find the info about your device’s IP address and your router’s IP address (which is your default gateway).
Linux users
Open the Terminal and type in the following command – netstat -r. The IP address you’re looking for is located under Gateway.
iOS users
Once you connect to the network, go to Settings → select Wi-Fi → tap that smaller letter i (information) standing next to your network. You will see your iOS device’s IP address, subnet mask, and your router’s default gateway.
Android users
Once you connect to the network, go to Wi-Fi settings → long tap on the network you are connected to → Modify network → Advanced → switch IP settings from DHCP to static → look for Gateway.
Now that you definitely know what your router’s default IP address is, let’s see what routers use this address.
192.168.254.254 is not the most common default gateway but there is still a number of routers using it. Some of the most notable manufacturers and router models are:
ARRIS (models – NVG448B, NVG468MQ, NVG448BQ, NVG443B)
NETGEAR (models – D2200D, 7550)
SAGEM (models – 4320, 2705, 1704N, SE567)
ACTIONTEC (model – T3200)
Siemens (models – SE587, SS2624, SS2623, SS2524, 6520)
ARRIS and NETGEAR models are (or were) used by Frontier, while SAGEM and Actiontec models were used by Windstream.
Configuring Router with 192.168.254.254
Once you’re certain that 192.168.254.254 is, in fact, your default gateway, you can use it to access your router’s settings (also known as web console, router setup dashboard, etc.).
Here’s what you need to do:
- Open your browser (Google Chrome, Mozilla Firefox, Opera, Safari, etc.)
- In the address bar (not the search bar), type in your address and hit ENTER

- Depending on the router model, you will either see the Login screen or a status screen and two text boxes for the username and password.
- You have to type in your username and password. In case you’re accessing the router settings for the first time, then type in the default username/password. You can usually find them on the label located on the bottom of your router (or in your router’s manual). The most common username/password combos are admin/password, admin/admin, blank/password, user/user, root/root, admin/1234.
- If you’ve been using the dashboard in the past and changed the username/password, but now can’t remember your credentials, you have to reset your router. To do that, press the reset button on the back of the router and hold it for 10sec.
- Once the dashboard opens, you can start adjusting various parameters of your network.
Changing Wi-Fi Network Name and Password
One of the first things that people do after installing the router is changing the wi-fi network name (SSID) and password. In many cases, this is the only thing that people do – they usually don’t change any other settings even though there’re so many options.
For starters, let’s see how you can change your network’s name and password. We will show you how to do this on one of ARRIS’s gateways (model NVG468MQ) used by Frontier. The procedure is similar for other gateways and routers.
Assuming that you have already opened the dashboard, go to the Wireless tab. Select your wi-fi network. In our case, we have multiple options starting with Total Control Wireless, separate 2.4G and 5G home wi-fi networks, as well as separate 2.4G and 5G guest wi-fi networks. To set the same passwords for all these networks, you can go to Total Controls Wireless. However, most people prefer using different passwords and different names for different networks. That’s probably a more secure option.
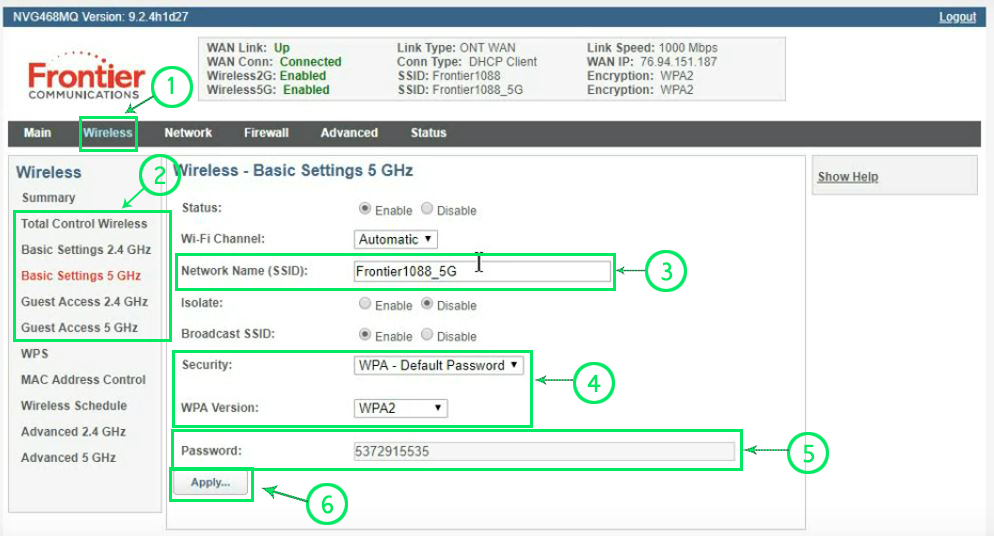
So, once you select Wireless tab (1), and wi-fi network you want to set up (2), you will see a window with basic settings. In this window, you can enable/disable your wi-fi network, select the wi-fi channel, change SSID, select the security protocol and set your password.
Since we don’t want to disable wi-fi, we will leave ‘’Enable’’ checked. In the field Network Name (SSID), enter the name you want to appear when you search for available wi-fi networks (3). It’s highly recommended to use the WPA2 security protocol (4). Enter the password you want to use (5) – make sure that it’s not an easy password (like your birthday or something like that). Finally, click Apply (6). If you want to change the settings for other networks, just repeat this procedure for other network tabs. Once you’re done, just click on the Logout button (in the top-right corner).
For other Frontier modems, visit Frontier’s help page. For Windstream routers/gateways, check out one of our previous articles.
What Other Settings Can You Change?
Your default gateway gives you access to the confusing world of your router’s settings. Besides changing your wi-fi network name and password, there’s a number of things that you can change, adjust, enable, disable, etc.
You can use it to adjust your firewall settings, change parental control settings (prevent some devices from accessing certain websites, limit access to certain devices by introducing time limits, etc.), change DHCP pool settings (change DHCP pool size, make a reservation – assign static IP to your printer or some other device), change DNS settings, adjust sharing settings (enable Samba sharing, FTP sharing, change NAS settings, enable DLNA), etc.
Before changing any of these settings, we strongly advise you to learn about them and see what kind of effect will that specific change have on your network.
192.168.254.254 as a Host IP Address?
Instead of being your default gateway, this address could also be one of the available addresses in your DHCP pool and can be assigned (by your router) to one of the devices connected to your wi-fi (dynamic IP address).
You can also make a DHCP reservation and assign it to a certain device (like a printer) connected to your wi-fi. That way, you will make it static – when you make a DHCP reservation, the same IP address will always be assigned to the same device on your network.

Hey, I’m Jeremy Clifford. I hold a bachelor’s degree in information systems, and I’m a certified network specialist. I worked for several internet providers in LA, San Francisco, Sacramento, and Seattle over the past 21 years.
I worked as a customer service operator, field technician, network engineer, and network specialist. During my career in networking, I’ve come across numerous modems, gateways, routers, and other networking hardware. I’ve installed network equipment, fixed it, designed and administrated networks, etc.
Networking is my passion, and I’m eager to share everything I know with you. On this website, you can read my modem and router reviews, as well as various how-to guides designed to help you solve your network problems. I want to liberate you from the fear that most users feel when they have to deal with modem and router settings.
My favorite free-time activities are gaming, movie-watching, and cooking. I also enjoy fishing, although I’m not good at it. What I’m good at is annoying David when we are fishing together. Apparently, you’re not supposed to talk or laugh while fishing – it scares the fishes.