If you’re using one of Huawei’s routers from the WS series or one of Amped Wireless routers from the R and RTA series, 192.168.3.1 is an important address for you. It is the default IP address of these routers, and you have to use it to set up your router. Read this article, and you will learn everything you need to know about this IP address and about the router setup process.
CONTENTS
- Basics of IP Addressing
- The Purpose of IP Addresses
- The Form of an IP Address
- Classification of IP Addresses
- Public and Private IP Addresses
- How Do We Connect to the Internet?
- Static and Dynamic Addresses
- What is a Default IP Address?
- Is 192.168.3.1 a Common Default IP Address?
- What Devices Use 192.168.3.1 as a Default IP Address?
- How to Set Up a Huawei WS-Series Router Using 192.168.3.1
- How to Set Up Amped Wireless RTA2200T Using 192.168.3.1
- Troubleshooting 192.168.3.1
Basics of IP Addressing
In the next few chapters, we will try to give you some basic information about IP addresses (form, purpose, classification, assignment rules) and try to explain, in simple terms, how our devices use IP addresses to go online.
If you’re just looking for instructions on how to set up your Huawei or Amped Wireless router, you can skip to our tutorials.
The Purpose of IP Addresses
We need IP addresses. Our devices need them. They use IP addresses to identify each other when connected to a network, any network. Every device needs an IP address to communicate with other devices on the same network. They also need IP addresses to go online.
An IP address given to every device on one network must be unique – different devices must have different addresses. If two devices have the same address, they will be disconnected or just unable to communicate with other devices. This occurrence is called an IP address conflict.
The Form of an IP Address
All the addresses that we use today have the same basic form. Take the address from our title as an example – 192.168.3.1. This is the so-called decimal form of an IP address. It consists of four numbers, and there’re dots between these numbers. What you can’t see from the example is that those four numbers can’t be just any numbers. Each of those four numbers can be a number between 0 and 255. Why 0 and 255? You will find out in a minute.
Besides decimal, there’s also the binary form of an IP address. For digital devices (computers, phones, tablets, routers, modes, servers) binary form is the only form of an IP address that matters. Why? Well, because they only see ones and zeros, regardless of what we see.
An IP address in binary form is a large sequence of 32 ones and zeros (aka bits). The sequence is divided into 4 octets (groups of eight bits). Each octet can be converted into a number. Eight zeros convert to zero, and eight ones to 255. So, that’s why those two numbers – 0 and 255. You can’t make a number smaller than 0 or greater than 255 with 8 bits.
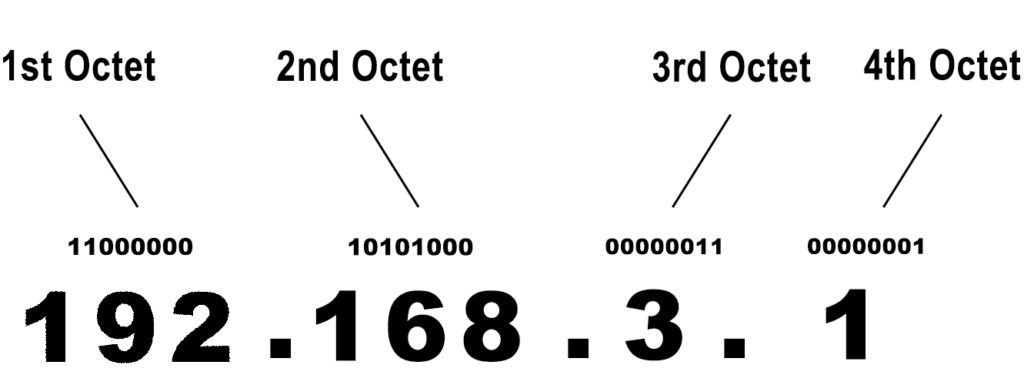
Why do we need both forms? Well, binary form is necessary because our digital devices can only communicate through ones and zeros. The decimal form is for us – when we need to handle addresses, it’s much easier and more convenient for our brains to deal with real numbers than with endless sequences of ones and zeros.
The entire explanation we’ve given you above applies to IPv4 addresses – that’s how an IP address is supposed to look like according to the IPv4 protocol. This protocol is currently in use.
Besides IPv4, we also have the IPv6 protocol. This protocol defines an IP address as a much longer string of ones and zeros (128 bits). IPv4 will, at some point, become obsolete, and that’s the reason why we have IPv6 – for future purposes. For now, we are all still using IPv4.
The number of unique IPv4 addresses that we can make with 32 bits is close to 4.3 billion. The number of devices with internet access in the world is larger than 10 billion. So, the number of unique addresses is much smaller than the number of devices, which means that we don’t have enough unique IPv4 addresses for every device in the world. So, we had to introduce some addressing rules (or rather fixes) to keep using the IPv4 protocol. Without those new rules, it would be impossible to use this protocol today. We will discuss those fixes in one of the next chapters.
Classification of IP Addresses
All 4.3 billion IPv4 addresses, from 0.0.0.0 to 255.255.255.255, are divided into 5 classes (A, B, C, D, E), based on the purpose and application of IP addresses.

Addresses that belong to Classes A, B and C are used on networks. Class A addresses are used on the largest networks with a huge number of hosts per network (more than a million hosts on each network). Class B IPv4 addresses are used on medium-sized networks with up to 65,354 clients per network. Class C addresses are used on the smallest networks with up to 254 clients on each network.
Class D and Class E addresses are not used on networks. They are used for multicast (D) and experimental purposes (E).
Public and Private IP Addresses
All the addresses from the first three classes (those used on networks) can be divided into two groups – public and private. Blocks of private addresses were introduced as a fix to the problem we’ve talked about a minute ago.

Private addresses are all 10.x.x.x (Class A) and 192.168.x.x (Class B) addresses, as well as all the Class B addresses from 172.16.0.0 to 172.31.255.255. In total, we have approx. 17.9 million private addresses. That’s just a small portion of all the available addresses (0.4%). So, how did the introduction of private addresses solve the problem with the number of available addresses?
Well, private addresses are designed for use on private networks (LANs) only. The best example of a private local area network is your home wi-fi network. We have billions of those all around the world. On all those networks, only private IP addresses are used. But how? Haven’t we just said that every device on a network must have a unique address? Yes, we did, but there’s a catch.
Every LAN network can be observed as an isolated network, independent from other LAN networks. Devices on one LAN network can use one set of addresses. Devices on the other network can also use the same set of IP addresses. The same applies to the third, fourth, and every other LAN network.
Devices on one LAN network will use their addresses only to communicate with other devices on that network. They won’t use private addresses for internet access. In fact, private addresses cannot be used for internet access (they are not routable online). So, how do we go online using our devices connected to LAN networks? How do we go online using PCs and our home Wi-Fi? The trick is in the router.
How Do We Connect to the Internet?
Our routers (or gateways) are the hubs of our Wi-Fi networks. They assign a unique private address to every device connected to them, and they route all traffic.
Every router has a private IP address. That address is assigned to the router by the manufacturer, and it’s often called the default IP address. Our routers also hold a set of addresses (DHCP pool), and they assign those addresses to our devices. The default address of the router and the addresses from the DHCP pool always belong to the same subnet and have the same subnet mask. For example, if the default IP of your router is 192.168.1.1, all the addresses from the DHCP pool will have the same first three numbers (the DHCP pool will look like this: 192.168.1.2-192.168.1.254).

All devices connected to your router will use those addresses from the DHCP pool to communicate with the router and with each other.
Your router also has one public address. Your ISP assigns that public address to your router (to your entire home network). Your entire network (all the devices connected to your Wi-Fi) uses just one public IP address to access the internet. The only device on your network that has internet access is basically your router.
All devices connected to your router use their private IP addresses to send their request for internet access to the router. The router receives all those requests (using its default IP address), communicates with the DNS servers (using its public IP address), obtains the information your device requested, and then forwards the information to your device (again, using its default IP address).
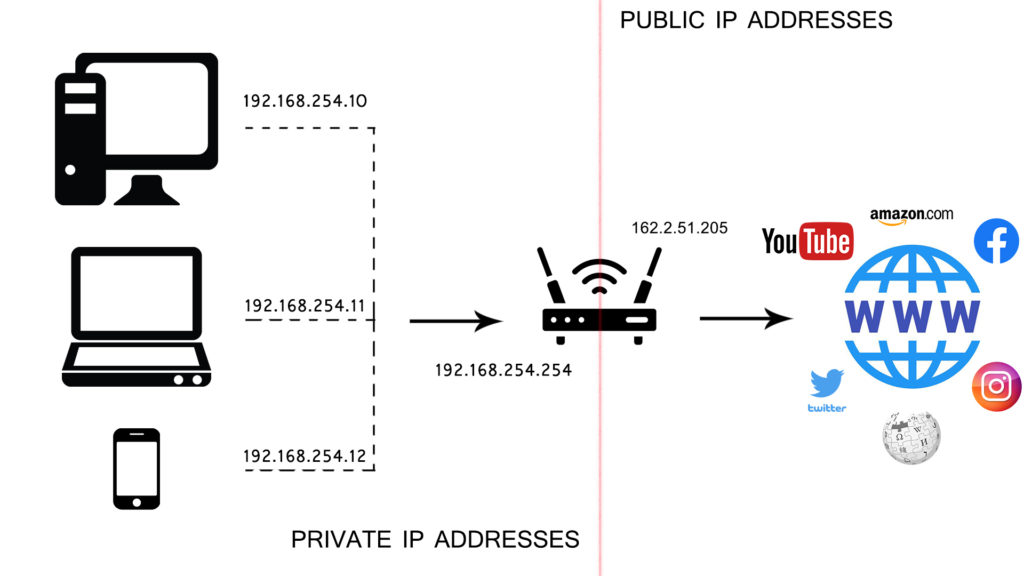
To sum up, every private IP address can be used on an unlimited number of LANs, but only one device can have one private IP address on one LAN at any given moment. Private addresses are not used for internet access – for that we need public addresses. Our routers have two addresses – one assigned by the manufacturer (private address – default IP) and the other assigned by the ISP (public address). The introduction of private addresses allowed us to use only one public address to give internet access to all devices connected to one home Wi-Fi network. You may have 20 or 30 devices connected to your Wi-Fi, and they all use the same public IP to go online, even though they all have unique private IP addresses.
Static and Dynamic Addresses
Every IP address used on a network (public or private) can be static or dynamic. Static addresses are those that are permanently assigned to one device. Dynamic addresses are not permanently assigned – they stay with one device for a certain period of time (they are leased) and they can be given to some other device in the future.
What is a Default IP Address?
As explained earlier, a default IP address is the address assigned to your router. Other pieces of network equipment also have default IP addresses. Your router uses this address to communicate with devices connected to it, and we use it to access the router settings and make all kinds of changes and adjustments to our Wi-Fi networks.
Theoretically speaking, router manufacturers can assign any private address to their routers. They can assign different default IP addresses to different routers. In practice, some addresses are much more used than others. The manufacturers prefer using the first or the last available address in a subnet. By doing so, they make it easier to handle IP addresses and adjust the DHCP pool size.
Is 192.168.3.1 a Common Default IP Address?
192.168.3.1 is the first available address in the 192.168.3.0/24 subnet, which makes it a slightly better choice than other addresses in this subnet. However, 192.168.3.1 is not one of the most common default IP addresses. Some other addresses like 192.168.0.1 or 192.168.1.1 are much more popular than 192.168.3.1. Still, that doesn’t mean that our address is not used at all.
What Devices Use 192.168.3.1 as a Default IP Address?
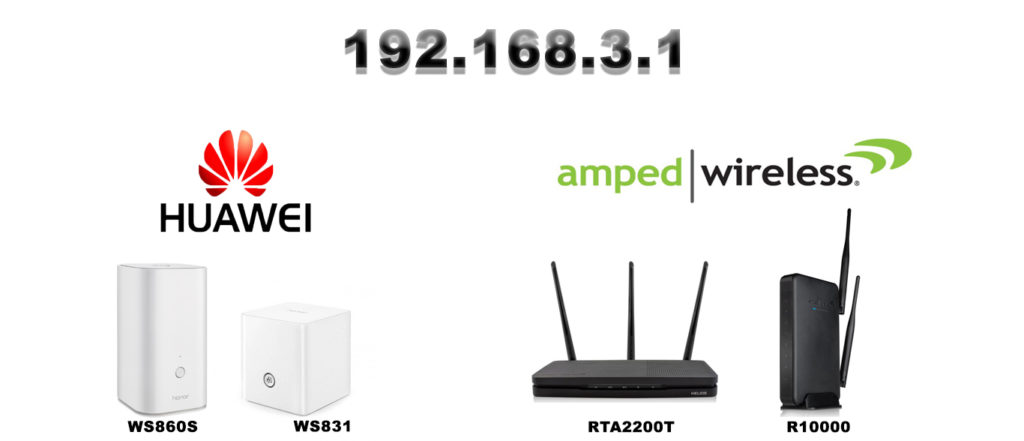
192.168.3.1 is used as the default gateway by two manufacturers – Huawei and Amped Wireless. Huawei’s WS routers, as well as RTA and R-series routers made by Amped Wireless, use this address as a default gateway. Below, you can find a list of the most popular router models that use 192.168.3.1 as a default IP address.
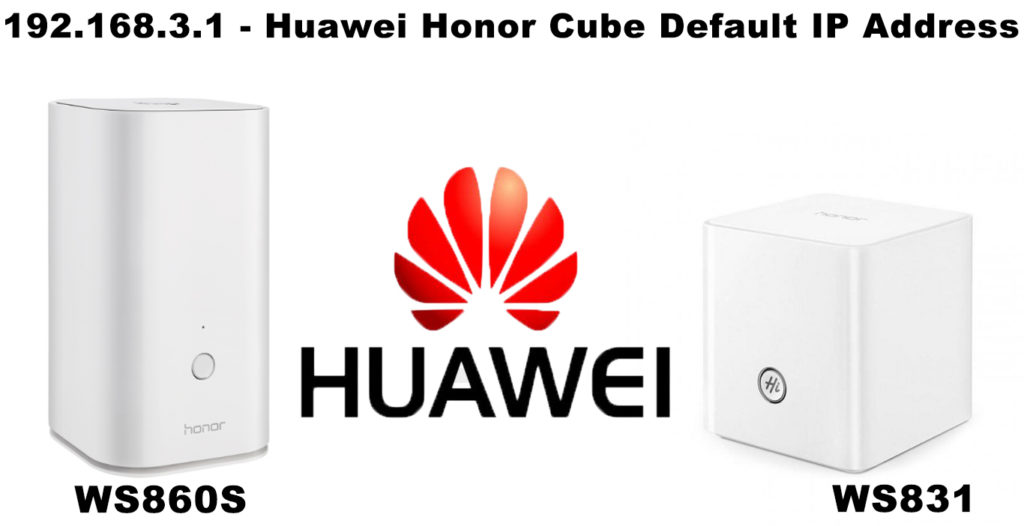
Huawei: Honor Cubes (WS860s and WS831), WS5200
Amped Wireless: RTA2200T, R10000, RTA1300M, R20000G
How to Set Up a Huawei WS-Series Router Using 192.168.3.1
To set up any router, you can either use the setup wizard (most routers have it these days) or do all the job manually. The most important things to do during the initial setup are changing the Wi-Fi password (and Wi-Fi network name), as well as changing the router’s default credentials (default username and password). All the other router settings can only be performed manually. We will now show you how to access Huawei router settings and change your Wi-Fi password.
STEP 1 – Open your browser, type in 192.168.3.1, and log in. The default router credentials are admin/admin.
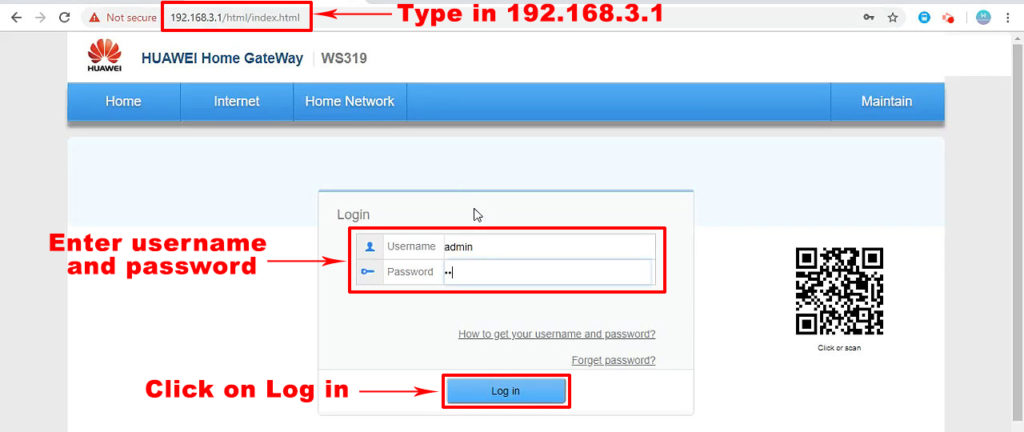
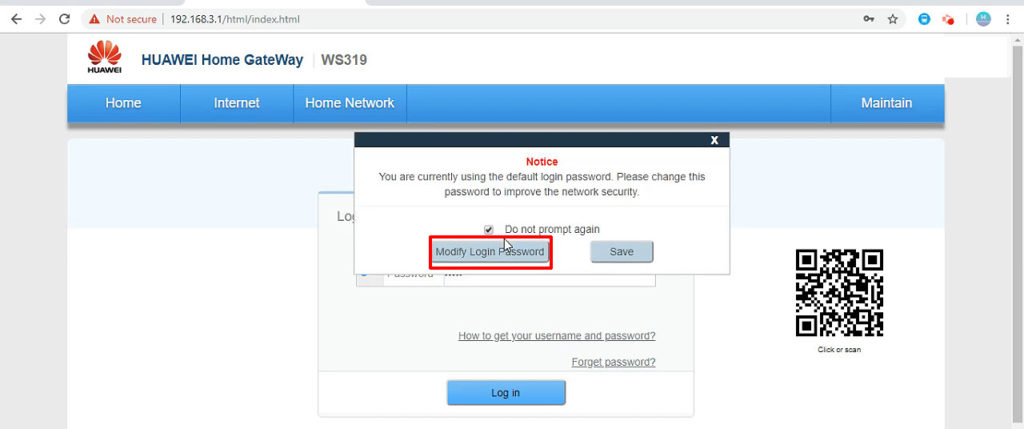
Note: The moment you log in, you will be asked to change the default router credentials (username and password). We strongly recommend that you change them and remember them. If you forget them, you will have to reset your router.
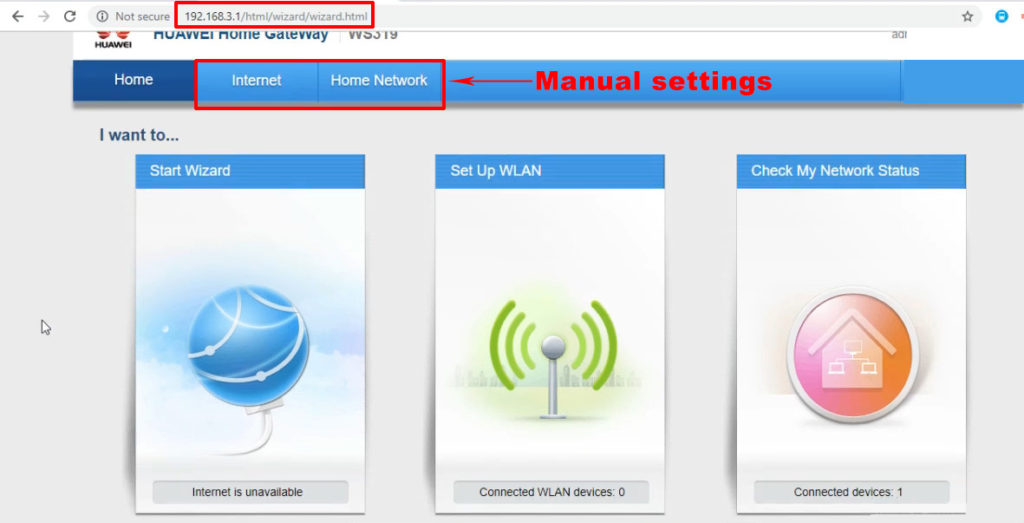
STEP 2 – When the home screen opens, you can either start the setup wizard or click on one of the tabs at the top and do all the settings manually.
STEP 3 – Let’s change your Wi-Fi network name and password manually. Click on Home Network. Then, select the WLAN Settings from the menu on the left. Finally, select WLAN Encryption.
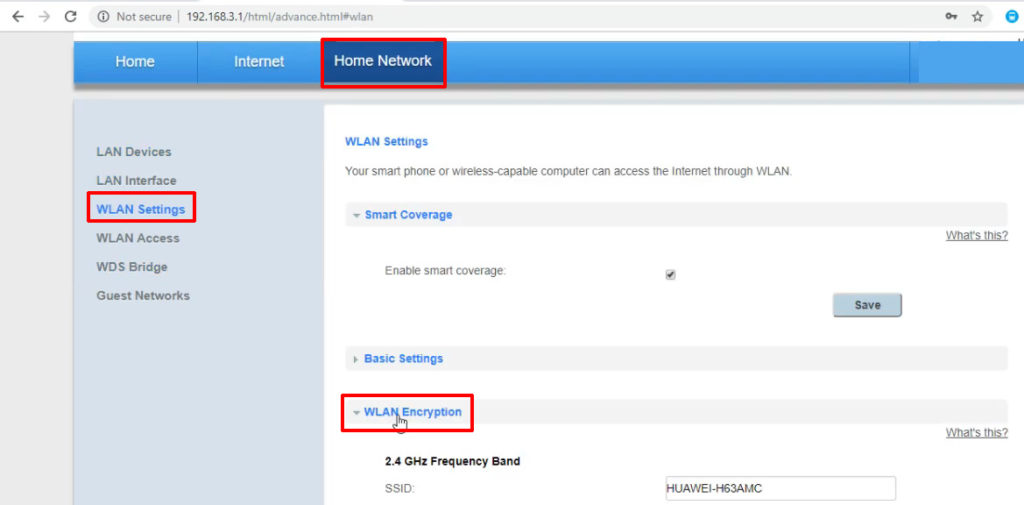
STEP 4 – To change the network name, click on the textbox next to SSID and enter the desired name. Select WPA2/PSK as a security mode and AES as the encryption type. Then, enter the password of your choice. Finally, click on Save.
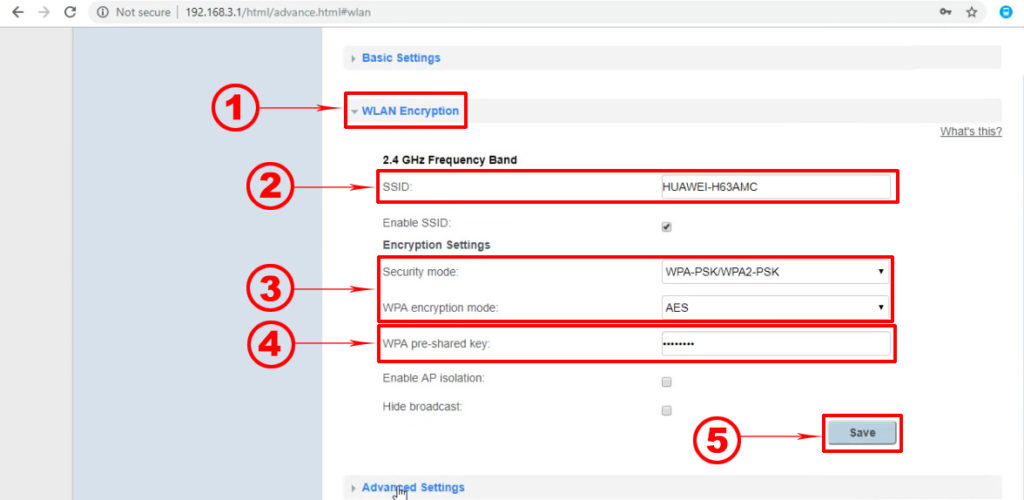
You have now changed the router web user interface credentials and your Wi-Fi password. For more tutorials on how to set up your Huawei router, check out other RouterCtrl tutorials.
How to Set Up Amped Wireless RTA2200T Using 192.168.3.1
Now, let’s do the same thing for Amped Wireless RTA2200T. This time we will show you how to set up your router using the setup wizard.
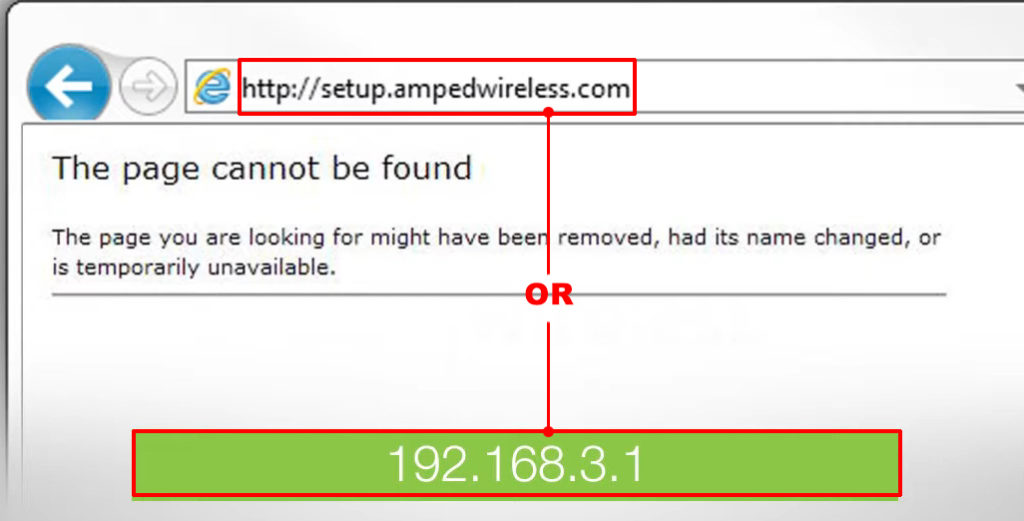
STEP 1 – Enter our default IP address (192.168.3.1) or type in the following address: http://setup.ampedwireless.com
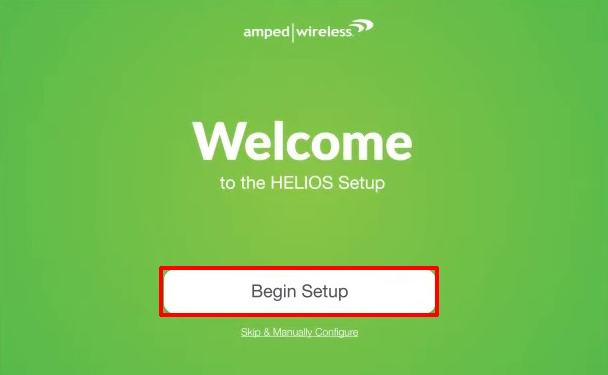
STEP 2 – If you are setting up the router for the first time, you will see the Welcome Screen. To start the Setup Wizard, just click on Begin Setup.
Note: If this is not the first setup, you will be asked to enter the router username and password, and after logging in, you will see the dashboard like in the image below. If you just want to change the Wi-Fi password (passwords) for one or all three Wi-Fi bands (this is a tri-band router), you don’t have to initiate the Setup Wizard. Just type in the password(s) of your choice and save settings. If you want to initiate the Setup Wizard, scroll to the bottom of the page, and click on Setup Wizard.
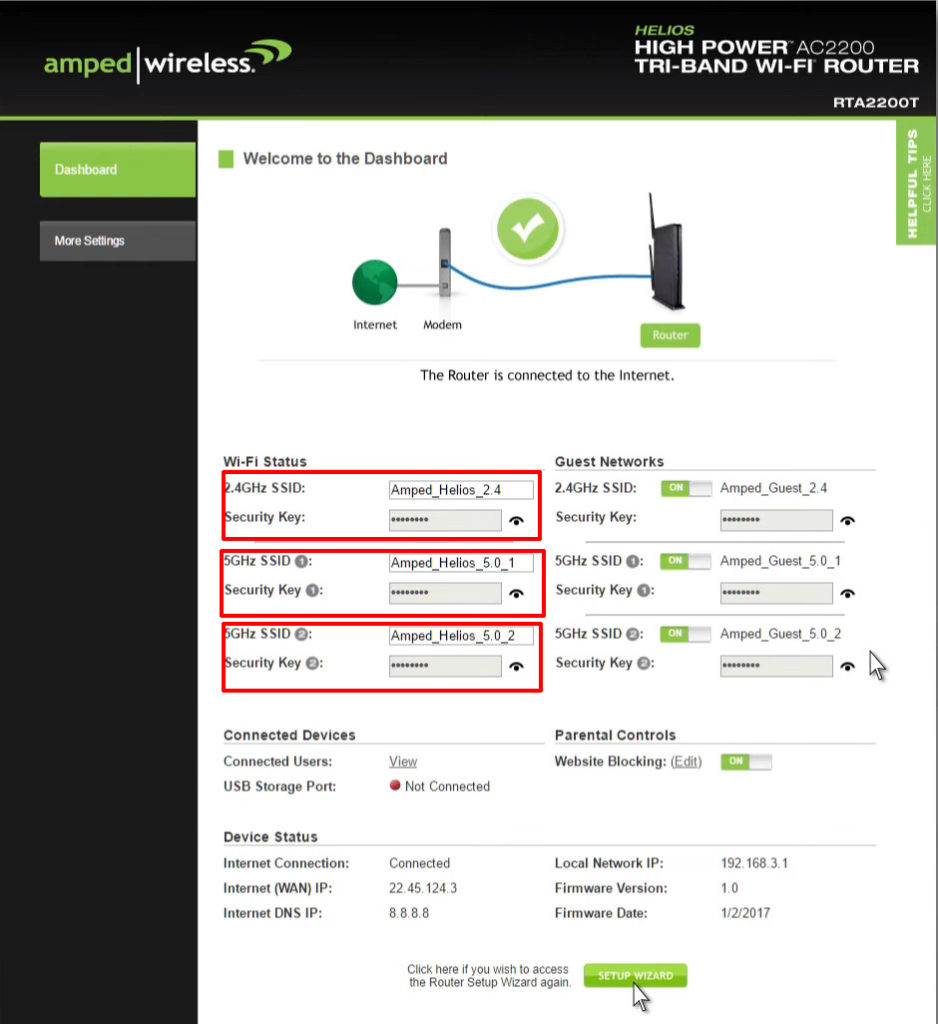
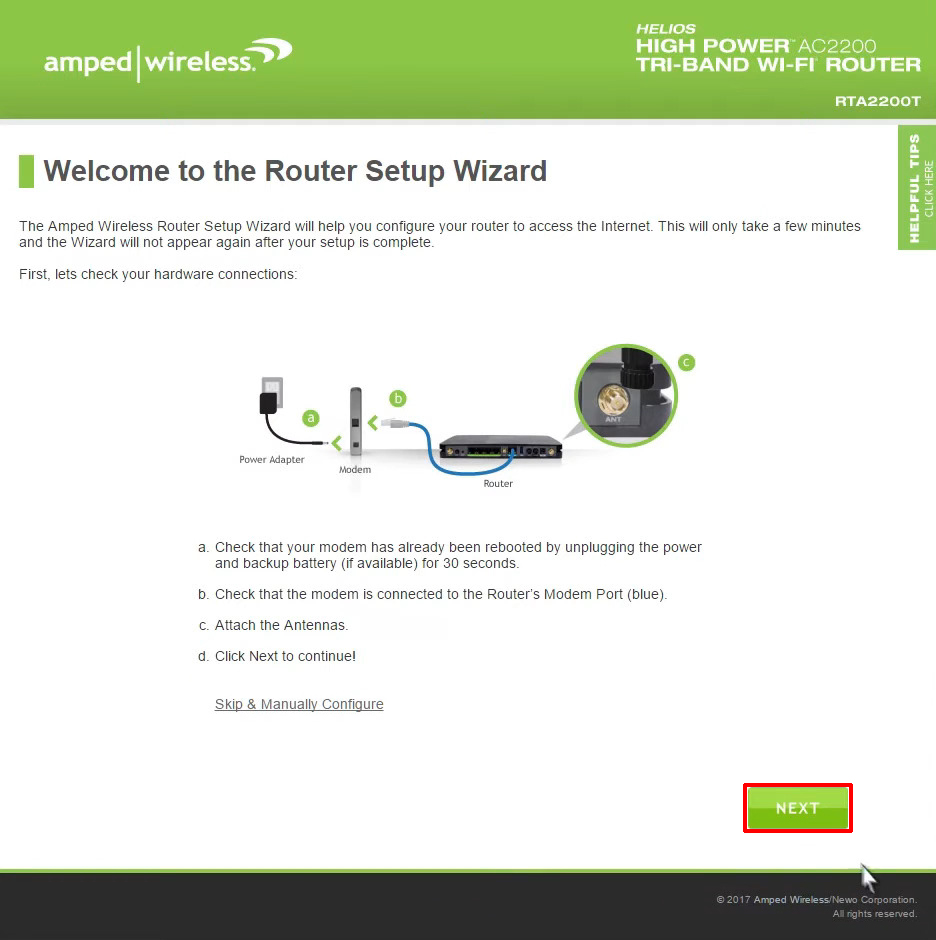
STEP 3 – During the first step of the Setup Wizard, you will be asked to connect the modem to the router, check if the antennas are connected to the router, and click Next.
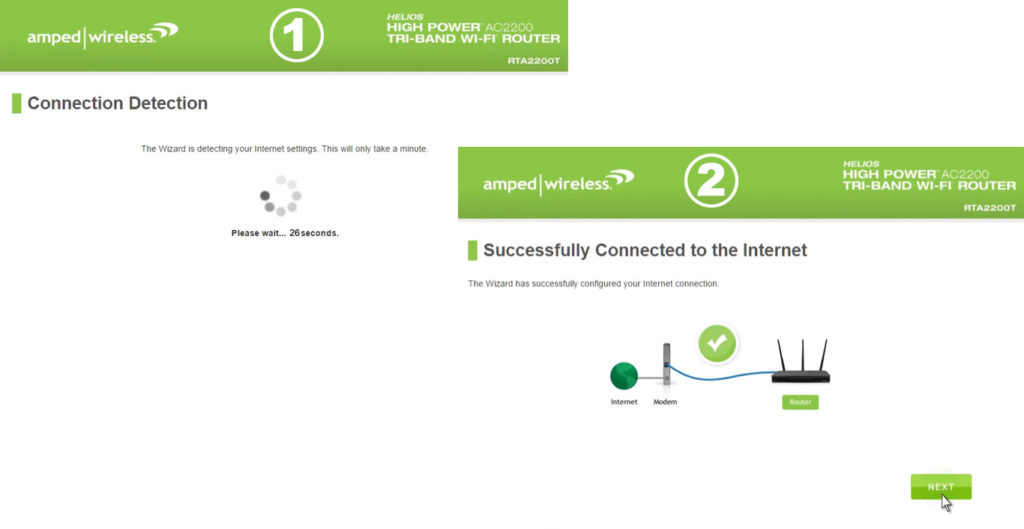
STEP 4 – The router will try to detect the internet connection. Once it confirms that the modem is connected and that you have internet access, you will be asked to click Next.
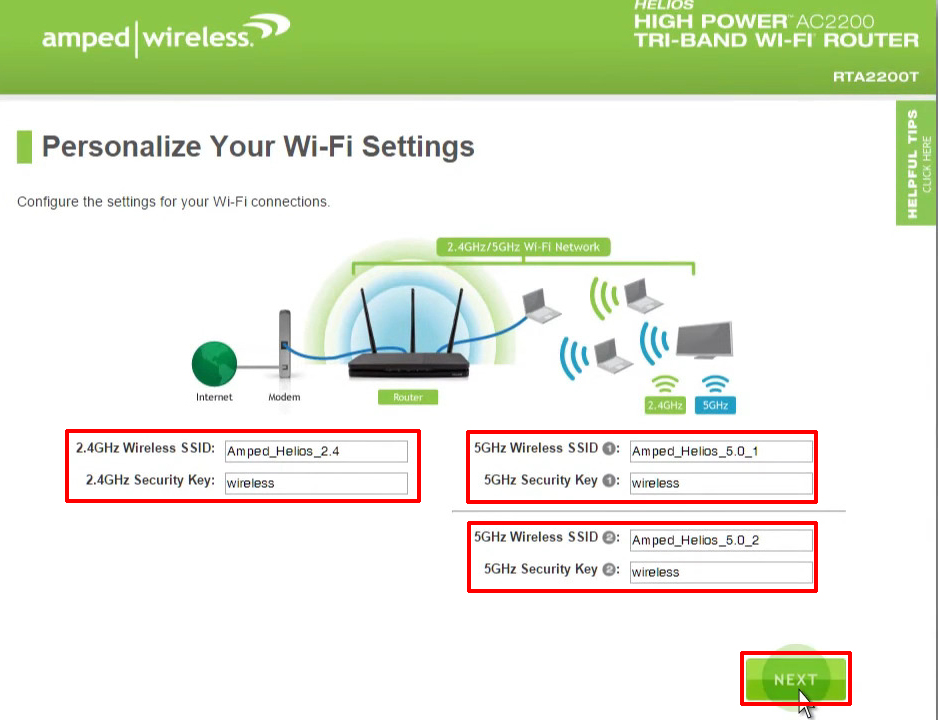
STEP 5 – You will be asked to enter the Wi-Fi name (SSID) and password for each of the three bands. Once you’re done, click Next.
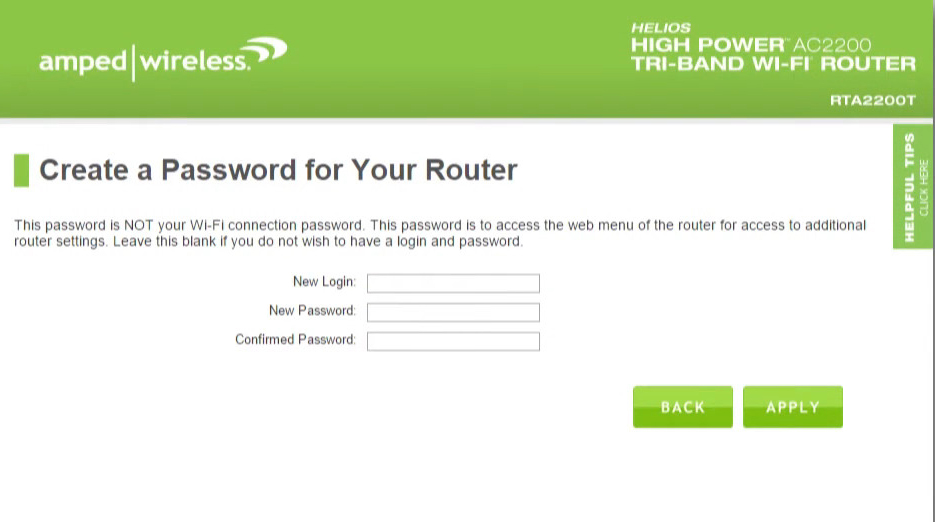
STEP 6 – Now, you need to enter the new username and password for your router. When you’re done, click on Apply.
STEP 7 – Wait for a few seconds and the settings will be saved. Then, you will see the status screen with all the settings you have just entered. If everything is fine, click on Finish.
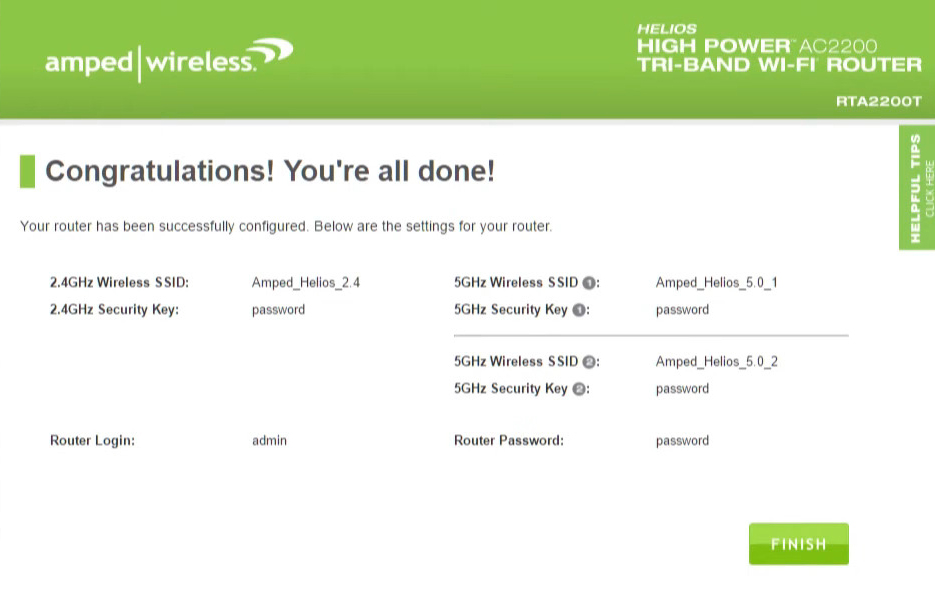
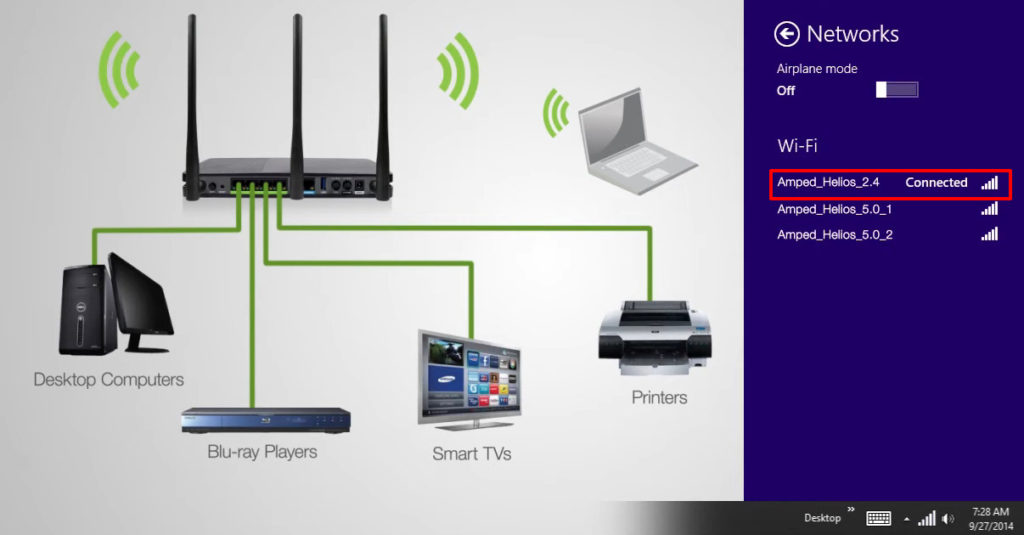
You have successfully configured your router. You can log out, search for available Wi-Fi networks, and connect to your router using the right password.
VIDEO TUTORIAL – How to Set Up Amped Wireless RTA2200T Using 192.168.3.1
Troubleshooting 192.168.3.1
If you can’t log in using our default IP address, double-check the address you’ve entered. The problem could be a simple typing mistake – 192.168.1.3 is very similar to 192.168.3.1, but won’t do anything for you if it’s not your default IP address. Unlike Microsoft Word, our browsers don’t have the AutoCorrect function. And, even if they did have the AutoCorrect, it wouldn’t do anything since both addresses are technically correct – they both exist and they are both used as default gateways.

Hey, I’m Jeremy Clifford. I hold a bachelor’s degree in information systems, and I’m a certified network specialist. I worked for several internet providers in LA, San Francisco, Sacramento, and Seattle over the past 21 years.
I worked as a customer service operator, field technician, network engineer, and network specialist. During my career in networking, I’ve come across numerous modems, gateways, routers, and other networking hardware. I’ve installed network equipment, fixed it, designed and administrated networks, etc.
Networking is my passion, and I’m eager to share everything I know with you. On this website, you can read my modem and router reviews, as well as various how-to guides designed to help you solve your network problems. I want to liberate you from the fear that most users feel when they have to deal with modem and router settings.
My favorite free-time activities are gaming, movie-watching, and cooking. I also enjoy fishing, although I’m not good at it. What I’m good at is annoying David when we are fishing together. Apparently, you’re not supposed to talk or laugh while fishing – it scares the fishes.
