Is the address from the title your router’s default IP? Do you need instructions on how to use it? Can it be a client IP address? What kind of address is this anyway? Keep reading this article, and you’ll learn everything there is to know about 192.168.31.1.
CONTENTS
Introduction – IP Addresses, IP Protocols, Types of IP Addresses
Without IP addresses, it would be impossible to connect any device to the internet or to any network. They are unique identifiers (like phone numbers or home addresses) that make your device recognizable on a network. If a device doesn’t have an IP address, it can’t communicate with other connected devices – it can’t send nor receive any data.
Rules of IP Addressing
IP protocols (IPv4 and IPv6) gather all the rules of IP addressing. They define the form of an IP address as well as the classes and rules of assigning IP addresses to devices. IPv4 is the protocol that is currently in use, while IPv6 is developed for future purposes. Let’s see how IPv4 defines the basic form of an IP address.
192.168.31.1 is an IP address. All the IP addresses have the same form – you have four numbers with dots between them. That’s at least how we perceive them.
What our routers and computers see is a string of 32 zeros and ones (32 bits), divided into 4 groups (4 octets), each containing 8 bits. The number of unique addresses that you can make with 32 bits is 232 (close to 4.3 billion).
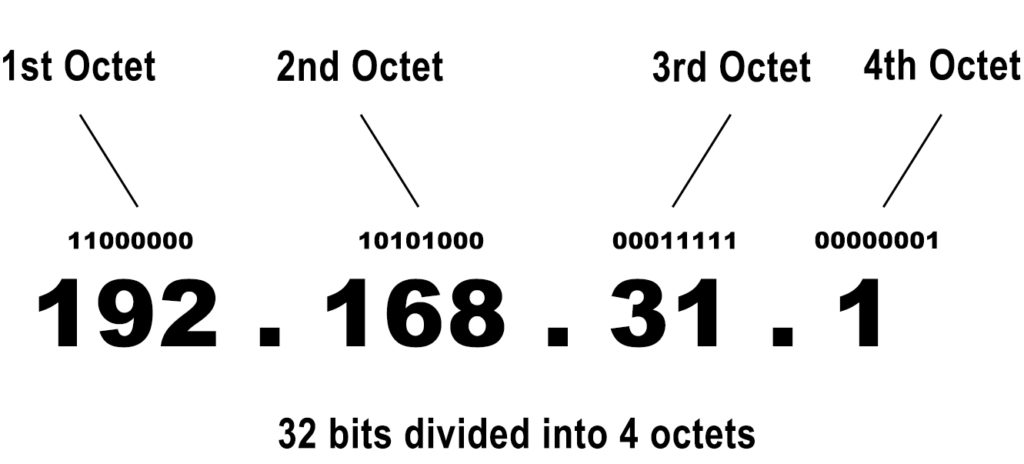
Each octet can be converted into a number between 0 and 255. Why? Because you can’t make a number smaller than 0 with 8 bits (that’s 8 zeros), or a number greater than 255 (that’s 8 ones). So, if an address looks like this – 192.168.311.1, you should know that it’s not a valid address (because of the number 311). But if an address looks like this – 192.168.31.1, it is a valid IP address (all the numbers are within the scope 0-255).
A unique IP address is assigned to every device connected to every network. This applies to your home wi-fi, to a larger corporate network, and to the largest network in the world (aka the Internet).
The way that IPv4 defines IP addresses gives us 4.3 billion addresses. That seems quite a lot and was more than enough for quite some time, but the rapid development of digital technologies and astronomical increase in the number of devices connected to the internet created a small problem.
You see, there are more than 10 billion devices in the world that can be connected to the internet. Since we have only 4.3 billion IP addresses, it’s impossible to assign a unique address to every device. Websites also must have IP addresses and, when you add them to the equation, the problem becomes even bigger. The IP addressing authorities came up with an elegant solution – they introduced certain classifications that allowed us to use some addresses multiple times, and to use a single address to give access to the internet to multiple devices. So, let’s say a few words about different classifications of IP addresses.
Classes
All the IP addresses are divided into classes, depending on their purpose. You have five classes. The first three classes are used for networks of various sizes. The fourth class (Class D) is used for multicast. The fifth class (Class E) is used for experimental purposes.
Class A is the largest (231 IP addresses) and is used for the largest networks with huge numbers of clients on each network. Of 32 bits in a Class A IP address, only 8 bits define the network. The rest of the address (24 bits) determines the host/client.
Class B addresses are used on medium-sized networks (with fewer clients on each network than Class A). Of 32 bits in a Class B IP address, 16 bits define the network. The rest of the address (the other 16 bits) determines the host/client.
Class C addresses are used on small local area networks (with 254 clients on each network). Of 32 bits in a Class C IP address, 24 bits define the network. The rest of the address (8 bits) determines the host/client. So, you can have a lot of networks with 254 clients on each network.

This classification only defines the purpose of each block but doesn’t really help with our problem. That’s why we needed private IP addresses.
Private and Public Addresses
A large majority of all the IP addresses are public. That means that they can be recognized and routed over the internet. Websites, as well as our modems, use public IP addresses to access the internet.
There’s a dedicated block of private addresses within the first three classes (look at the table above). In total, there are 18 million private addresses. Private addresses cannot be traced over the internet and are not used for internet access. So, why do we need them?
Private IP addresses are actually quite important. They are only used on local area networks (your home wi-fi network, for example, is a LAN). The introduction of private addresses is what allowed us to use the same IP address on numerous networks without creating a problem.
Similar Articles:
It may not seem logical since every device must have a unique IP address in order to communicate with other devices on the network, but it is actually perfectly logical. You see, your home wi-fi and your neighbor’s wi-fi network are two separate LANs. If your smartphone uses some IP address and your neighbor’s computer has the same private address, there’s no conflict since those two devices are on two different networks. Those devices use private addresses assigned to them only for communication with other devices on the same network. They do not use their private addresses to access the internet. The way they access the internet is through your router.
Your wi-fi router is an odd little device. This thing has a private address (default IP or default gateway) and uses it to communicate with other devices connected to your wi-fi. This address is assigned to the router by the manufacturer.
Your router also does the job of assigning IP addresses to every device connected to your wi-fi. The scope of addresses (DHCP pool) your router assigns to various devices connected to your wi-fi is predefined, and it usually includes addresses from the same subnet as the default IP address. For example, if your router’s default IP is 192.168.31.1, the scope could look like this – 192.168.31.2-192.168.31.100 (all the addresses belong to the 192.168.31.0/24 subnet).
Your router also has a public address, besides its private address. This address is assigned to it by the internet provider. While the private address (default IP) is used for communication with other devices connected to your wi-fi, the public address is used for internet access.
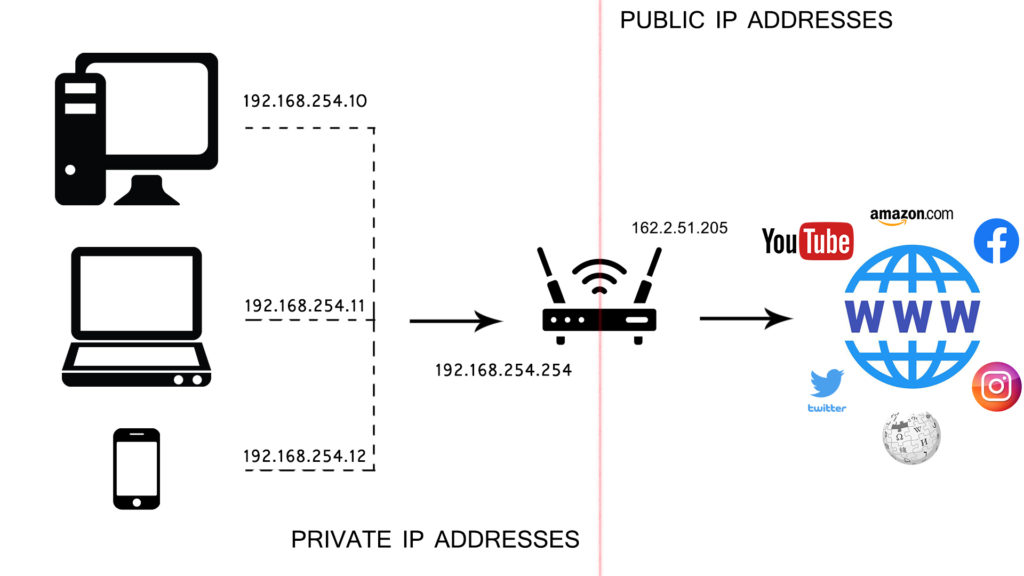
When you want to open a website on your phone (you type in the address or click on the shortcut icon), you’re basically sending a request to your router. The router then uses its public address to access the internet, and when it gets the information you’re looking for, it sends it to your device.
So, the introduction of private addresses allowed us two things – to use one private address multiple times on multiple networks and to use one public IP address (the one assigned to your network by your ISP) to give access to the internet to multiple devices.
Private addresses also allowed us to keep using the IPv4 protocol and postpone the implementation of IPv6.
Static and Dynamic Addresses
All the addresses (public and private) can be divided into two groups – static and dynamic. Static addresses are those that stay assigned to one device indefinitely. Dynamic addresses are those that are only leased to devices and don’t have to stay with one device forever. Websites can have static public IP addresses or they can share one public address with a few other sites (just like all the devices connected to our how wi-fi networks use only one public address to go online). Dynamic public IP addresses are usually assigned to routers (to residential wi-fi networks). You can ask your ISP to assign a static IP to your network but you will have to pay more for that.
Devices connected to your home wi-fi network have private IP addresses. Those addresses can also be static or dynamic. By default, all the devices connected to your wi-fi have dynamic addresses. However, if you need or want one of your devices to have a static IP address, you can easily assign it to your device through your router’s DHCP settings.
What Kind of Address is 192.168.31.1?
This is a private IP address. It comes from a dedicated block of class C private addresses. The address can be used by your router as a default IP address or, it can be an address assigned to some device connected to your wi-fi.
Can This Address Be a Default Gateway? Is 192.168.31.1 My Default Gateway?
Any private IP address can be a default gateway. As mentioned, router manufacturers assign IP addresses (default IP addresses) to their routers. They can use literally any private address. However, some addresses are simply more convenient (and more popular) than others. Most manufacturers prefer using the first available (or the last available) address in a subnet. So, if the subnet is 192.168.1.0/24, the manufacturers will use 192.168.1.1 as a default gateway. That’s one of the most popular choices. Other popular options are 192.168.0.1, 192.168.1.254, 10.0.0.1.
The address from the title (192.168.31.1) is also the first available address in the 192.168.31.0/24 subnet, which makes it a convenient choice. However, it is not a popular choice. But there’s still one manufacturer that assigns this address to its wireless routers – it’s Chinese electronics company Xiaomi. Below, you can find the list of Xiaomi routers using this address as a default IP address.
Xiaomi wi-fi routers: Mi WiFi 3A, Mi WiFi 3C, Mi WiFi Mini, Mi WiFi HD, Mi WiFi Lite, Mi WiFi 3, Mi WiFi 4, Mi WiFi Pro, Mi WiFi 3G, Mi WiFi R2D, Mi WiFi R3C,
If you don’t know your default IP address and want to find it, you have multiple options. You can check the label on your router or go through the manual. Or, if you want, you can use your computer or even phone to find your default gateway. Read our guide and learn how.
Setting Up Xiaomi Router with 192.168.31.1 Default IP
We will now go through some basic settings of a Xiaomi router that uses 192.168.31.1 as a default IP address. We’ll show you how to access the Mi router Configuration Manager, how to perform the initial setup, change the wi-fi network name and password, and how to assign a static IP to some device.
Accessing the Configuration Manager
Whatever you want to do, regardless of the adjustments you want to make, the first step is always the same. You have to open the Configuration Manager. For most Xiaomi routers, you have two ways of doing that. For some routers, there’s the third option.
OPTION 1 -Use the default IP address and your browser
This is the old-school option and works for any router made by any manufacturer. You have to find your default IP (in this case, it’s 192.168.31.1) and type it in your address bar. Then, you have to agree with the terms of service. When the login window opens, enter the right username and password. The default username/password combo for most Xiaomi routers is admin/admin.
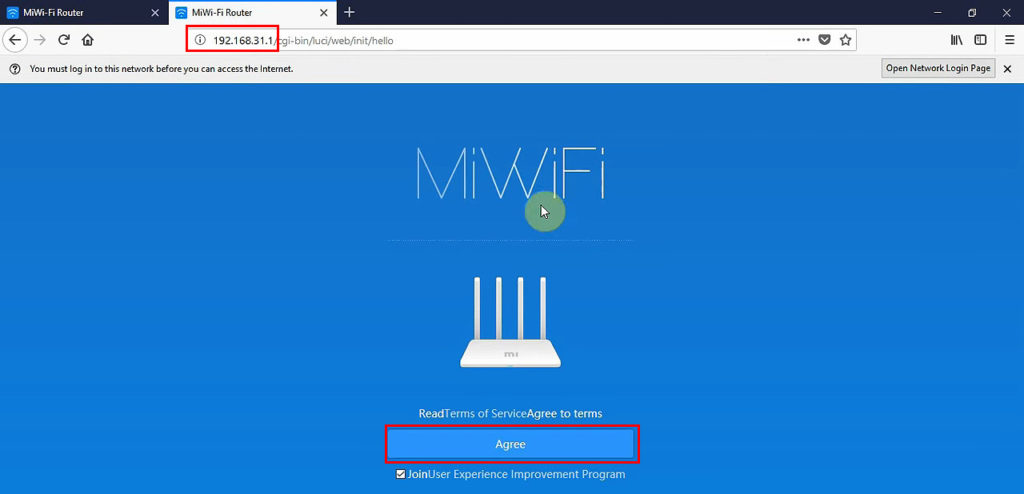
STEP 1
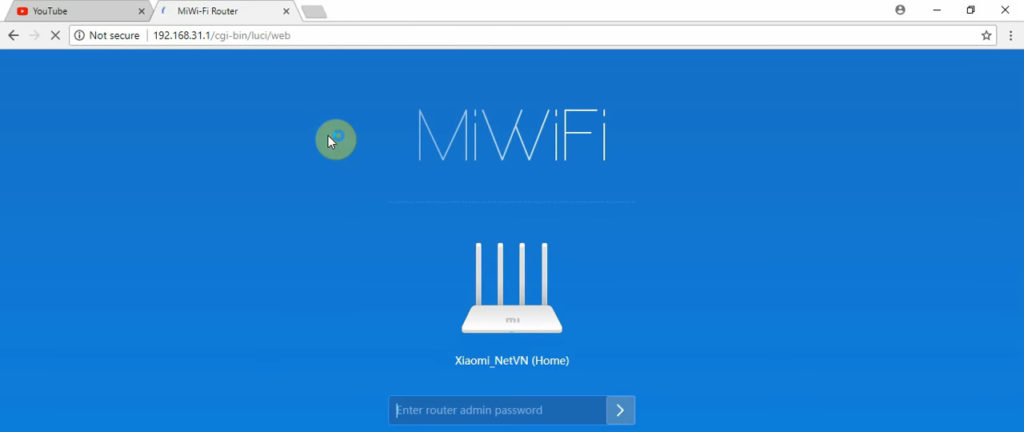
STEP 2
When you enter the right password, you will be redirected to the Xiaomi router status page. From there, you can navigate to SETTINGS or ADVANCED, and adjust all the network settings you want.
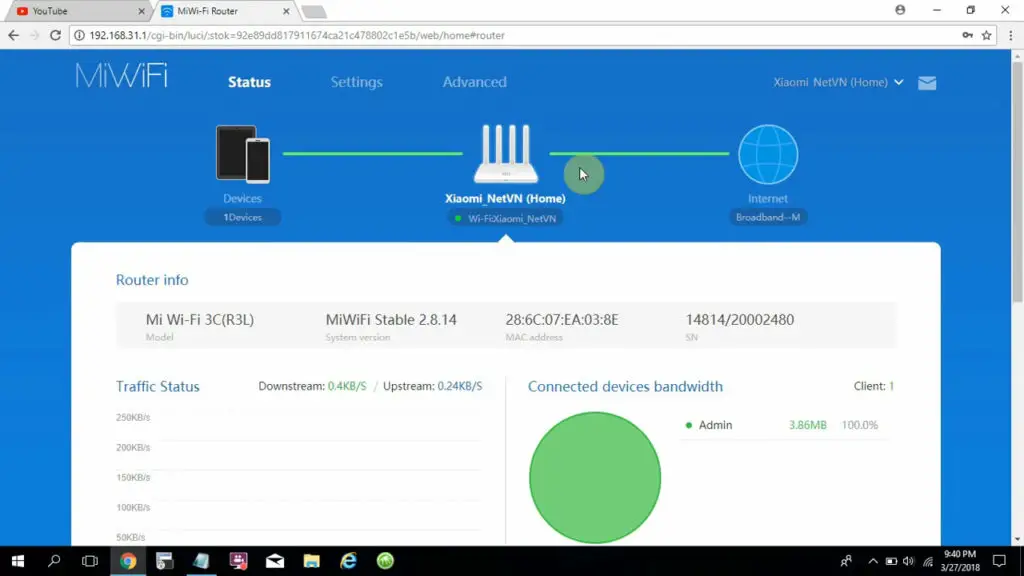
Xiaomi router status page – you have successfully accessed the configuration page
OPTION 2 – Use miwifi.com instead of the default IP address
Option 2 is almost exactly the same as Option 1. The only difference is that you are going to use the address – miwifi.com instead of 192.168.31.1. After that, all the other steps are the same (Agree to Terms of Service > enter password > status page opens).
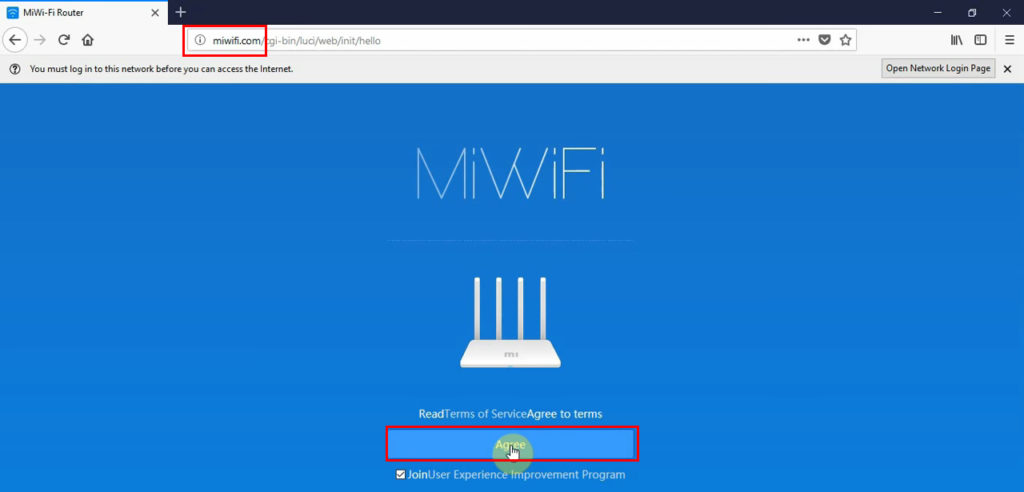
OPTION 3 – Use the Miwifi app
Instead of using your computer and browser, for some Xiaomi routers, you can use your phone and the Miwifi app (Android/iOS). The app is decent but it lacks some of the functionalities and features of the browser-based access. Our advice is to use the first two options rather than the app.
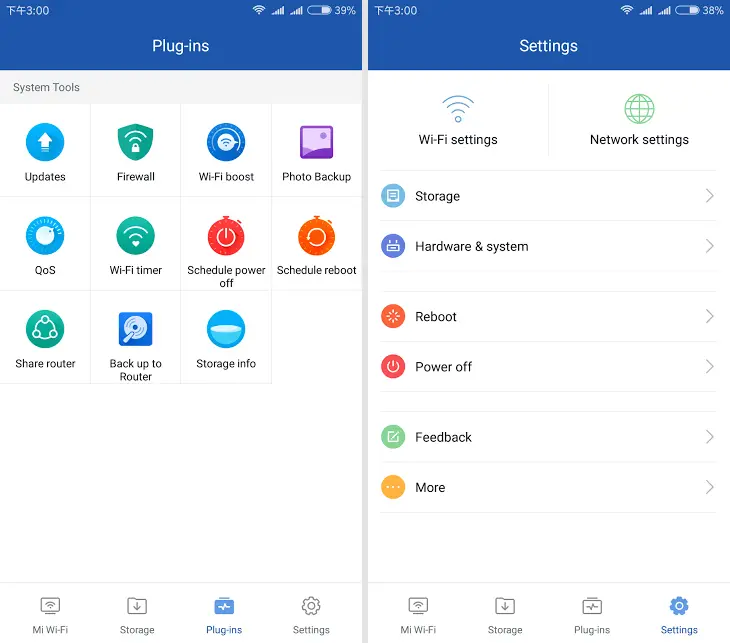
Xiaomi Miwifi app
First-time setup
If you’re entering the Configuration Page for the first time, you will have to go through the initial setup. After you enter your default IP (or miwifi.com) and click on Agree, you’ll be asked to select the operation mode (in case your router can also work as an AP or range extender). After you select the router mode, you will be asked to create a wi-fi network (or two, if it’s a dual-band router), and to change your router’s username/password.
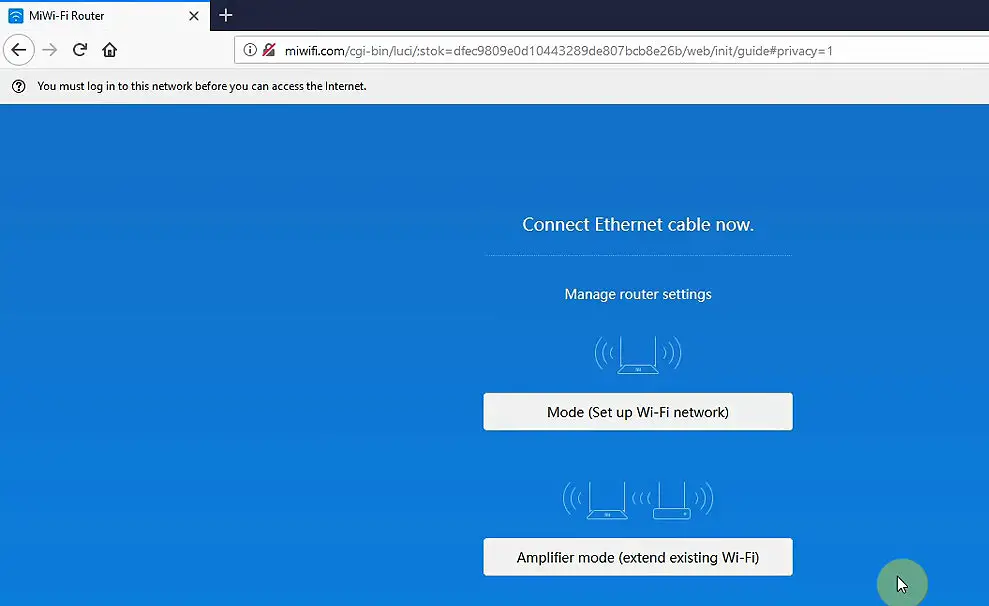
STEP 1 – Select Mode
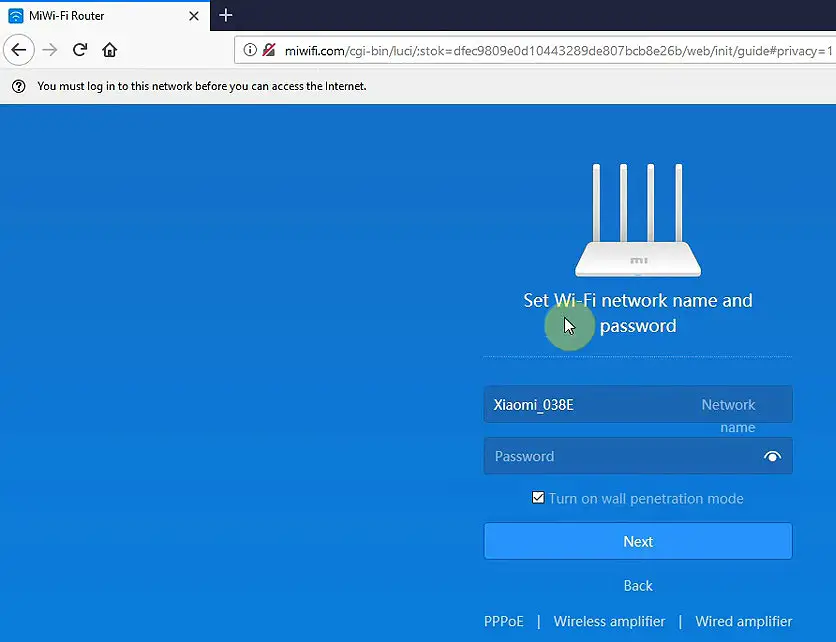
STEP 2 – Create a Wi-Fi network (enter the name and password for your wi-fi network)
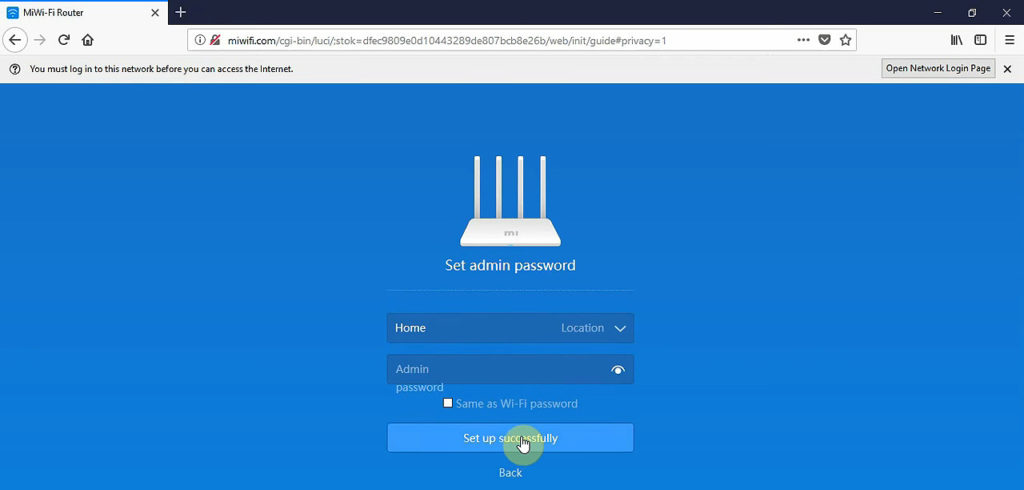
STEP 3 – Change your router’s default password
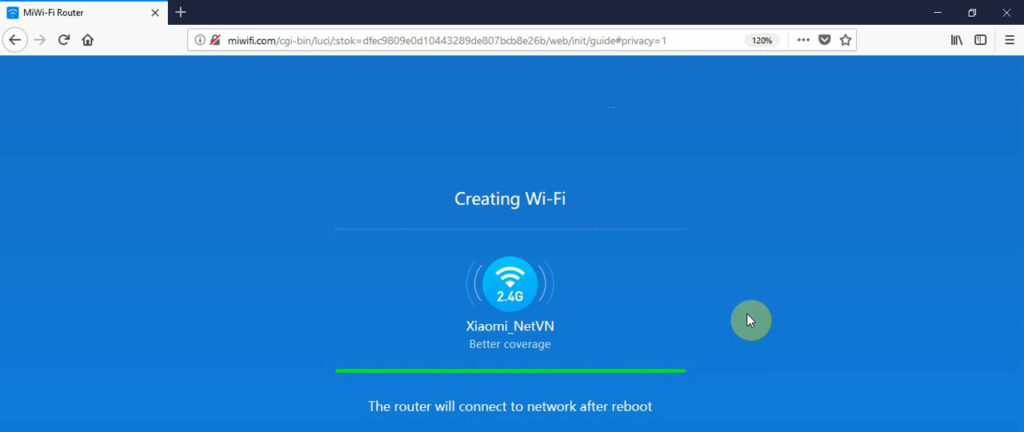
STEP 4 – Wait for the router to reboot and create the wi-fi network
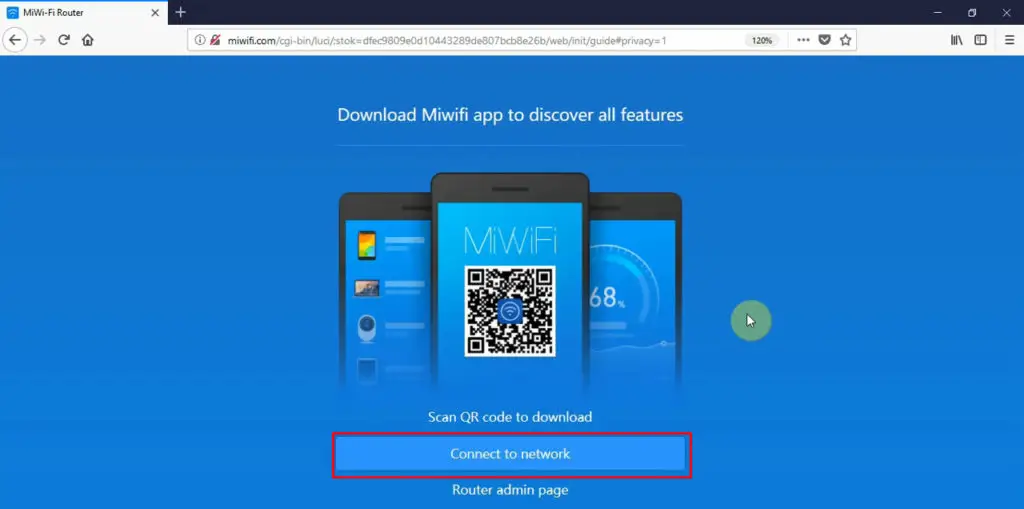
STEP 5 – Connect to your new network
During the last step of the initial setup, you’ll also be asked to download the Miwifi app by scanning the QR code.
Changing Wi-Fi network name (SSID) and password
As always, the first step is accessing the configuration page. Just follow the guidelines we’ve already given you. When the status page opens, select SETTINGS, and then go to Wi-Fi settings.
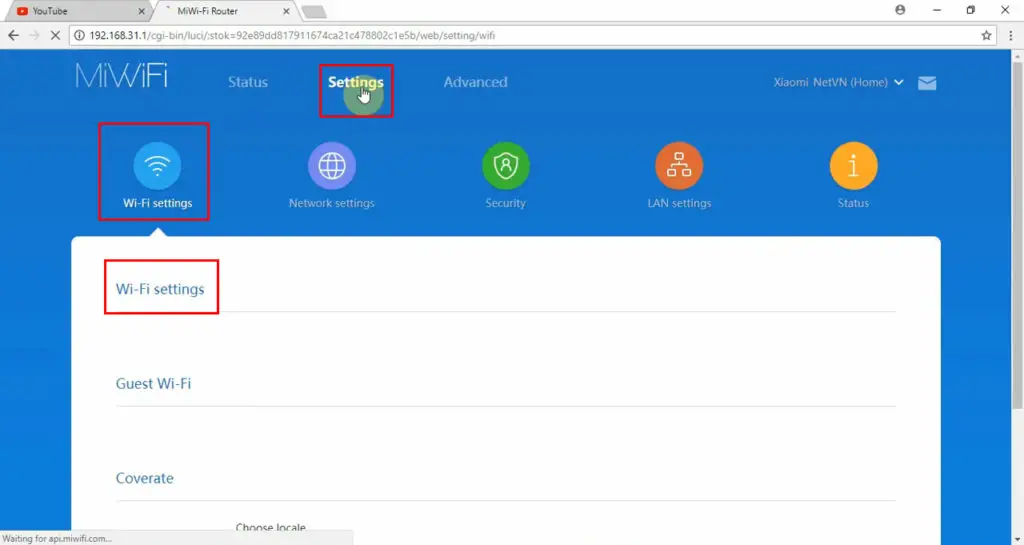
STEP 1 – Go to Wi-Fi settings
When the settings open, you can change the network name and password, and select the Encryption type.
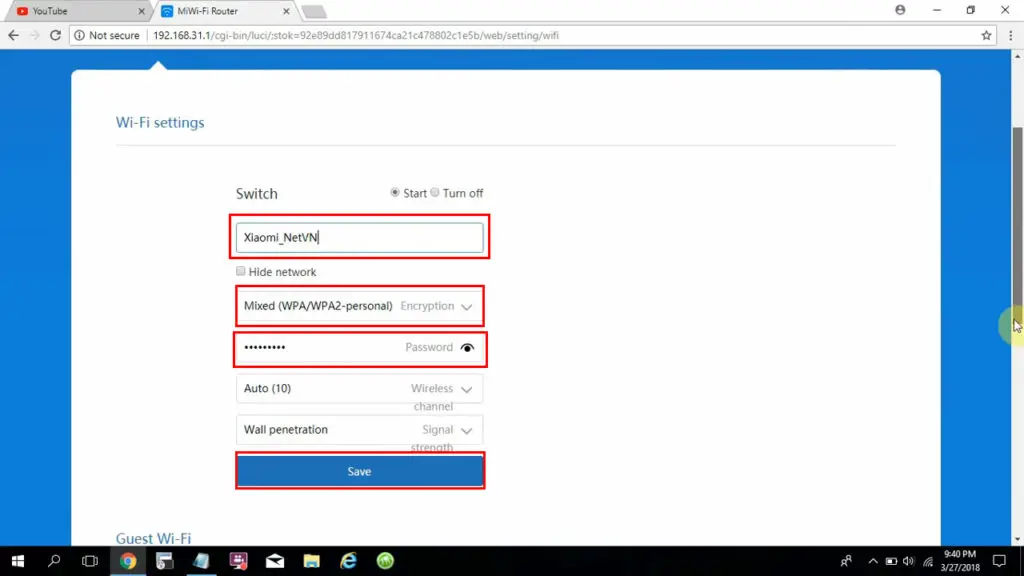
STEP 2 – Change network name, select Encryption type (preferably WPA2), enter your new password, and save settings
If you are using a dual-band Xiaomi router, you will see two options – 2.4G Wi-Fi settings and 5G Wi-Fi settings. If it’s just a 2.4G router, you will only see wi-fi settings.
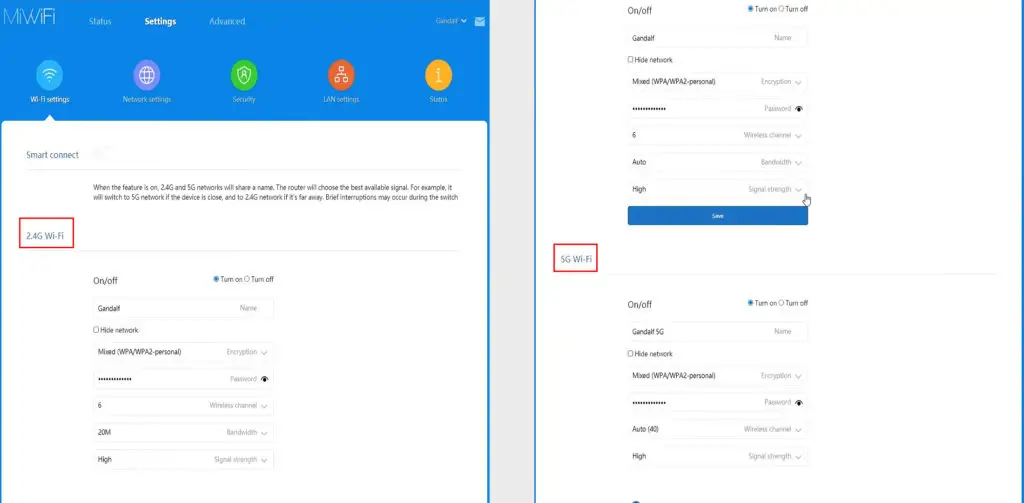
Dual-band routers will have separate SSID settings for 2.4 GHz and 5 GHz bands
Create Guest Wi-Fi
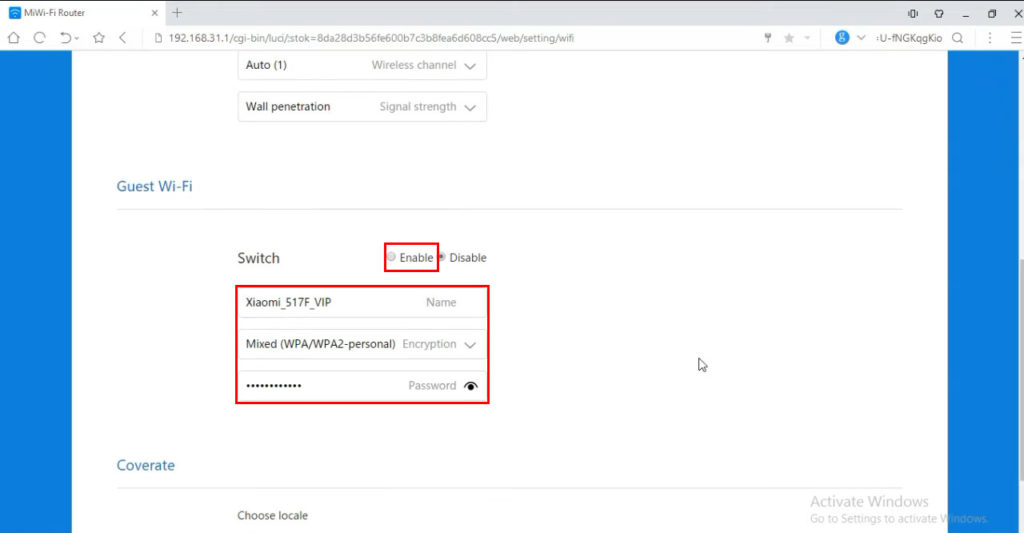
If you want to create a separate wi-fi network for your guests, you just have to stay in wi-fi settings and scroll down until you find ‘Guest Wi-Fi’. Enable it, create a different name for your guest wi-fi network, select the Encryption type, enter the guest network password, and click on Save.
Assigning static IP to a device
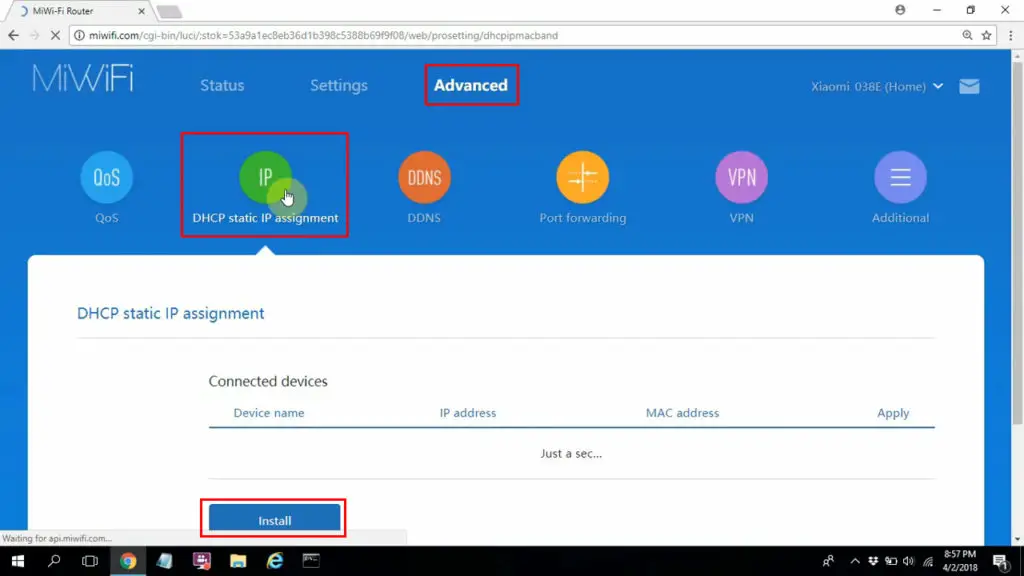
To assign a static IP to some device using your Xiaomi router, follow these steps:
STEP 1: Access the configuration page
STEP 2: Go to Advanced Settings
STEP 3: Click on DHCP static IP, and then click on ADD or INSTALL (depending on the router model)
STEPS 1-3
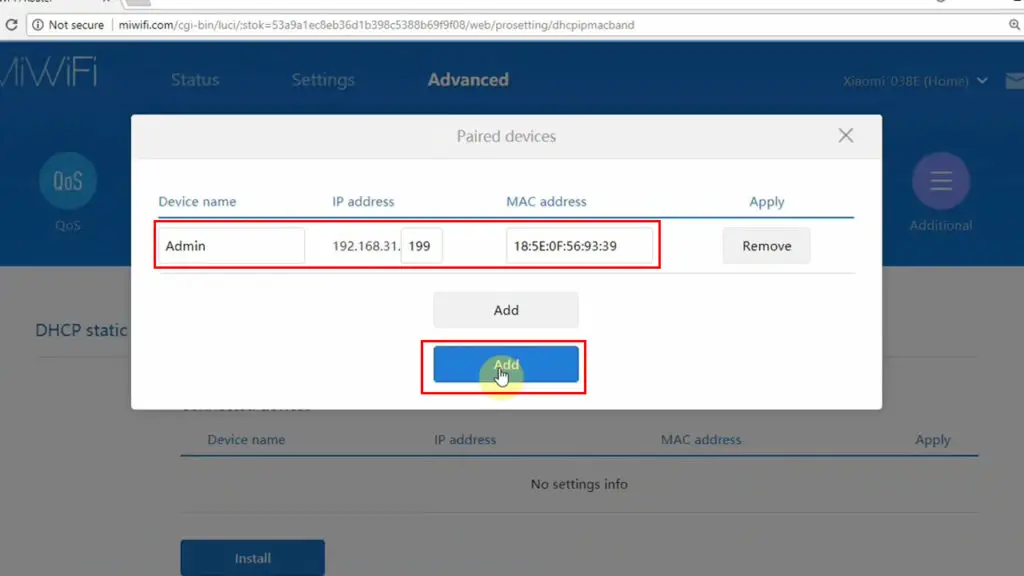
STEP 4: Enter your device’s name, MAC address, and enter the IP address that you want to assign to that device. The IP address has to be from the same subnet as your default IP address (192.168.31.1 belongs to 192.168.31.0/24 subnet). When you are done, click on ADD.
STEP 5: Wait for a few seconds, and you will be redirected to the previous page. On that page, you will now see the list of devices with static IP addresses and your device will be on that list.
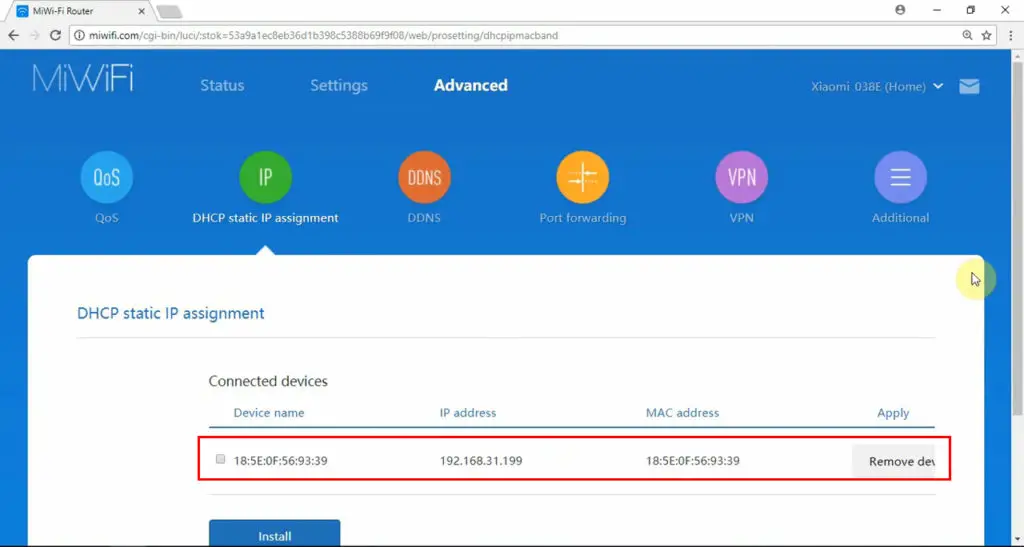
Your device now has a static IP address – this address will be assigned to your device the next time you connect to the network
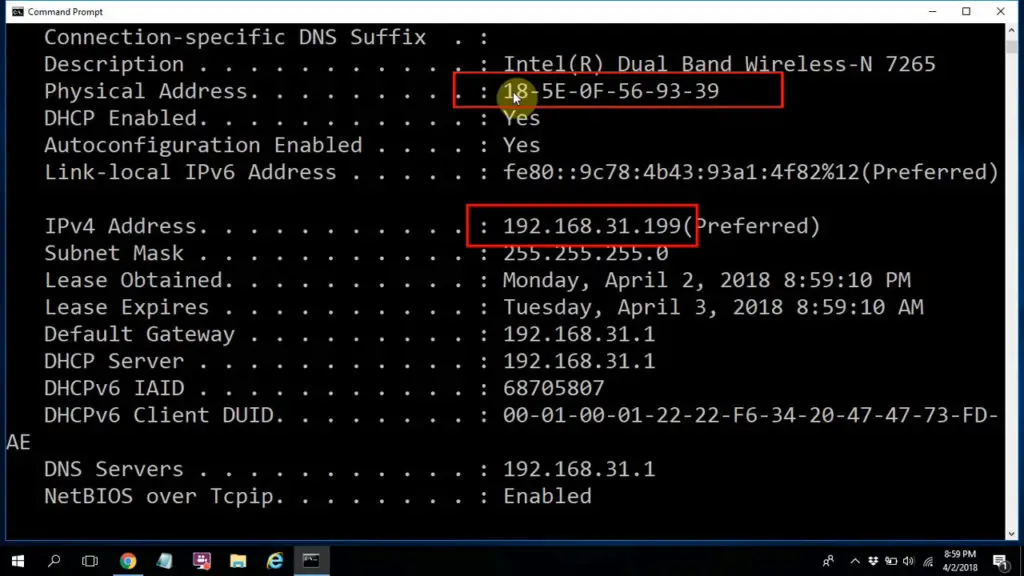
To check if your device has the static IP address that you assigned to it, you can log out and open the Command Prompt. Type in ipconfig /release to release the IP address. Then type in ipconfig /renew to get a new IP address. Scroll up and check what address was assigned to your device (under IPv4 Address). It should be the address you assigned to your device a moment ago.
Can 192.168.31.1 Be a Client/Host IP?
Theoretically, any private address can be a client IP address, just like any IP address can be a default IP. So, 192.168.31.1 can be a client IP (it can be one of the addresses assigned to your devices) only if the default IP address is some other address from the same subnet (192.168.31.0/24).
For example, 192.168.31.1 could be one of the addresses in the DHCP pool if 192.168.31.254 is your router’s default IP address. However, we don’t really know any router that uses 192.168.31.254 as a default gateway.

Hey, I’m Jeremy Clifford. I hold a bachelor’s degree in information systems, and I’m a certified network specialist. I worked for several internet providers in LA, San Francisco, Sacramento, and Seattle over the past 21 years.
I worked as a customer service operator, field technician, network engineer, and network specialist. During my career in networking, I’ve come across numerous modems, gateways, routers, and other networking hardware. I’ve installed network equipment, fixed it, designed and administrated networks, etc.
Networking is my passion, and I’m eager to share everything I know with you. On this website, you can read my modem and router reviews, as well as various how-to guides designed to help you solve your network problems. I want to liberate you from the fear that most users feel when they have to deal with modem and router settings.
My favorite free-time activities are gaming, movie-watching, and cooking. I also enjoy fishing, although I’m not good at it. What I’m good at is annoying David when we are fishing together. Apparently, you’re not supposed to talk or laugh while fishing – it scares the fishes.
