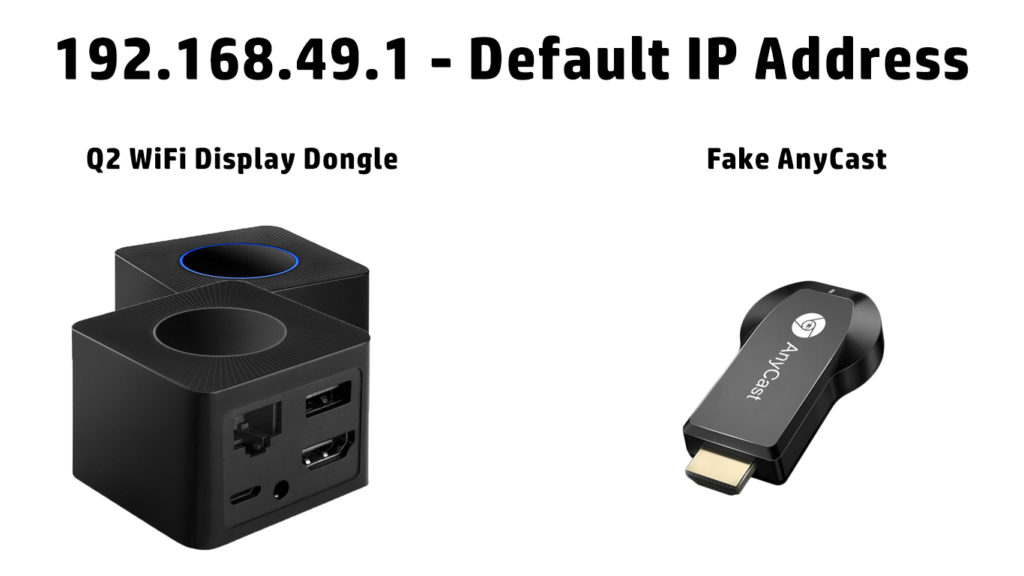
Have you just bought a brand new AnyCast dongle or a Q2 Wi-Fi Display Dongle? You’ve connected it to your TV, and now you see the message containing 192.168.49.1. Don’t know what to do with this IP address? Don’t worry – we’re here to help. Read this article, and you will learn all you need to know about the IP address from the title and about setting up your dongle.
CONTENTS
Theoretical Framework
Before explaining how to set up your dongle, we want to tell you a few basic things about IP addresses. This is not crucial for the dongle setup, but it will help you get a better understanding of IP addresses in general. It may help you understand how all devices on your home network communicate with each other, how they communicate with the router, and how they go online.
If you really want to expand your knowledge about IP addresses and learn why, how, and when they have to be used, read the following few chapters. If you’re just looking for step-by-step instructions on how to install your dongle and where to enter 192.168.49.1, skip the introduction and read the last two chapters.
What Are IP Addresses and Why Do We Need Them?
IP addresses are used as unique identifiers for devices connected to a network. Just like every citizen must have a unique social security number or a street address, every device connected to every network (including the internet) must have a unique IP address. Without it, a device can’t receive or send data and can’t communicate with other devices.
The form of an IP address is defined through IP protocols. IPv4 is the name of the protocol that is currently in use. We also have the IPv6 protocol, but this one is designed for future purposes, and it hasn’t been implemented yet.
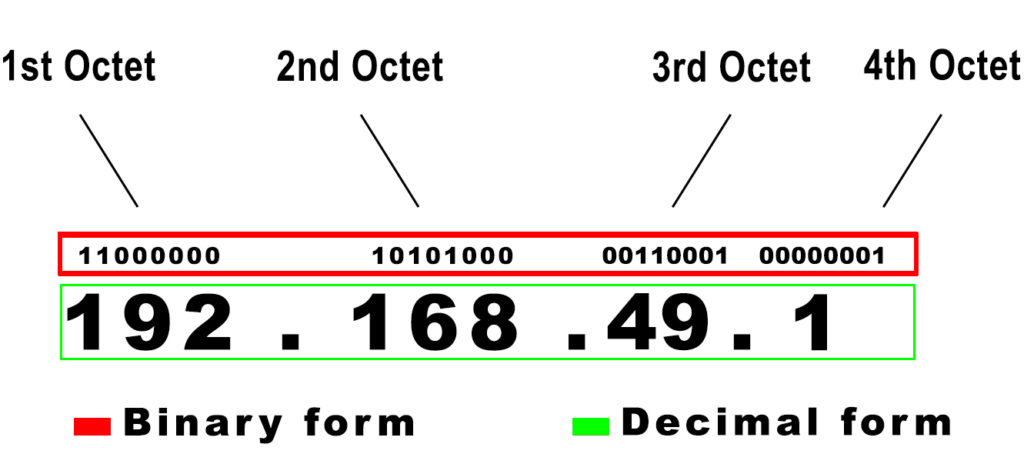
As defined by the IPv4 protocol, every IP address is a string of 32 bits (ones and zeros) divided into 4 segments (octets). Each octet, as the name implies, consists of eight bits. This is the binary form of an IP address. This form is used by our devices and network equipment.
When we want to handle IP addresses, assign them manually to our devices, or adjust some IP address ranges, we don’t deal with ones and zeros. Instead, we deal with actual numbers (like 192.168.49.1). We can convert every IP address from binary (ones and zeros) to decimal form (numbers) and vice versa.
Every octet in an IP address can be converted into a number between 0 and 255. Why these two numbers? Because an octet that consists of eight zeros converts to zero, while an octet that consists of eight ones converts to 255. Any other combination of eight bits converts to a number between these two. So, when you convert an IP address from binary (32 bits divided into 4 octets) to decimal form, you get a sequence of four numbers between 0 and 255 separated by dots. Just like the IP address from the title.
The total number of unique IPv4 addresses is approx. 4.3 billion (232, to be precise). It is a huge number, and it may seem like more than enough, but it’s not. You see, in the world, there are more than 10 billion devices with internet access. Giving a unique IP address permanently to each device connected to the internet is impossible with just 4.3 billion addresses.
That’s why the IPv6 protocol was invented. This protocol defines an IP address as a string of 128 bits, which gives us so many more unique combinations and is more than enough for every single device connected to the internet.
However, the implementation is a complicated process and takes years, so we had to come up with a fix that would allow us to prolong the lifespan of the IPv4 protocol without increasing the number of available IP addresses and without creating IP address conflicts. The fix was quite elegant and it included creating blocks of private IP addresses, as well as making a distinction between static and dynamic addresses. We will explain all these terms but first, let’s discuss the oldest classification of IP addresses.
Classes of IP Addresses
All 4.3 billion IPv4 addresses are divided into five classes (A to E). Each class is designed for a specific purpose or a specific network size. Classes A, B, C are used on networks. Class-A addresses are used on the largest networks (126 networks with up to 16.3 million hosts per network), Class-B addresses on medium-sized networks (16,384 networks with up to 65,354 hosts per network), and Class-C addresses on the smallest networks (2.1 million networks with up to 254 hosts per network).

Class-D addresses are used for multicast and Class-E addresses for experimental purposes.
Private and Public Addresses
The crucial thing for prolonging the life of the IPv4 protocol was the introduction of private IP addresses. There’s one dedicated block of private addresses within Class A, Class B, and Class C. All the other addresses are considered public. But what do these terms – public and private actually mean?
Private addresses are designed for use on local area networks only (devices connected in one physical location). The best example of a LAN network is your home network.
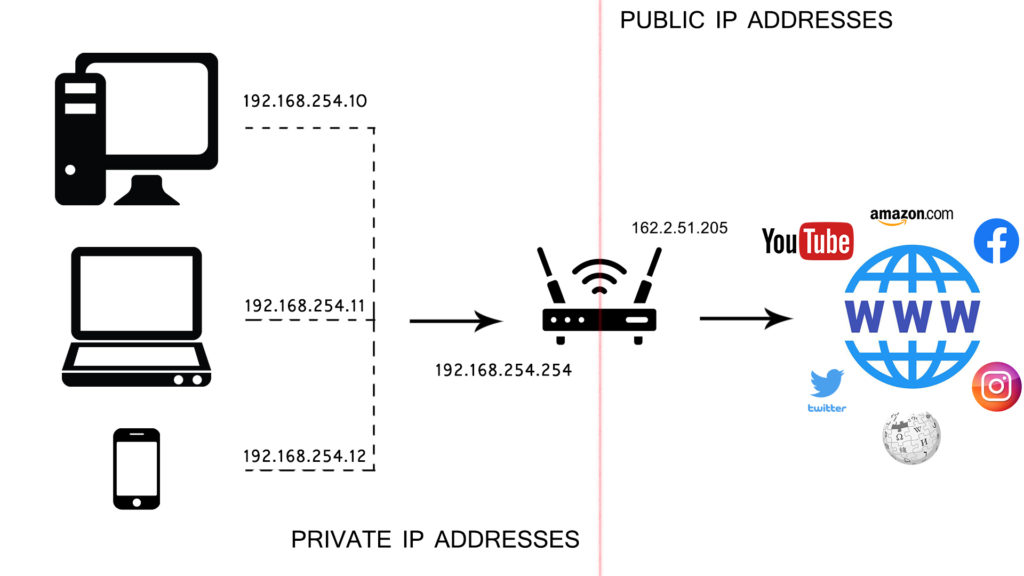
Every device connected to your home Wi-Fi has a private IP address (usually some 10.x.x.x or 192.168.x.x address). These addresses are only used for communication within that network.

Your devices use private IP addresses to communicate with the router and, through the router, with each other. Private IP addresses are not used for internet access – public addresses are used for that. So, how do we go online? To answer this question, we have to tell you first what default IP addresses are.
What is a Default IP Address?
Our routers (or gateways) are the hubs of our home Wi-Fi networks. Routers come with a private address already assigned to them by the manufacturer. This address is known as the default IP address. Other network devices, like range extenders, repeaters, and access points also come with predefined default IP addresses (also private). Some devices, like USB streaming dongles, Wi-Fi cameras, and similar devices come with predefined default IP addresses, too.
Default IP address is always a private address and comes from one of those three dedicated blocks of private addresses. Manufacturers usually choose the starting (or sometimes the ending) IP address in a subnet. This means that default IP addresses usually end with 1 (or sometimes 254). Most common default IPs are 192.168.0.1, 192.168.1.1, 192.168.2.1, 192.168.3.1, 10.0.0.1, 192.168.1.254, 192.168.0.254, etc.
Theoretically, any private IP address can be a default IP address.
How Do We Go Online?
All devices on your home network are connected to your router. All the communication between your devices goes through the router, and all the requests for internet access are sent to your router.
You already know that our routers come with a predefined default IP address (which is a private IP address). Your router also holds a pool of addresses (aka DHCP pool) and assigns those addresses to every device connected to it. The default IP address and all the addresses in the pool belong to the same subnet. For example, if the router’s default IP is 192.168.1.1, all the addresses in the DHCP pool will begin with 192.168.1.x.
When your router assigns an IP address to your PC, phone, or any other device, that device can use this address to communicate with other devices on the same network. When you want to open a website on your device, you’re sending a request to the router. Your router goes online, finds the information you needed, and sends it to your device. But, wait. How can a router go online if it has a private IP address, just like the rest of your devices?
Well, one thing we didn’t tell you is that your router has two addresses. The first one is a private IP address assigned by the manufacturer (default IP) and used to communicate with devices on the same LAN. The second address is assigned by your ISP. It is a public IP address and is used for internet access.
So, when your device sends a request for internet access, the router and device use their private addresses to communicate. When it receives the request, the router uses its public address to find the info you requested. When it obtains the information you asked for, it forwards that info to your device using its private IP address.
What Kind of Address is 192.168.49.1?
192.168.49.1 is the starting address in the 192.168.49.0/24 subnet. It is a Class-C private IP address.

As a private IP address, it can be a default IP address, just like any other private IP address. What makes it an even better choice than most other addresses is the fact that it’s the starting address in a subnet. But is it used as a default IP address?
What Devices Use 192.168.49.1 as a Default IP Address?
Our address is not the most common choice when it comes to default IP addresses. We don’t know any router (or any other piece of network equipment) that uses this address as a default IP. But some other devices use it.
192.168.49.1 is the default IP address of two devices – Q2 Wi-Fi Streaming Dongle and fake AnyCast dongle (a few versions of a fake AnyCast dongle). We say fake is because all dongles that use 192.168.49.1 as a default gateway and are named AnyCast are fake. The original AnyCast dongles use a different default IP address (192.168.203.1).
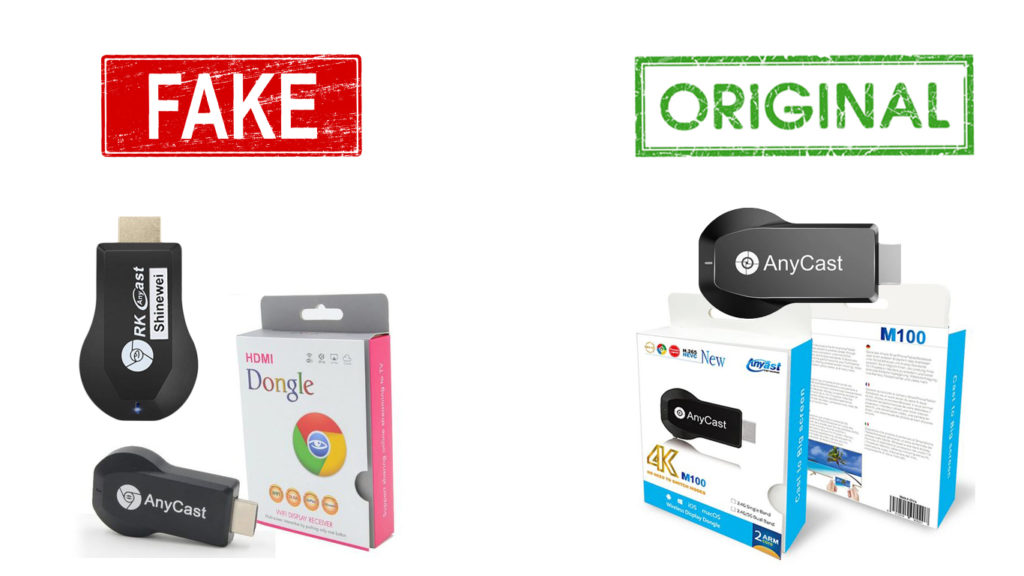
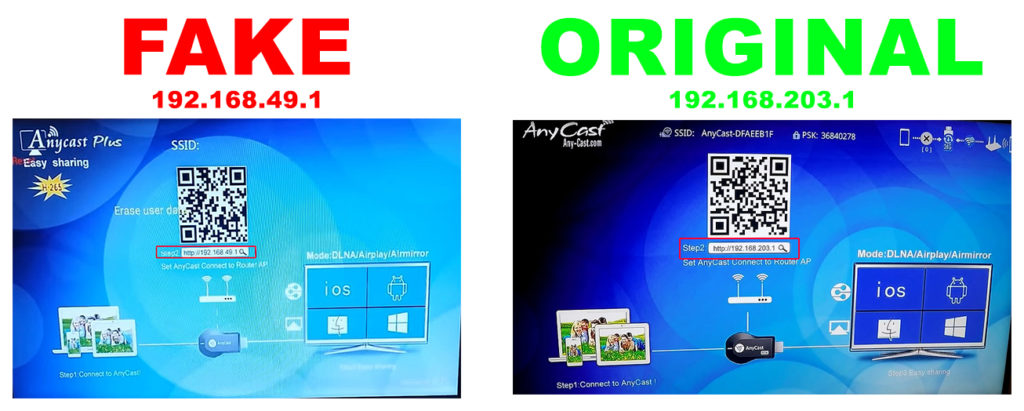
The differences between original and fake AnyCast dongles are not just in the packaging and default IP address. The most important difference is in the performance (overheating issues, unstable screen mirroring, Wi-Fi issues). So, if you’re thinking about buying the AnyCast dongle, make sure that you’re buying the original.
If you have already bought the fake one and still want to try it, here’s how to set it up.
How to Set Up Fake AnyCast Dongle Using 192.168.49.1
STEP 1 – Connect the antenna and a USB cable to your dongle. Then, connect the dongle to one of the available HDMI inputs on your TV. If your TV has free USB ports and if it can supply power through those ports, connect the USB cable to one of the available USB ports. If your TV can’t power the dongle, you have to buy a 5V/1A adapter. The adapter is not included in the package.
STEP 2 – Turn the dongle on and select the right source on your TV (select the right HDMI input). If everything is connected properly, you should see the welcome screen like in the image below.
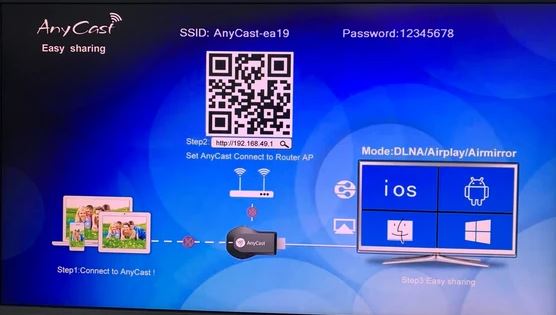
The welcome screen may look a little bit different depending on the version of the fake AnyCast.
STEP 3 – Once your turn it on, the dongle will create its own Wi-Fi network (it will become an access point). You will see the name of that network next to the SSID, right at the top of the welcome screen. The password for this Wi-Fi network is also located at the top. You need to disconnect your phone (or PC) from your home Wi-Fi and connect it to the Wi-Fi network created by your fake AnyCast dongle. Refresh the list of available Wi-Fi networks and look for the name of your dongle’s Wi-Fi.
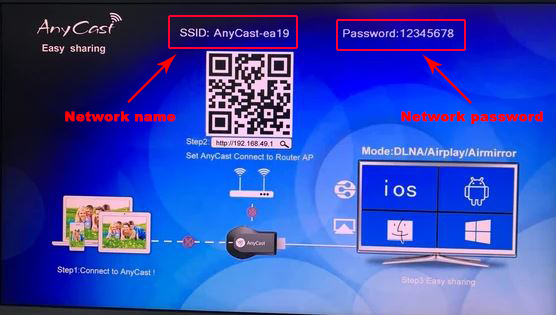
STEP 4 – Once you connect your phone/PC to your dongle’s Wi-Fi, you need to connect the dongle to your home Wi-Fi. For that, you need to access your dongle’s settings. To access your dongle’s settings, you have to open your browser and type in the default IP address of your fake AnyCast dongle. That’s our IP address – 192.168.49.1. Once you press Enter, the settings will open. You don’t have to log in or anything like that. The settings will open straightaway.
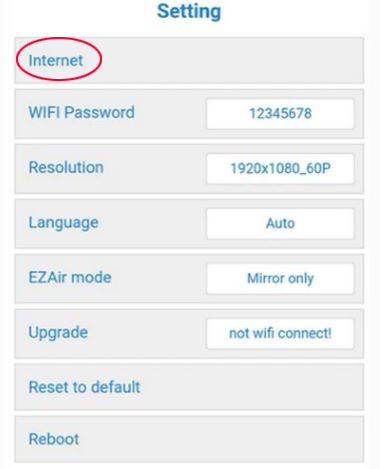
STEP 5 – Depending on the version of your dongle, the settings will look different. In the image below, you can see how the settings screen looks on the original dongle. Your fake AnyCast may have a more rudimentary appearance with just a few options. What you need to do is look for the Internet option or Scan option. You need to scan for available Wi-Fi networks, find your home Wi-Fi, and connect your dongle to it. When the dongle connects to your Wi-Fi, you can close the settings, connect your phone/PC to your home Wi-Fi, and start using your dongle.
Note: To set up the original AnyCast dongle and connect it to your home Wi-Fi, you can also use the EZMira app (iOS/Android/Windows). The app may not work with fake AnyCast dongles.

Hey, I’m Jeremy Clifford. I hold a bachelor’s degree in information systems, and I’m a certified network specialist. I worked for several internet providers in LA, San Francisco, Sacramento, and Seattle over the past 21 years.
I worked as a customer service operator, field technician, network engineer, and network specialist. During my career in networking, I’ve come across numerous modems, gateways, routers, and other networking hardware. I’ve installed network equipment, fixed it, designed and administrated networks, etc.
Networking is my passion, and I’m eager to share everything I know with you. On this website, you can read my modem and router reviews, as well as various how-to guides designed to help you solve your network problems. I want to liberate you from the fear that most users feel when they have to deal with modem and router settings.
My favorite free-time activities are gaming, movie-watching, and cooking. I also enjoy fishing, although I’m not good at it. What I’m good at is annoying David when we are fishing together. Apparently, you’re not supposed to talk or laugh while fishing – it scares the fishes.

Why do they ask for a credit card?