If you are a Virgin Media user, browsing the web to find a simple, easy-to-follow tutorial on how to forward ports on your Virgin Media hub, you’ve come to the right place.
This article will explain the basics behind port forwarding and provide you with a step-by-step tutorial about port forwarding for every Virgin Media hub you may have.
Furthermore, we will use a well-known videogame as an example. So, sit back, focus, and let’s begin.
CONTENTS
What is Port Forwarding, and Why Do You Need It?

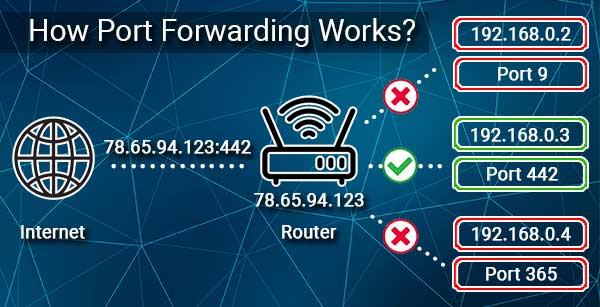
Port forwarding is a helpful application of NAT (Network Address Translation) that redirects one IP address and port combination to another while the data travels through the network gateway such as a router.
To put it simply, port forwarding allows data to go through the router and reach the destination. Without it, the requests to communicate will be blocked by the router’s firewall.
However, you will need to bypass this to allow some computer outside your home network to access some specific device or app within your home network.
One way of doing this is by forwarding ports.
Among younger generations, the most common reason for port forwarding is gaming. However, you can also use it to access your security system, among other things.
Recommended reading:
- 5 Ways To Fix Virgin Media No Internet Access But Connected
- Why is Virgin Media Upload Speed Slow? (A Quick Fix Guide)
- How to Reset Virgin Media Router? Step-by-Step Guide
Still, let’s use the modern, popular video game Call of Duty – Warzone as an example to show you how to forward ports for it to work.
Before you get into the process, you’ll need to find out what ports you need to forward. You can do this by simple Google search. Find a credible source and write down or save the port numbers and protocols.
For Call of Duty- Warzone, they are:
TCP Ports: 3074, 27014-27050
UDP Ports: 3074, 3478, 4379-4380, 27000-27031, 27036
Once you know the port numbers and protocols, you can set up the router.
Virgin media provides half a dozen different hub models, and some of them have slightly different interfaces and setup processes. Find your hub model below and follow the steps.
Setting Up Port Forwarding on Virgin Media Hubs 1, 2 and 2ac
Connect your PC or laptop to the hub using an ethernet cable before you access the hub’s settings and start changing things. This will help things go much quicker and smoother.
Step No. 1 Access the Router’s Admin Panel
Once you connect the PC to the hub using an ethernet cable, you’ll need to access the settings.
You can do this by opening the internet browser of choice and typing the hub’s IP address into the address bar.
By default, it is 192.168.0.1.

If this IP address doesn’t load the login page, open the Command prompt app by typing CMD into the windows search bar and clicking on the app.
Then type ipconfig and press Enter. Hub’s IP address is next to the Default gateway.
Once the login screen loads, you’ll need administrator credentials to access the settings. If you didn’t change them, they are username: admin and no password.
You can find the default username and password on the sticker glued on the back of the hub.
Step No. 2. Assign Static IP to the Device You Are Forwarding Ports To
You don’t have to assign static IP, but it would be wise not to skip this step. Your hub uses DHCP to lease IP addresses to your devices for a fixed period of time.
When they are connecting to the hub on a daily basis, there are no problems. However, if you go on vacation for a few weeks, leases will expire, and devices will get different IP addresses, so your port forwarding will no longer work.
To find the current IP address for the device you want to forward ports, go to DHCP settings, look at the list of connected devices and write down the IP address since you will need it later.
You can reserve the same IP address for that device and make it static in the Advanced Settings.
Step No. 3. Forward Ports
Go to the Advanced Settings menu and look for Port Forwarding.
Once there, you will need to fill out some information.
First, find out if there is a Predefined rule that suits your needs from the drop-down menu.
If there isn’t a predefined rule, add a new rule.
Name the rule. You can write anything, but it would be good to give it a name that correlates with the purpose. In this case, CoD- Warzone PC would work just fine.
It’s time to set the Start Port and End Port.
Enter the lowest number as a start port and the highest as an end port, and choose the type from the drop-down menu. Let’s remind ourselves what ports we need to have open.
TCP Ports: 3074, 27014-27050
UDP Ports: 3074, 3478, 4379-4380, 27000-27031, 27036
Save the settings and exit the router’s menu.
Setting up Port Forwarding on Virgin Media Hubs 3 and 4
If you have Hubs 3 or 4, port forwarding will go just a bit differently than with older models.
Step No. 1 Access the Router’s Admin Panel
Just like with previous models, you’ll need a device that is connected to the hub. Preferably by ethernet cable.
Open any internet browser you may like and type in 192.168.0.1 and press enter.
Username and password are, by default admin, and password.
Step No 2. Assign Static IP to the Device You Are Forwarding Ports To
Just like we mentioned earlier, you can skip this step if you are in a real hurry, but it would be very helpful to assign a static IP address to a device you are forwarding ports to. That way you will make sure that the IP address stays the same no matter how long you don’t use that device.
You can find the current IP address and IP address reservation settings in the Advanced settings.
Step No 3. Forward Ports
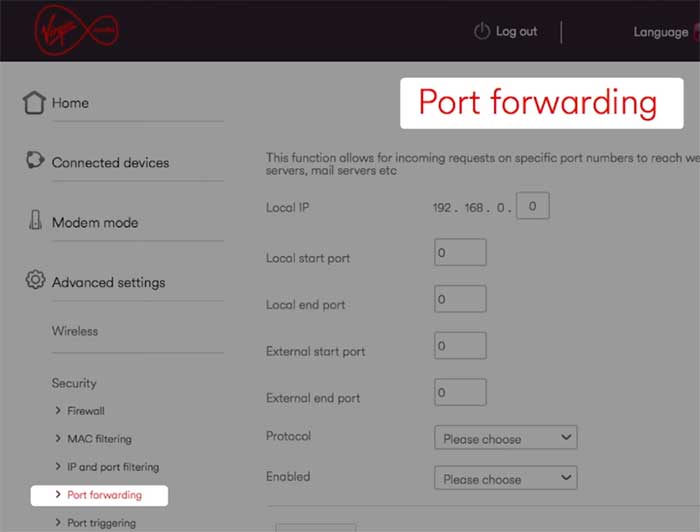
Go to Advanced settings > Security > Port forwarding

Type in the IP address you are forwarding ports to.
Don’t get confused when you see Local Start and End port, then External Start and End port. Type in the same port numbers in both. The lowest number goes in the Start and the highest in the End port field.
Choose the correct protocol. TCP, UDP, or both.
Select ON from the drop-down menu to enable port forwarding you just set up, then click add.
Repeat this process as many times as you need for every piece of software and device you want to forward ports to.
Should You Take the Hub 5?
As Hub 5 is becoming more available for new users and testing purposes, many wonder if they should get it now, and our firm answer is – not yet.
At its current state, in the first half of 2022. It is not 100% functional and reliable, especially regarding port forwarding functionality.

Hey, I’m Jeremy Clifford. I hold a bachelor’s degree in information systems, and I’m a certified network specialist. I worked for several internet providers in LA, San Francisco, Sacramento, and Seattle over the past 21 years.
I worked as a customer service operator, field technician, network engineer, and network specialist. During my career in networking, I’ve come across numerous modems, gateways, routers, and other networking hardware. I’ve installed network equipment, fixed it, designed and administrated networks, etc.
Networking is my passion, and I’m eager to share everything I know with you. On this website, you can read my modem and router reviews, as well as various how-to guides designed to help you solve your network problems. I want to liberate you from the fear that most users feel when they have to deal with modem and router settings.
My favorite free-time activities are gaming, movie-watching, and cooking. I also enjoy fishing, although I’m not good at it. What I’m good at is annoying David when we are fishing together. Apparently, you’re not supposed to talk or laugh while fishing – it scares the fishes.
