A large number of wireless routers support WPS. It is a feature that has been designed to make connecting computers and other devices to an encrypted wireless network much easier. When you use WPS to connect your device you don’t need to enter the wireless network password. Instead, you can use the WPS button or connect using a WPS Pin.
The WPS PIN or WPS button connection can come in really handy when you need to connect your wireless printer or scanner, smart TV, Smart A/C unit, and similar devices to your wireless network.
In this article, we are going to explain how to find the WPS PIN and connect some of your devices to Wi-Fi using it, and also give answers to some of the frequently asked questions about this topic.
CONTENTS
What is WPS Pin?
The WPS Pin (Personal Identification Number) is a unique number generated by the device in order to connect the device with a wireless router. We can describe it as a secret code that allows the devices to connect to each other.
When you want to connect your device using a PIN you have two options. The first option is to generate the PIN of the wireless router and then enter that PIN into the other WPS-enabled device. The other option is to enter the generated Wi-Fi Protected Setup PIN number from the device we want to connect into the router’s WPS section.
NOTE: WPS will only work if your wireless network is encrypted with WPA or WPA2 encryption. If your device supports only the WEP encryption, WPS won’t work.
Where Can I Find The WPS PIN And How To Connect?
Depending on the device, the WPS PIN can be found either in the wireless router or on the device we want to connect.
How To Find The WPS PIN On Wireless Router?
Some wireless routers have the WPS PIN printed on the label along with other default login details like the router IP address, default admin username and password and SSID and Pre-Shared Key.
However, if you already have access to your wireless router but you need a PIN in order to connect to another device, you need to login to the router admin dashboard in order to find it.
The login process is simple. You need to enter the router’s IP into the browser’s URL bar and press Enter. Then you will be asked to enter a username and password. When you click on Login, you should see the router’s admin dashboard.
Now find the WPS section. It is usually located in the Wireless section of the router settings.
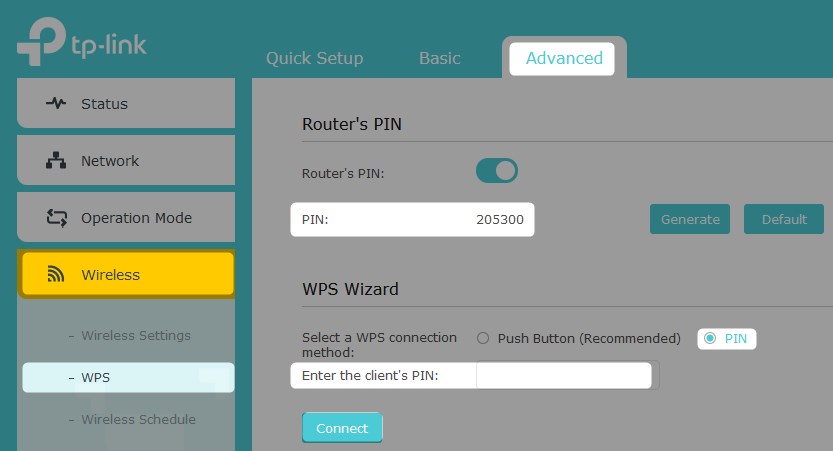
For example, if you have a TP-LINK router, after you login you need to click on Advanced settings, then click on Wireless in the menu on the left. When it expands down click on WPS. There you should see the router’s PIN if it’s already enabled. If it isn’t, enable it and then you will see the PIN. On the other hand, if you need to enter the device’s PIN, select PIN in the WPS wizard section and you will see the field where you can enter the PIN from the device you want to connect.
After you enter the PIN, click on Connect and that should be it. The devices will pair and your device will be connected to the network.

How To Connect LG TV To Wi-Fi With A WPS PIN?
LG Smart TVs have the option to be connected to the wireless network using a WPS PIN.
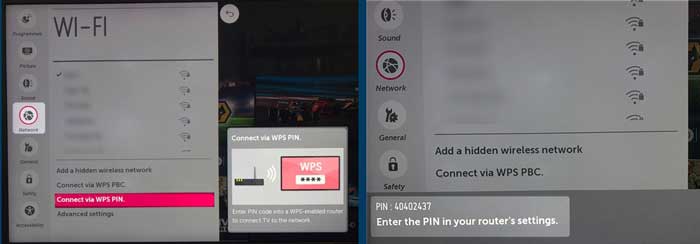
Click the Q. Menu button on the remote. Go down to Advanced and click OK to select it. Take a look at the menu on the left. Go down to Networks and click OK on the remote. The Wi-Fi section will open. At the bottom of the page, you should see Connect via WPS PIN. Navigate to it and click OK on the remote again.
Now you should see a gray bar at the bottom of the screen with the WPS PIN code. Now you have to login to your router and enter the WPS PIN code in the router settings.

How To Connect Your Printer To Wi-Fi With A WPS PIN?
Some printers today can also be connected to your network using a WPS PIN.
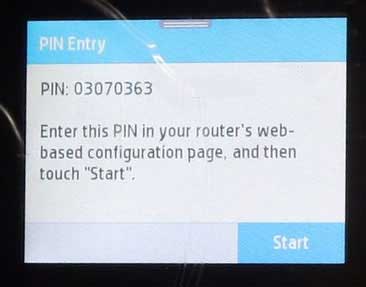
In this example, we are going to use a HP Printer. On the display panel, swipe down the display with your finger and tap the Settings icon. After that tap on Network Setup and then on Wireless Settings. Now you need to scroll down and tap on Wi-Fi Protected Setup. Now click on PIN and the WPS PIN will be generated and shown on the display. Now you need to enter this WPS PIN into the router settings WPS section and then click Start on the printer’s display.
This process should be similar for other wireless printers as well.
NOTE: In most cases, the WPS PIN number can be used for 90 seconds after it has been generated.

Recommended reading:
- How to Connect Sky Box to Wi-Fi Without WPS Button? (Quick Setup Guide)
- How to Disable WPS on AT&T Router?
- How To Enable WPS On Spectrum Router?
Frequently Asked Questions
Should You Keep WPS Enabled Or Disabled?
Although WPS has its benefits and you can quickly connect your device using the WPS button, we have to say that it is pretty unsecure and prone to brute force attacks. It can be used by attackers to access your network without your permission and even access the router admin settings and abuse your network or make it completely unusable. This is why it is better to keep the WPS feature disabled.
Can You Connect an iOS Device using WPS?
iOS devices don’t support WPS to connect to Wi-Fi. The main reason for this is the security of your iOS device. Therefore, in order to connect, you need to manually enter the wireless password into your iOS device. If you are using an iPhone, unlock it and tap on the Settings icon. Then select Wi-Fi, enable it if it isn’t enabled and you should see a list of available networks in the Other Networks section. Tap on the Network name you want to connect to and you will be asked to enter the wireless password. Type it carefully and then tap on Join. You should be connected almost instantly.
Final Words
As you can see it isn’t too complicated to connect your device to WiFi using WPS PIN. Once you go through the steps described in this article you will easily connect your other devices using the WPS PIN method. However, if you don’t use this feature too often, it is better to keep it disabled. You can enable it for a short period of time when you want to connect a new device to your WiFi network.

Hey, I’m David. I’ve been working as a wireless network engineer and a network administrator for 15 years. During my studies, I also worked as an ISP field technician – that’s when I met Jeremy.
I hold a bachelor’s degree in network engineering and a master’s degree in computer science and engineering. I’m also a Cisco-certified service provider.
In my professional career, I worked for router/modem manufacturers and internet providers. I like to think that I’m good at explaining network-related issues in simple terms. That’s exactly what I’m doing on this website – I’m making simple and easy-to-follow guides on how to install, set up, and troubleshoot your networking hardware. I also review new network equipment – modems, gateways, switches, routers, extenders, mesh systems, cables, etc.
My goal is to help regular users with their everyday network issues, educate them, and make them less scared of their equipment. In my articles, you can find tips on what to look for when buying new networking hardware, and how to adjust your network settings to get the most out of your wi-fi.
Since my work is closely related to computers, servers, and other network equipment, I like to spend most of my spare time outdoors. When I want to blow off some steam, I like to ride my bike. I also love hiking and swimming. When I need to calm down and clear my mind, my go-to activity is fishing.
