Traditionally, you could only connect a printer to a computer using a wired connection, especially within an office space. However, many printer manufacturers now allow users to connect their MacBooks to their printers wirelessly.
A wireless connection will make using and operating the printer more convenient and faster as long as the network is stable. Additionally, several people within the same network connection can have access to the printer at the same time.
Although different macOS versions have various features, they all work in the same manner while connecting to a printer. Ensure the printer supports a wireless connection for best results.

CONTENTS
Methods of Connecting a Printer to MacBook Wirelessly
Connecting your Mac to a printer wirelessly has a significant advantage over a wired connection. Several users can connect to the printer, although only one user can print at a time.
You can also wirelessly connect your printer to your Mac using the printer’s WPS function and Bluetooth. Additionally, you can manually key in the printer’s IP address in case your Mac cannot read it from the network.
Depending on the macOS version, such as macOS Monterey 12, you will need to connect using a USB cable. Then, set up the printer for Wi-Fi printing before disconnecting the cable from the Mac and printer.
However, ensure that the printer and Mac have a connection to the same Wi-Fi network. Additionally, ensure the drivers in the printer are up-to-date to avoid any bugs that might occur during connection.
Some printers will have the AirPrint technology, which allows a Mac user to connect to the printer without updating drivers. Thus, you will not require to install additional applications and drivers to update the printer’s software.

AirPrint offers constant updates to the printer, allowing the Mac to discover the printer quickly. Always check with the manufacturer to see whether the printer model has the AirPrint feature.
macOS is usually compatible with all printers, whether or not they have the AirPrint feature. Therefore, if you connect an AirPrint-compatible printer to Mac, the MacBook will automatically use the feature.
Recommended reading:
- How to Check Wi-Fi Signal Strength on iPhone? (Explained)
- Boost Wi-Fi Signal on Laptop (Ways to Fix Inconsistent Wi-Fi Connection on a Laptop)
- Placing Wi-Fi Router Near TV (Should I Put My Router Near TV?)
If your printer lacks the AirPrint feature, check for updates from the manufacturer. Depending on your macOS version, you can use the following steps to check for all software updates:
- Choose the Apple menu, then go to the App Store
- Click on the Updates option
- Install all software updates available
Even though different macOS versions have distinct features, they all use the same variation of steps to access the printer. The macOS versions are High Sierra, Mojave 10.14, Catalina 10.15, Big Sur 11.0, and Monterey 12.
The methods to use to connect a printer wirelessly include:
1. Connecting over Wi-Fi
The Mac must read the printer when connecting it through the Wi-Fi network. Also, ensure the printer and Mac have a USB connection before the initial Wi-Fi setup.
Use the following steps to add the printer to your Mac over Wi-Fi:
- Prepare your printer and connect it to a power source to turn it on
- Connect the printer to the same Wi-Fi network according to the manufacturer’s instructions
- Connect the printer to the Mac using a USB cable, then disconnect after the software update
- Check for updates and download them if your printer does not use AirPrint
- Then, select the Apple menu on the screen’s top-left corner
- Go to the System Preference menu
- Select the Printers and Scanners option
- A list of devices connecting to the Mac will be seen on the left part of the screen
- If you cannot see your printer, click on the + button at the bottom
- A list of all the printers within your local Wi-Fi network will appear
- Select your printer from the list, and click on the Add button
- If there is a message prompt showing that you need to download software, download it first and install
- If the printer does not appear when you click on the Add button, use the printer’s IP address to add the printer manually

Once you add the printer to your list, you will not have to add it again the next time you want to use it. Unless you remove the printer from the list, the printer will remain on the list at all times.
Also, macOS will automatically detect the accessories that come with your printer once the connection is made. If not, manually add the accessories in the dialog box that will appear on the screen.
How to Add a Printer to Your Mac Using Wi-Fi
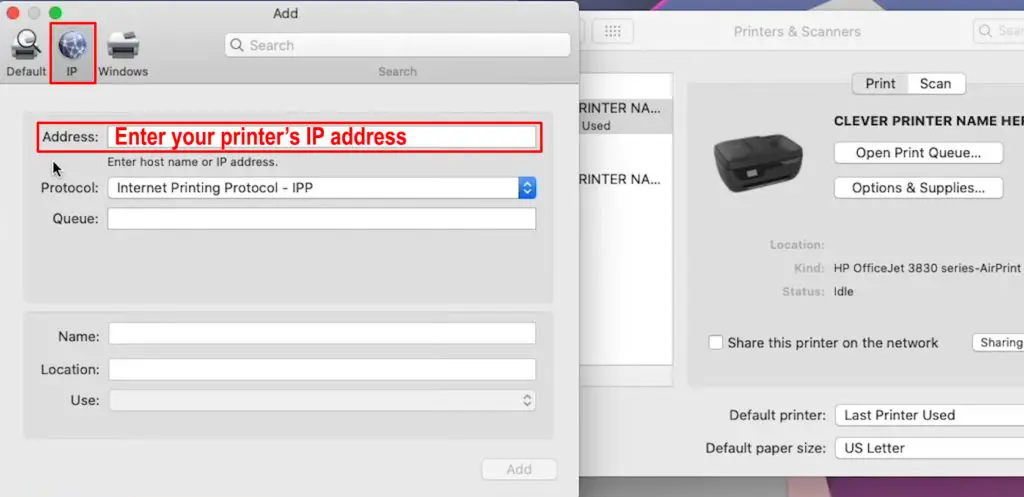
2. Using the Printer’s IP Address for Connection
Sometimes, the Mac may fail to read the printer; hence, you cannot add the printer to the list of devices. Depending on the manufacturer, the IP address found on your printer through the menu options will resolve the issue.
However, the printer will require to have some protocols to be able to use the IP address for the connection. The protocols include AirPrint, Internet Printing Protocol (IPP), HP Jetdirect (Socket), and Line Printer Daemon (LPD).
Use the following steps to connect your printer using the IP address:
- Prepare the printer and plug it into a power source, then turn it on
- Ensure the printer’s software is up-to-date
- Connect the printer to the Wi-Fi network as per the manufacturer’s instructions
- From the Apple menu, go to the Systems Preference option
- Select the Printers and Scanners option
- Select the + button on the left part of the screen
- Select the IP tab and enter printer information
- Add in the printer’s IP address, one of the protocols shown above, and the name
- Also, fill in the printer’s location and select your printer’s software under the Use option
- Select the Add option after filling in all the information to complete the connection to your Mac
Setting Up a Printer on a Mac Using Printer’s IP Address
Sometimes, a network printer will need you to install a configuration profile for the printer to use the AirPrint feature. You can either download or copy the printer’s profile to your Mac to obtain the configuration for installation.
Use the following steps for the configuration profile:
- Double-click the profile on Mac to open it
- Click on the Continue button from the message asking to install the profile
- Confirm the process and click on Install
- The profile will appear on the System Preferences option
- Add the printer to the printer list from the Printers and Scanners option
- Then, select the + button and select the Default option
- The printer will be seen as an AirPrint profile
- Select the Add button to add the printer to your list
3. Connecting Using the WPS Function
The Wi-Fi Protected Setup feature acts mainly as a network security feature in a Wi-Fi network. Therefore, your network should use WPA or WPA 2 encryption protocols to use the feature for the printer’s connection.
If Apple does not make the Wi-Fi router, follow the manufacturer’s instructions to connect the printer via WPS. However, you can use the following steps:
- Prepare your printer and switch it on
- Ensure the printer’s and Mac’s software is up-to-date
- Connect the printer and Mac to the same network as shown on the devices
- Press the WPS button found on the router and the printer
- Follow the previous steps to connect your printer to the Mac
Connecting an HP Printer to Wi-Fi Using WPS
https://www.youtube.com/watch?v=YIjghaR5E-o&t=102s
If you are using an AirPort Base Station Wi-Fi router, use the following steps:
- From the Applications folder, select the Utilities folder
- Open the AirPort Utility, then select your base station
- Enter the password if necessary
- Select the Base Station option from the menu bar and select the Add WPS Printer option
- Select the First Attempt option, or PIN option, then click on the Continue button
- If you select the First Attempt option, push the WPS button on the printer
- If you select PIN, enter the printer’s PIN, then click on the Continue button
- After the MAC address appears from both options, click Done
- Exit from the AirPort Utility
4. Using a Bluetooth Connection
First, you must ensure that both Mac and printer have Bluetooth functions.
Use the following steps for a Bluetooth connection:
- Prepare the printer and switch it on
- Ensure that the software for macOS and the printer is up-to-date
- Turn on the Bluetooth feature in your printer according to the manufacturer’s guidelines
- Also, turn on Bluetooth on your Mac from the menu at the top of your screen
- Go to the Apple menu and select the System Preferences option
- Select the Printers and Scanners option, then select the + button at the bottom of the list of devices
- Please navigate to the Default tab and choose your printer to add it to the list
- If the connection fails, try manually reinstalling the printer drivers and software, then repeat the steps above
Conclusion
Connecting any printer to your Mac wirelessly is a more convenient method of accessing your printer, especially in an office setting. Several Mac users can connect wirelessly to the same printer as long as they connect to the same network.
You must ensure the printer’s software is up-to-date and use the latest macOS version for wireless connection. The AirPrint function found in printers is made by Apple, which makes connection easier since it automatically updates printers’ software.

Hey, I’m Jeremy Clifford. I hold a bachelor’s degree in information systems, and I’m a certified network specialist. I worked for several internet providers in LA, San Francisco, Sacramento, and Seattle over the past 21 years.
I worked as a customer service operator, field technician, network engineer, and network specialist. During my career in networking, I’ve come across numerous modems, gateways, routers, and other networking hardware. I’ve installed network equipment, fixed it, designed and administrated networks, etc.
Networking is my passion, and I’m eager to share everything I know with you. On this website, you can read my modem and router reviews, as well as various how-to guides designed to help you solve your network problems. I want to liberate you from the fear that most users feel when they have to deal with modem and router settings.
My favorite free-time activities are gaming, movie-watching, and cooking. I also enjoy fishing, although I’m not good at it. What I’m good at is annoying David when we are fishing together. Apparently, you’re not supposed to talk or laugh while fishing – it scares the fishes.
