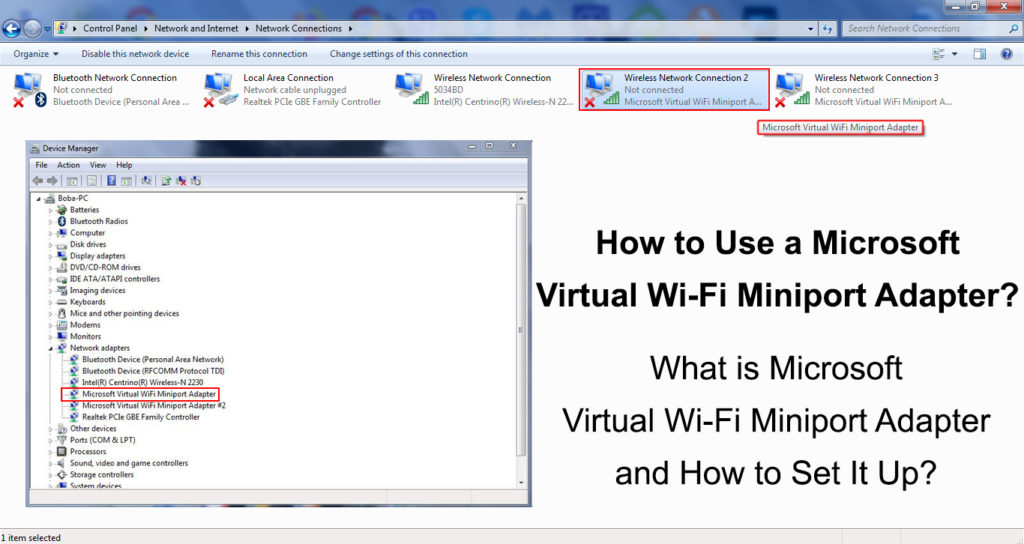
You may have recently noticed the Microsoft Virtual Wi-Fi Miniport Adapter option on your device. Wondering what it’s for? You will probably be surprised by the fact that this option has been available since 2009. More specifically, the first time this feature was available was on Windows 7.
Whether you’ve heard about this option for the first time and want some information about it, or you already know about it but don’t know how to use it, look no further – in this post you’ll find the most important information, including a detailed guide on how to use Microsoft Virtual Wi-Fi Miniport adapter.

CONTENTS
- Some Basic Facts About the Microsoft Virtual Wi-Fi Miniport Adapter
- Configuration Steps for Microsoft Virtual Wi-Fi Miniport Adapter
- What Is Microsoft Virtual Wi-Fi Miniport Adapter Used For?
- How Often is Microsoft Virtual Wi-Fi Miniport Adapter Used?
- Steps to Disable Microsoft Virtual Wi-Fi Miniport Adapter
- How to Completely Delete Microsoft Virtual Wi-Fi Miniport Adapter from Your Computer
- Conclusion
Some Basic Facts About the Microsoft Virtual Wi-Fi Miniport Adapter
The main function of the Microsoft Virtual Wi-Fi Miniport Adapter is to virtualize your network. What exactly does that mean?
Well, without the need for new hardware (new wireless adapter), this feature can provide one virtual network, as well as two different networks. This enables you to simply create a Wi-Fi hotspot on your Windows PC and allow other devices to connect to Wi-Fi.
Configuration Steps for Microsoft Virtual Wi-Fi Miniport Adapter
There are two ways of setting up the Microsoft Virtual Wi-Fi Miniport Adapter:
- Via the Command Prompt.
- Using third-party software.
Keep in mind that the third-party program is paid, and in addition, it is risky because it can introduce unwanted viruses to your device. For these reasons, we will only show you the first way. Follow the steps below:
- So let’s start. The first thing you have to do is provide a wired internet connection to your computer because if you connect your computer to Wi-Fi, you will not be able to enable Virtual Wireless Access Point.
- Your main physical network adapter’s internet connection should be shared. You need to access the Network and Sharing Center.
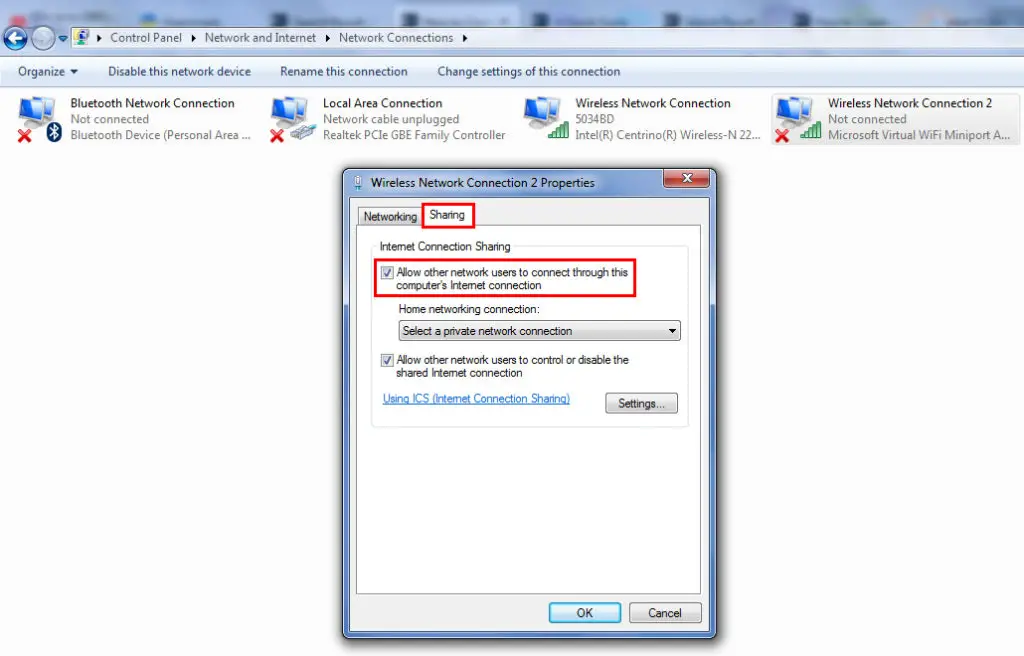
- Click on Change Adapter Settings. Then, right-click on your Virtual Wi-Fi Miniport Adapter, select Properties, and go to Sharing tab.
- Check the field Allow other network users to connect through this computer’s internet connection

- Now, find and click on the name of your Wi-Fi Miniport adapter. (It is located below the section titled “Home networking connection”)
- Launch the Command Prompt
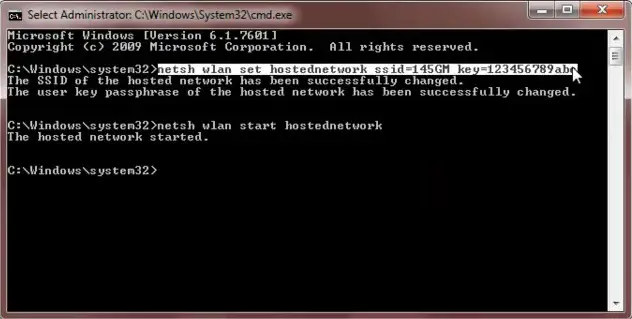
- Now, you need to create a name for your virtual Wi-Fi network and set a password for it. Enter this command into your Command Prompt: “netsh wlan set hostednetwork ssid=Virtual Network Name key=Password”.
Instead of “Virtual Network Name” type a name of your choice for your wireless network. Instead of “Password” Type the password of your choice for the network.
- After you have finished typing your network name and password, you need to type “netsh wlan start hostednetwork”

The Wireless Access Point will then be enabled and it will appear in other users’ Wi-Fi network listings.
You can always open Command Prompt and enter “netsh wlan show hostednetwork” to get information about the Wireless Access Point.
What Is Microsoft Virtual Wi-Fi Miniport Adapter Used For?
You may build a whole new virtual wireless network using a Microsoft virtual Wi-Fi Miniport adapter. If you have to expand your Wi-Fi connection, it’s extremely helpful.
In a situation when you want to extend your Wi-Fi connection, your laptop will play the role of a host, enabling Wi-Fi to other devices in the area.
How Often is Microsoft Virtual Wi-Fi Miniport Adapter Used?
You should not be surprised by the fact that many users have not even heard of this option or at least have not used it because it can only find its purpose in specific situations. For example, when you don’t have a Wi-Fi router (or if it’s broken) and you want to allow other Wi-Fi-enabled devices to connect to the internet, you can set up a computer to work as an access point.
Recommended reading:
- How to Check Wi-Fi Signal Strength on iPhone? (Explained)
- How to Connect Printer to MacBook Wirelessly (Detailed Instructions)
- How to Connect Two Computers Using Wi-Fi on Windows 10? (Connecting Computers Wirelessly)
In reality, it is unlikely that you will need this option. In case you have to use it, keep in mind that when this option is active, your computer will run a bit slower. This is probably one of the reasons why it is rarely used.
Steps to Disable Microsoft Virtual Wi-Fi Miniport Adapter
There are two ways to disable the virtual Wi-Fi Miniport Adapter. Of course, if you change your mind after disabling it, you can always re-enable it. Follow the steps below to disable the Microsoft Virtual Wi-Fi Miniport Adapter.
The First Way
- Launch the Command Line.
- Type in “netsh wlan stop hostednetwork” and hit enter.
- The last step in disabling Virtual Wi-Fi is the following: Enter “ netsh wlan set hostednetwork mode=disallow ” and hit enter on your keyboard.
The Second Way
- Open the Control Panel
- Open Device Manager.
- In the Network Controllers section, disable Virtual Wi-Fi Adapter.
After you have successfully disabled it, it won’t appear in your network connections and won’t consume any bandwidth. Also, it won’t be permitted to restart or operate in the background without your permission.
How to Completely Delete Microsoft Virtual Wi-Fi Miniport Adapter from Your Computer
Previously, we showed you how to disable the Microsoft Virtual Wi-Fi Miniport Adapter. Additionally, you can completely uninstall and delete this option from your computer. We recommend that you only do this if you are absolutely certain that you will not need it.
Follow the steps below to uninstall the Microsoft Virtual Wi-Fi Miniport Adapter:
- Lunch Command Prompt as an administrator.
- Type “net start VirtualWiFiService” and hit enter.
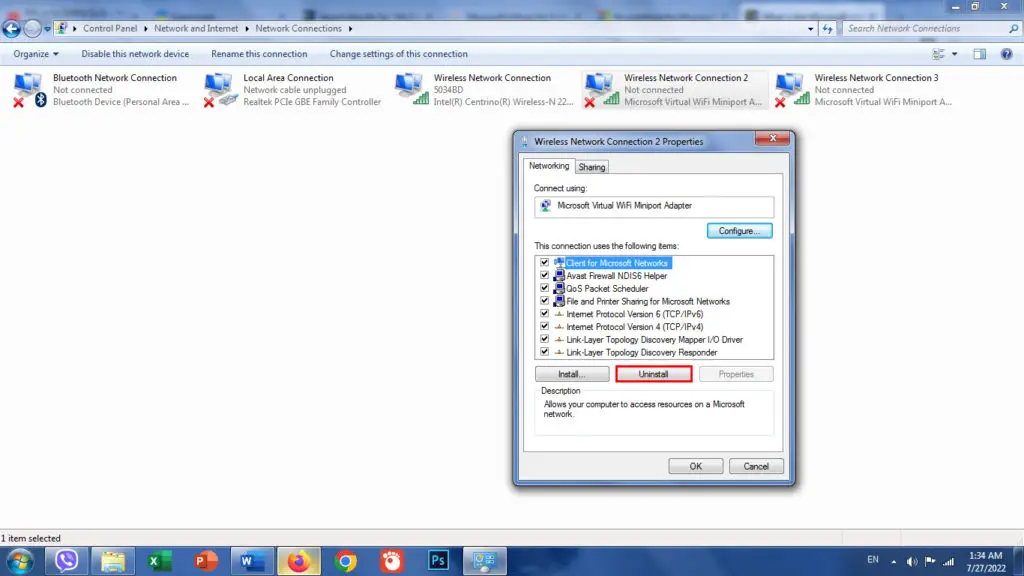
- Do the following: Launch Control Panel > Network and Sharing Center.
- Using your mouse, right-click Microsoft Virtual Wi-Fi Miniport Adapter
- From the menu that opens, choose Properties.
- Select uninstall, then take the wizard’s guidance.

- Insert ‘net stop VirtualWiFiService’ and click Enter.
- Insert ‘VirtualWiFiSvc.exe -remove’, then click Enter.
If, after uninstalling it, you want to use the Microsoft Virtual Wi-Fi Miniport Adapter again, you must download the driver directly from the official Microsoft website.
Conclusion
We hope that, after following our guide, you were able to set up Microsoft Virtual Wi-Fi Miniport Adapter or uninstall and completely delete it from your computer.
While we’re almost certain that you will not need this option, it is still necessary in some cases, so you should know how to use it and how to set it up.

Hey, I’m Jeremy Clifford. I hold a bachelor’s degree in information systems, and I’m a certified network specialist. I worked for several internet providers in LA, San Francisco, Sacramento, and Seattle over the past 21 years.
I worked as a customer service operator, field technician, network engineer, and network specialist. During my career in networking, I’ve come across numerous modems, gateways, routers, and other networking hardware. I’ve installed network equipment, fixed it, designed and administrated networks, etc.
Networking is my passion, and I’m eager to share everything I know with you. On this website, you can read my modem and router reviews, as well as various how-to guides designed to help you solve your network problems. I want to liberate you from the fear that most users feel when they have to deal with modem and router settings.
My favorite free-time activities are gaming, movie-watching, and cooking. I also enjoy fishing, although I’m not good at it. What I’m good at is annoying David when we are fishing together. Apparently, you’re not supposed to talk or laugh while fishing – it scares the fishes.
