The address from our title is one of the common default IP addresses used by several router manufacturers. In this article, you can find all the info about this address and its purpose. You will learn how to check if 192.168.0.254 is your default IP and how to use it if it is your default IP. We will also list some of the most popular devices (routers, access points, range extenders) that use this address as a default IP and show you how to set up those devices. Finally, we will discuss situations in which this address is used as a client IP address.
CONTENTS
Basic Info About IP Addresses and IP Addressing?
IP addresses are unique identifiers assigned to every device connected to every network (whether it’s your home wi-fi network, larger office network, or the internet). If a device doesn’t have an IP address, it can’t communicate with other connected devices. It can’t even connect to a network.
Every device connected to a network must have a unique IP address. You can’t have two devices on the same network with the same IP address because that causes an IP address conflict. When two devices are in conflict, they can’t be connected to the network and communicate with other devices on that network.
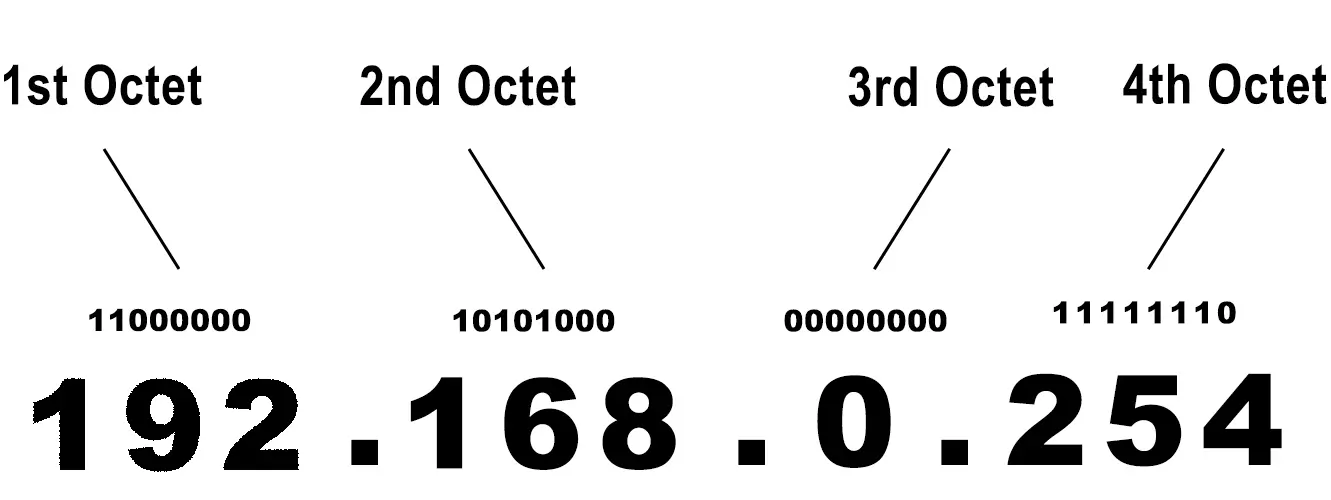
Every IP address has the same general form – it consists of 32 bits, arranged in four 8-bit segments. In case you didn’t know, bits are 1s and 0s. This is the binary form of an IP address. We can convert every binary address into decimal. Decimal form is what we perceive as an IP address. We convert them just because working with a bunch of ones and zeros is too confusing. Our routers (and other digital devices), on the other hand, handle IP addresses in binary form.
Every octet in an IP address converts to a number between 0 and 255. Zero is the smallest number you can make with eight bits (00000000) and 255 is the greatest number you can make with 8 bits (11111111). Below, you can see our address written in binary and decimal form.
All IP addresses (4.3 billion of them) are divided into 5 classes. Addresses from the first three classes are used on networks. Class A addresses are used on the largest networks, and class C addresses on the smallest networks. Class D and E addresses are not used on networks – they are used for multicast (D) or experimental purposes (E).

All the Class A, B, and C addresses can be divided into two groups – public and private. The reason for this division was the problem with the number of available IP addresses.
The thing is – the total number of addresses (4.3 billion) is much smaller than the total number of devices that can connect to the internet (10+ billion). So, you can’t have a unique address for every device and, as you already know, you must not have two devices connected to the same network (in this case, the largest network in the world) with the same IP address.
Blocks of private addresses were introduced to fix this problem. These addresses are used only on LAN networks, like your home wi-fi network. They are not routable over the internet and are not used for internet access. Only public addresses are routable online and only public addresses are used for internet access.
Recommended reading:
Every device connected to your home network has a private IP address. That address is assigned to every device by your router. Your router also has a private address (assigned to every router by the manufacturer). Your router’s address is also known as a default gateway or a default IP address. All of your devices, including your router, use these private addresses to communicate with each other. In this communication, your router is a mediator – all the communication goes through your router.
But how do your devices go online? What kind of address do they use if they can’t use their private addresses? All of your devices use only one public address to access the internet. They use the address assigned to your router, but not its private address. Your router (or your entire home network) also has a public address. While the default IP address is assigned to the router by the manufacturer, the public address is assigned by your internet provider. So, your router has two addresses – one private and one public. It uses its private IP to receive and send data to all the devices connected to your home wi-fi, and it uses its public IP address to give internet access to all of your devices.
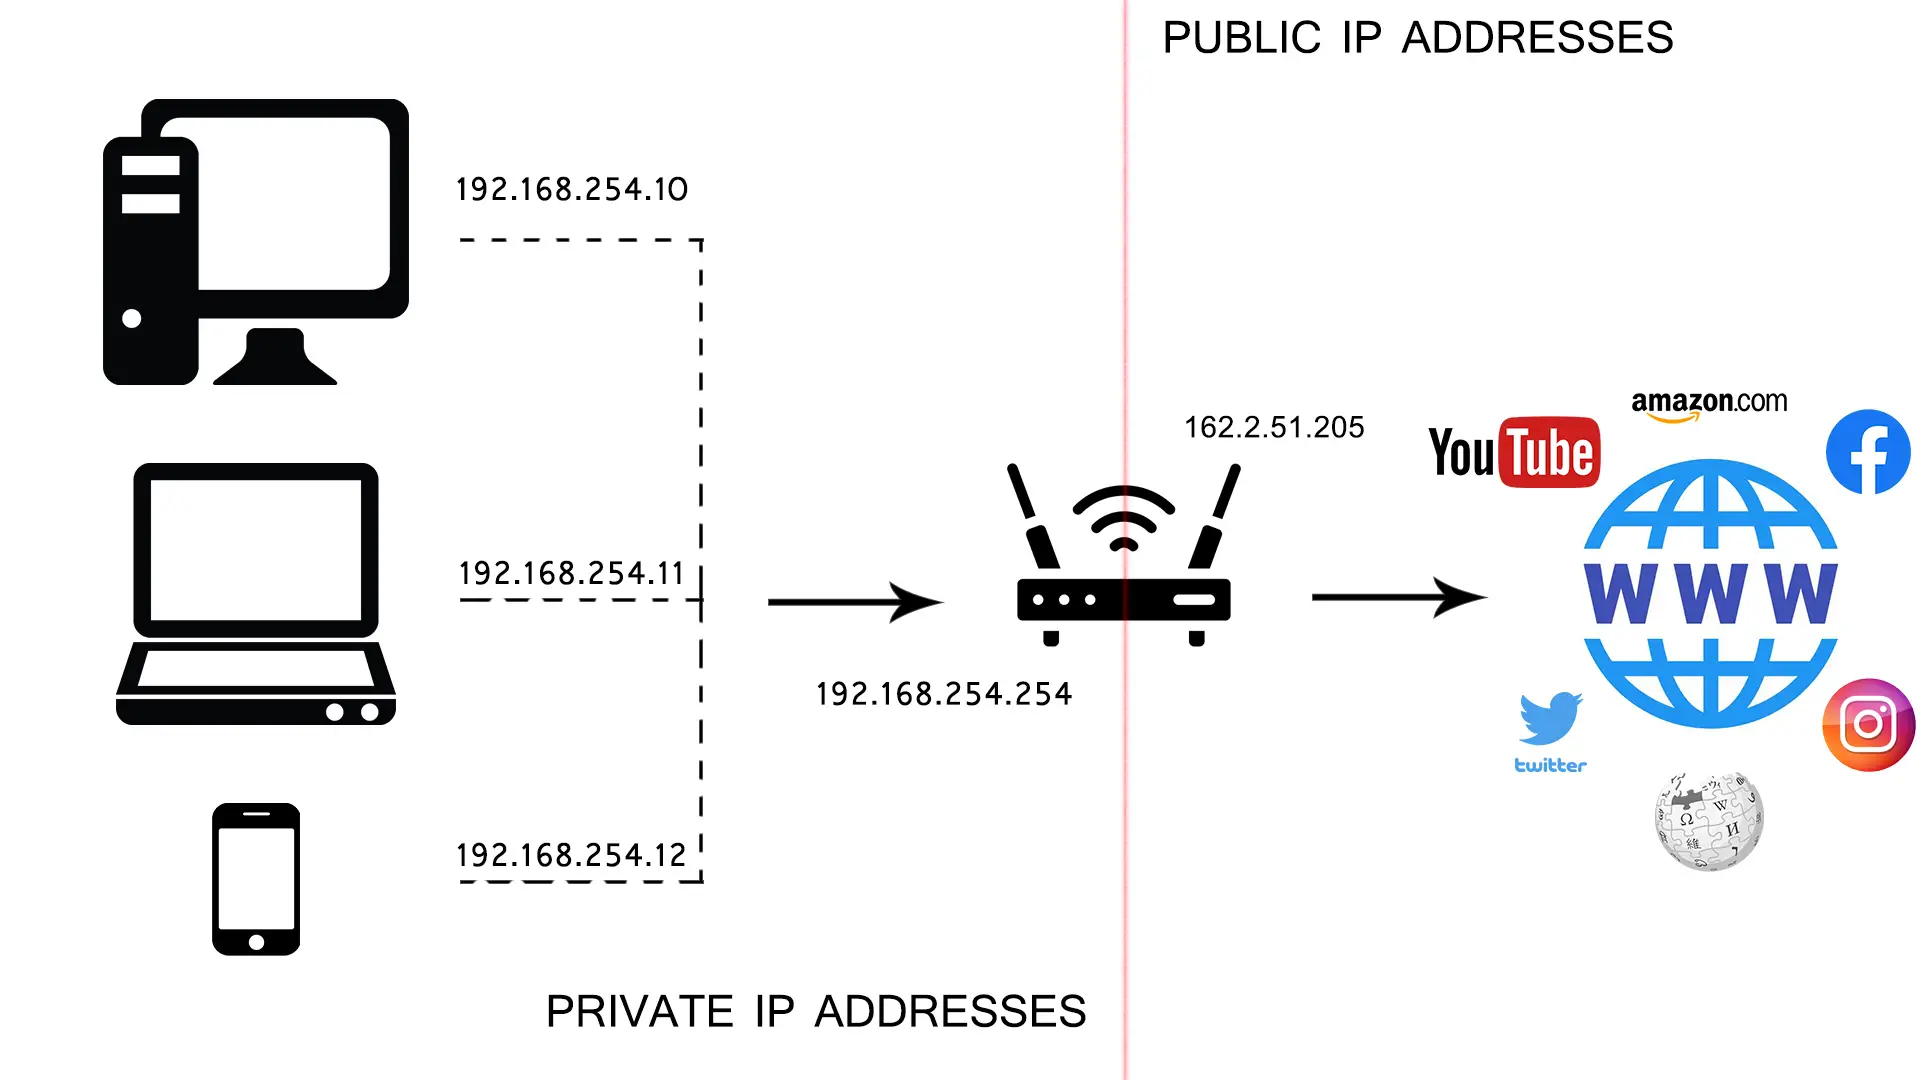
So, by introducing private addresses, we created a situation in which multiple devices connected to one LAN network can get internet access through only one public IP address. The introduction of private addresses also allowed us to use the same IP address on an unlimited number of LAN networks. We can use one address only once on one LAN network, but you can also use it on every other LAN network in the world since LAN networks are not inter-connected.
What Kind of Address is 192.168.0.254?
If you look at the table given above, you can see that 192.168.0.254 is a Class-C private IP address, just like all the addresses that start with 192.168.
As a private address, our address can only be used on LAN networks. It can either be a client IP address (your device’s IP address) or your default IP address (your router’s IP address).
Is 192.168.0.254 My Default IP? How Can I Find My Default IP?
Any private address can be a default IP. However, some addresses are simply more often used than others. Router manufacturers prefer using starting and ending addresses in a subnet because that makes it easier (or less confusing) to define and manipulate with the size of the DHCP pool.
Your router assigns IP addresses to every device connected to it, and all these addresses come from within the DCHP pool. This pool is basically a scope of addresses that your router assigns to your devices. All the addresses in the pool belong to the same subnet as the default IP. If our default IP is 192.168.0.254 (192.168.0.0/24 subnet), the pool can include all the addresses from 192.168.0.1 to 192.168.0.253.

192.168.0.254 is the ending address of the 192.168.0.0/24 subnet, and is used as a default IP by some manufacturers (primarily TP-Link). So, it could be your default IP. If you want to check if this address is your default IP, read our detailed guide on how to find your default IP.
Other popular default IPs, besides our address, are 192.168.0.1, 192.168.1.1, 192.168.1.254, 10.0.0.1, etc.
What Devices Use 192.168.0.254 as a Default IP?
This address is used by several manufacturers. The most notable manufacturer using this address as a default IP address is TP-Link. It uses it for its routers, extenders, bridges, repeaters, access points, etc. Other manufacturers that assign 192.168.0.254 to their networking devices are Tenda and TOTOLINK. We have listed below some of the devices that use this IP address as a default IP.
TP-Link: TL-WR810N v1.1 (travel router), TL-WR710N v1.0 (wireless router), TL-WA750RE v1.x (extender), TP-LINK TL-WA850RE v1.x (extender), TL-WA890EA (bridge), RE350K (range extender), TL-WA855RE (repeater), TL-WA850RE (repeater), TL-WA801ND (access point), TL-WA901ND (access point)
Tenda: W300A (access point)
TOTOLINK: EX200 (range extender)
How to Use 192.168.0.254 as a Default IP?
A default IP address is used to access your router’s configuration page. That’s the purpose of every default IP address. The first step (or rather two steps) is the same for every device, whether it’s a router, extender, repeater, or whatever.
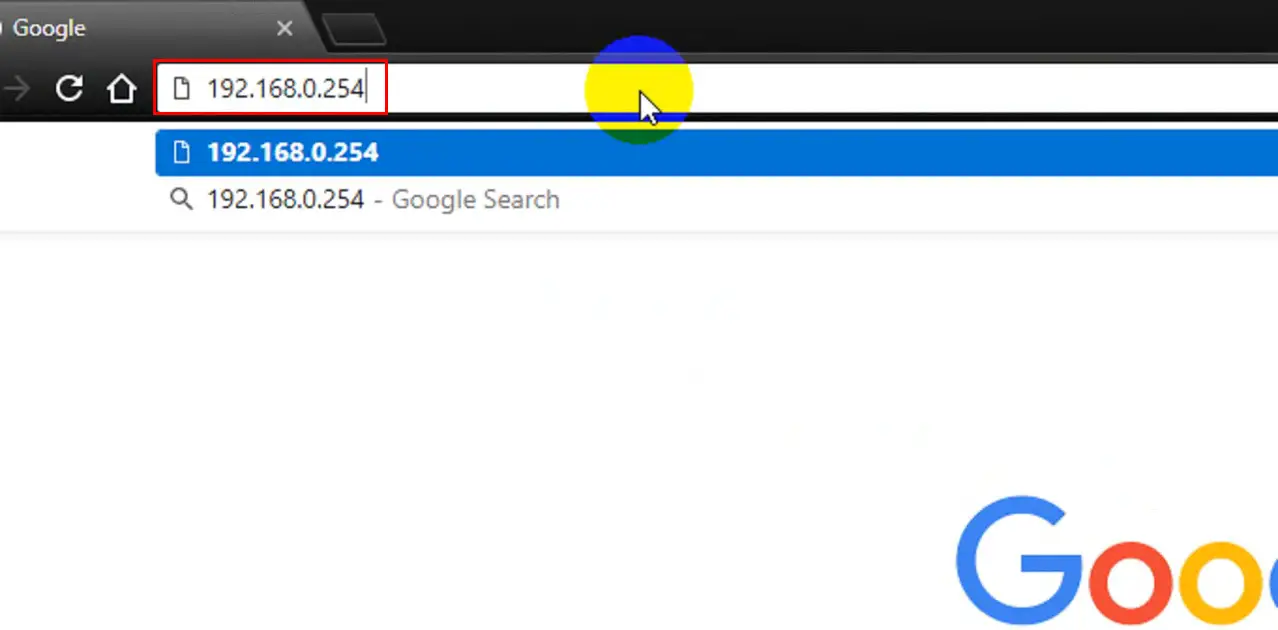
You open your browser (Mozilla, Chrome, Safari, etc.), enter your default IP address in the address bar, and hit enter.
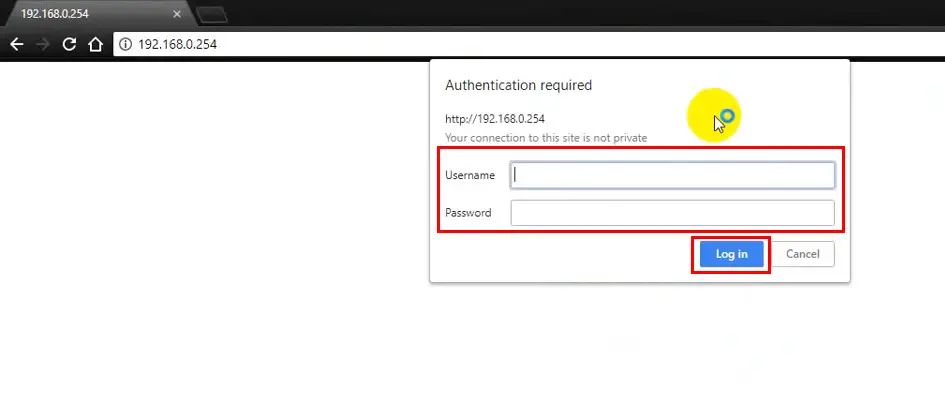
The login window will appear, and you will be asked to enter your username and password. If you’re entering the settings for the first time, you will have to enter the default credentials. The most common defaults are admin/admin,
When you finally access your settings, you can start setting up your device and adjust various settings. Below, you can find step-by-step tutorials on how to perform the initial setup for some devices that use 192.168.0.254 as a default IP. We will skip the first two steps since they are the same for every device.
How to set up TP-Link TL-WA860RE range extender
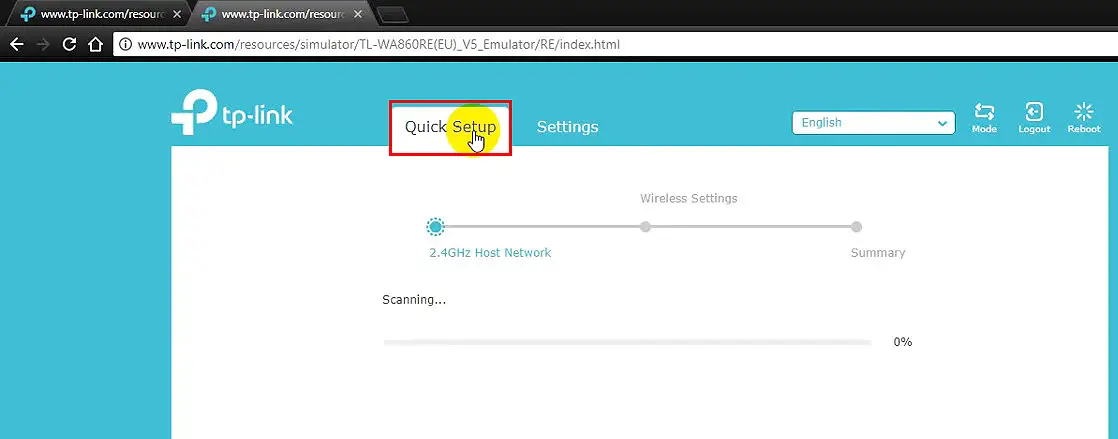
STEP 1 – When you open the settings, click on the Quick Setup, and wait for your extender to find all the available wireless signals.
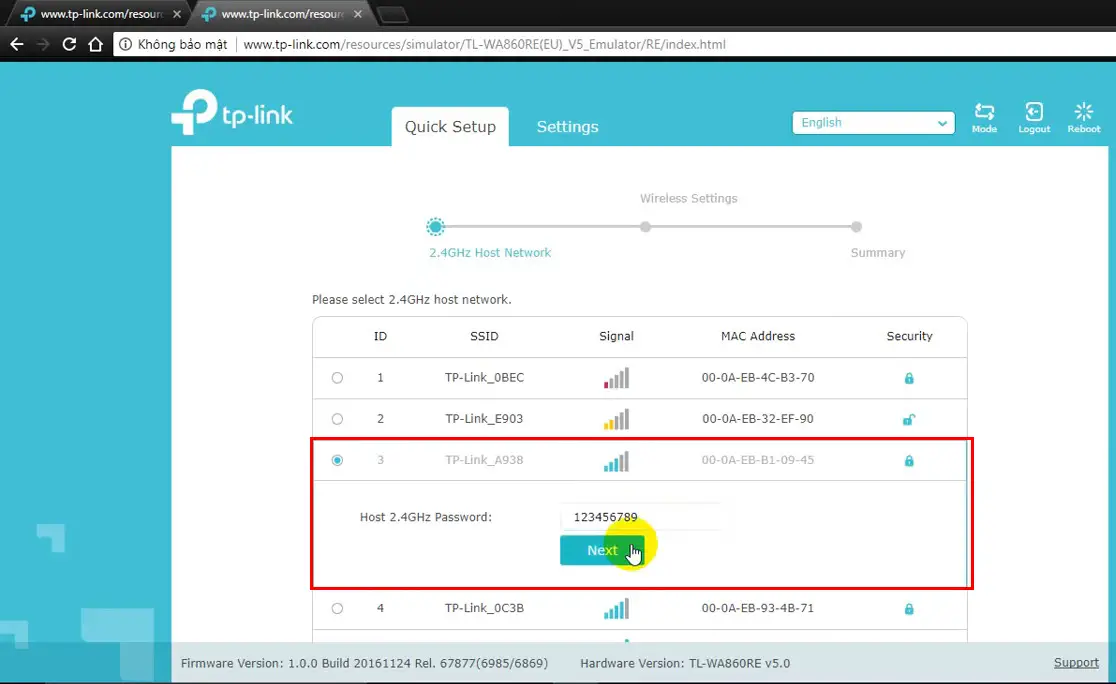
STEP 2 – Find your router, click on it, enter your wi-fi password, and click on Next
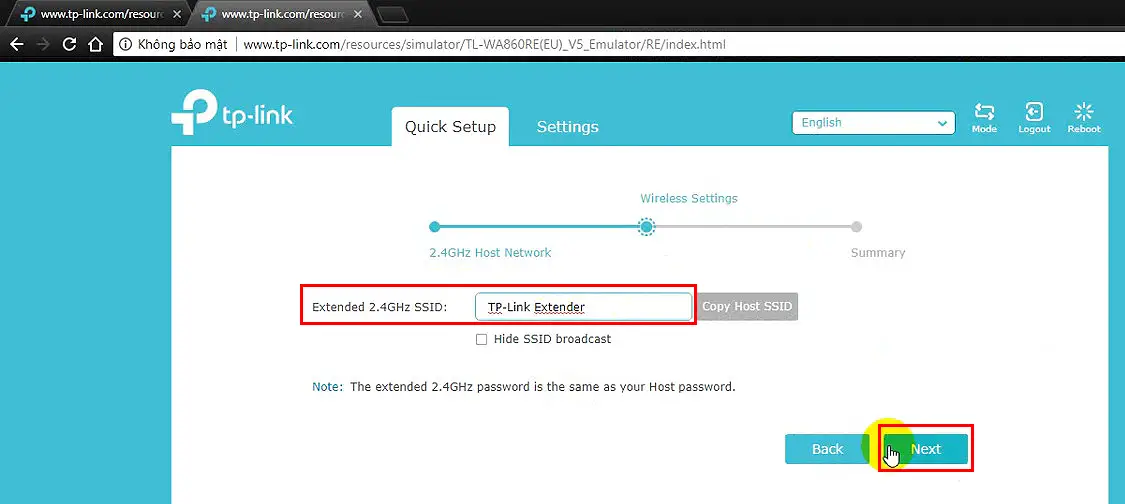
STEP 3 – Enter the network name for your extender’s network. The name can be the same as the name of your primary network, but it’s recommended to enter a different name, so you can make a difference between the two networks. Click on Next.
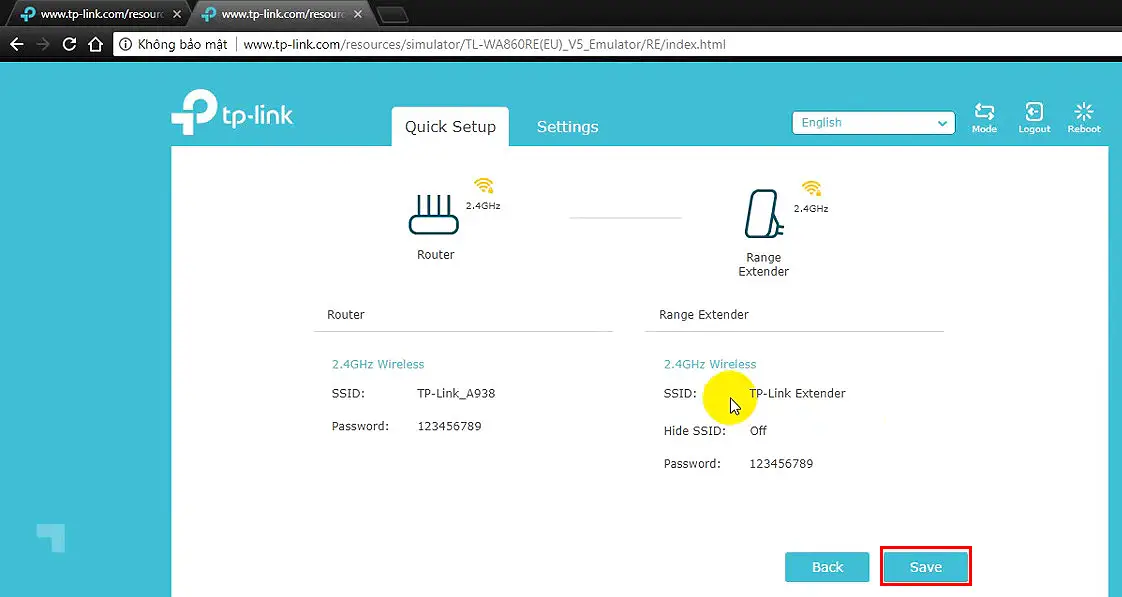
STEP 4 – We are almost there – just click on Save and wait for the extender to reboot and apply settings.
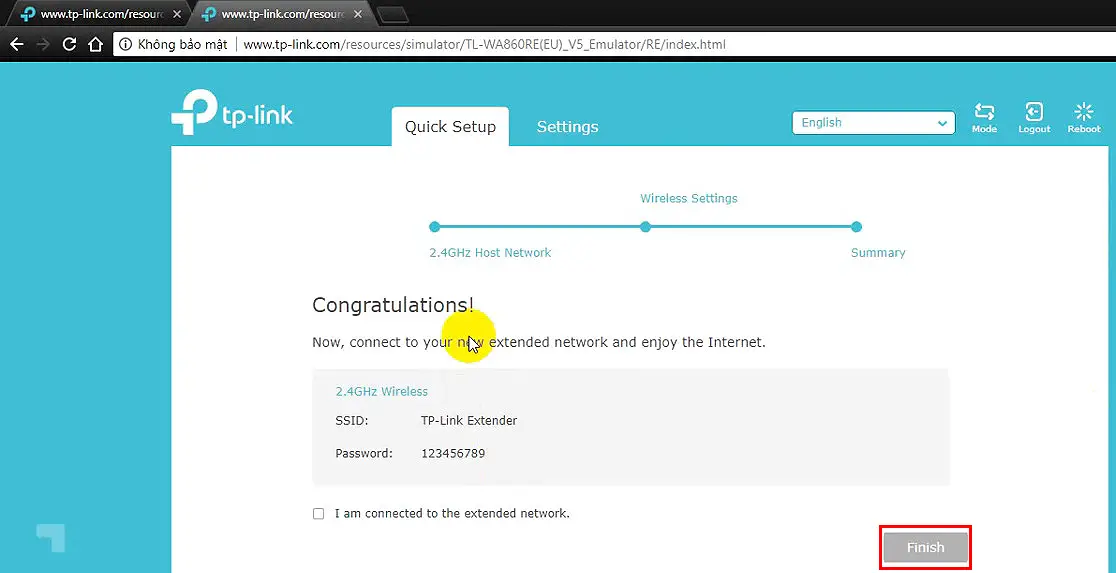
STEP 5 – You’re done. Just click Finish, and you can start using your extender
How to set up TOTOLINK EX200 range extender
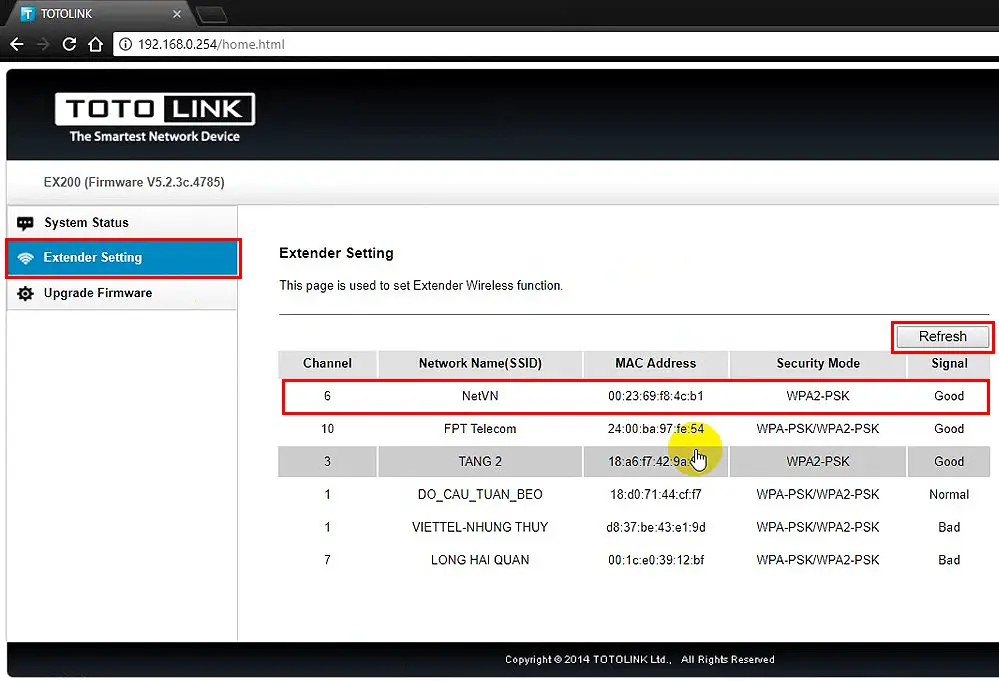
STEP 1 – When the configuration page opens, go to Extender Settings, click on Refresh to scan for networks, find your router, and click on it.
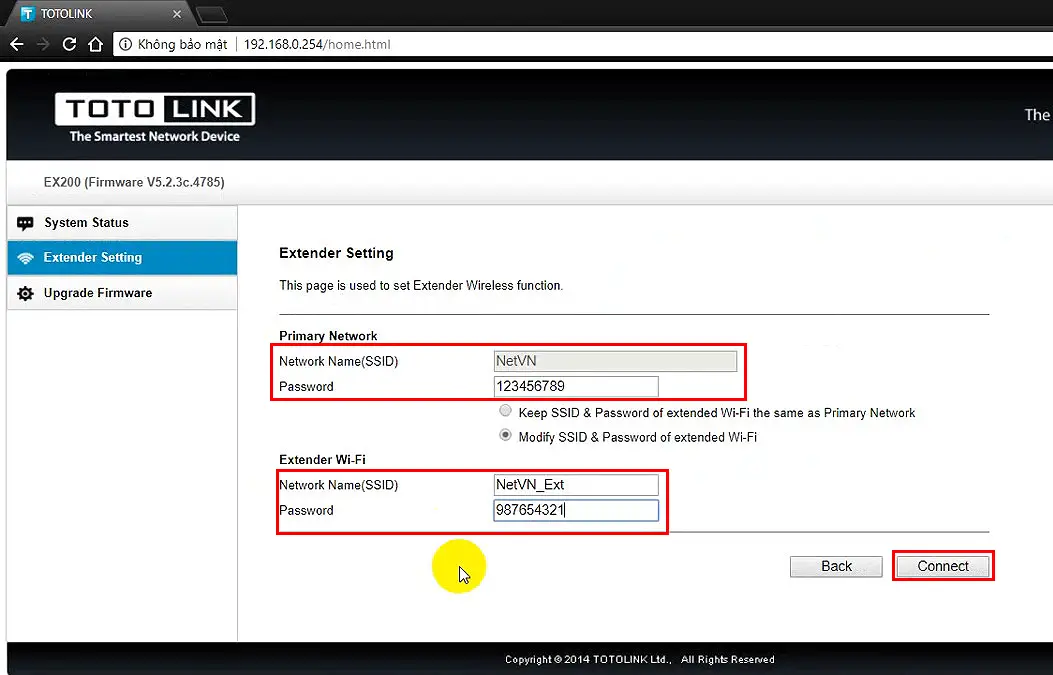
STEP 2 – Fill out all the fields – enter your wi-fi password, the name for your extender’s network, and your password for that new network. If you want, you can also keep the same SSSID and password for both networks (your router’s and your extender’s), but some people find that confusing. Click on Connect.
STEP 3 – Wait for the extender to reboot and for the changes to take effect. When the range extender reboots, you can exit the settings, and start using your extender.
How to set up TP-Link TL-WA901ND access point
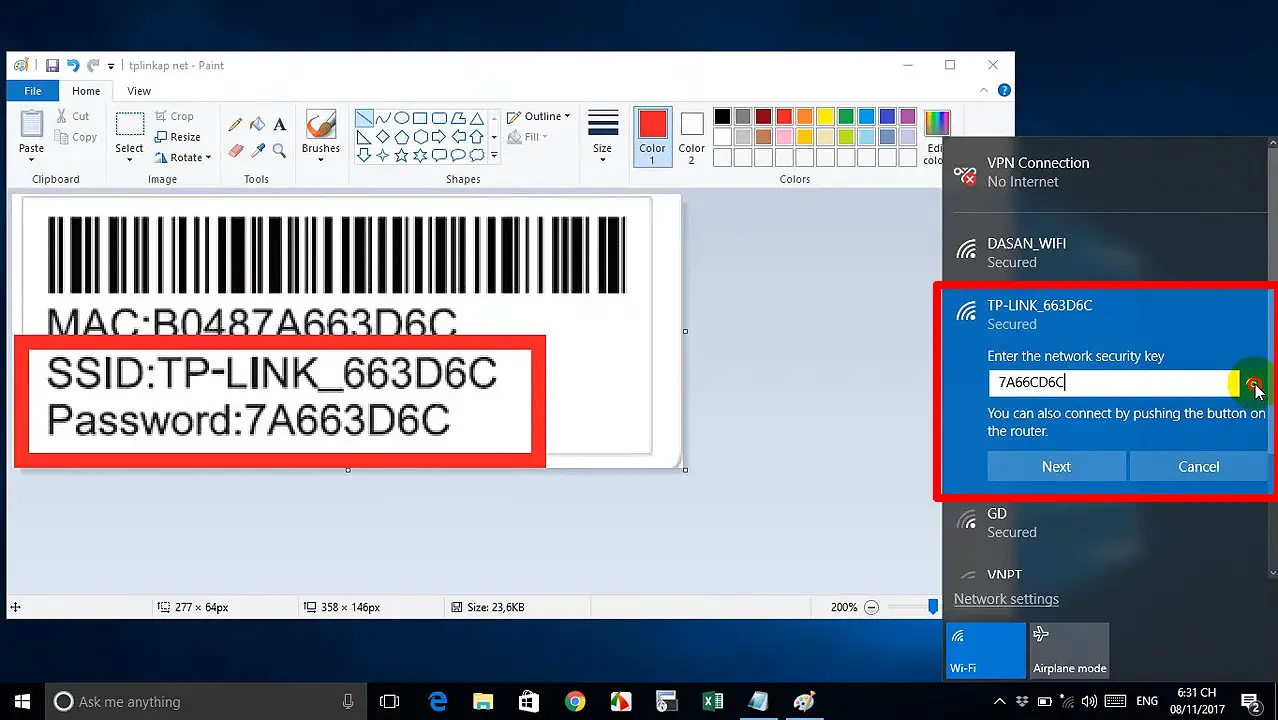
STEP 1 – Connect to your wireless access point using its default wi-fi password. Then, open your browser, type in our address, and hit enter. Finally, enter your default username and password (admin/admin).
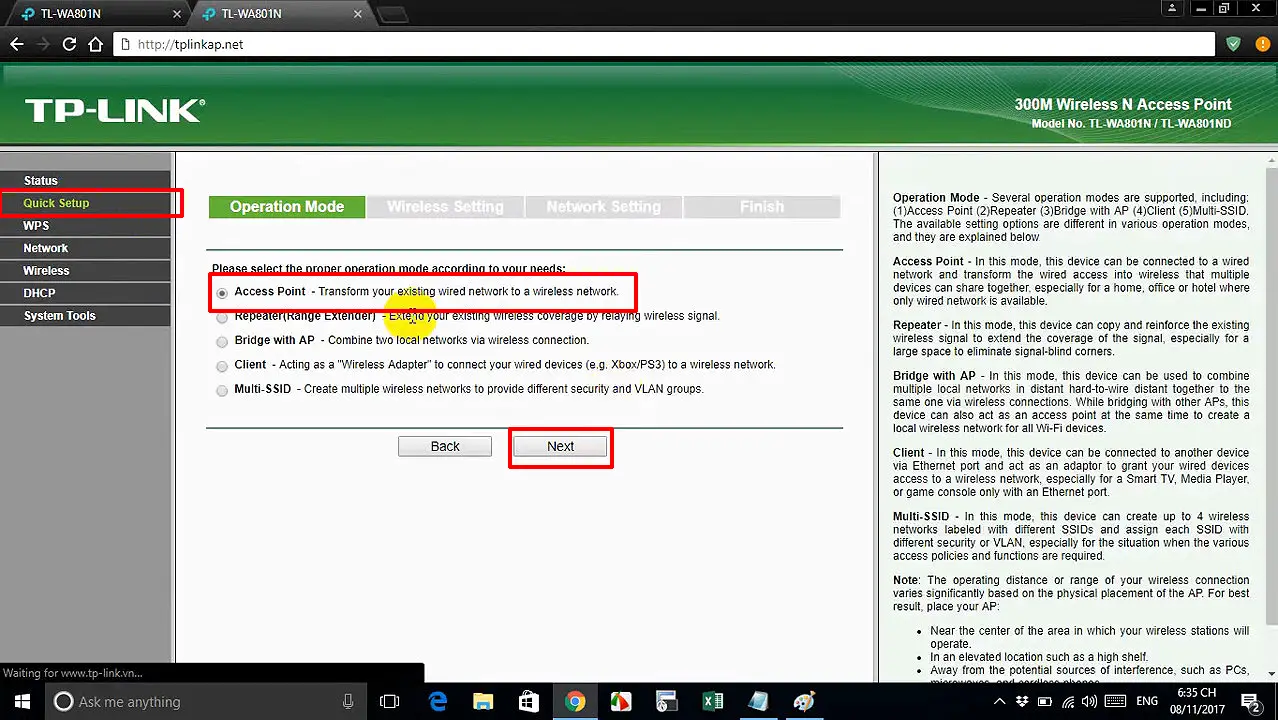
STEP 2 – When you access the settings, select Quick Setup, then choose the Operation Mode, and click on Next.
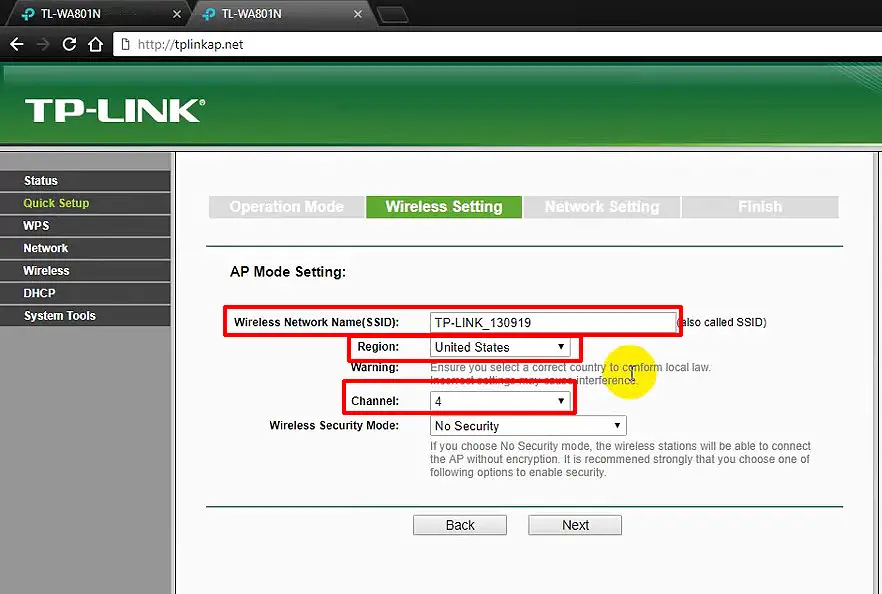
STEP 3 – Wireless Settings – enter the desired network name, your region, select channel (if you don’t have preferences, select Auto).
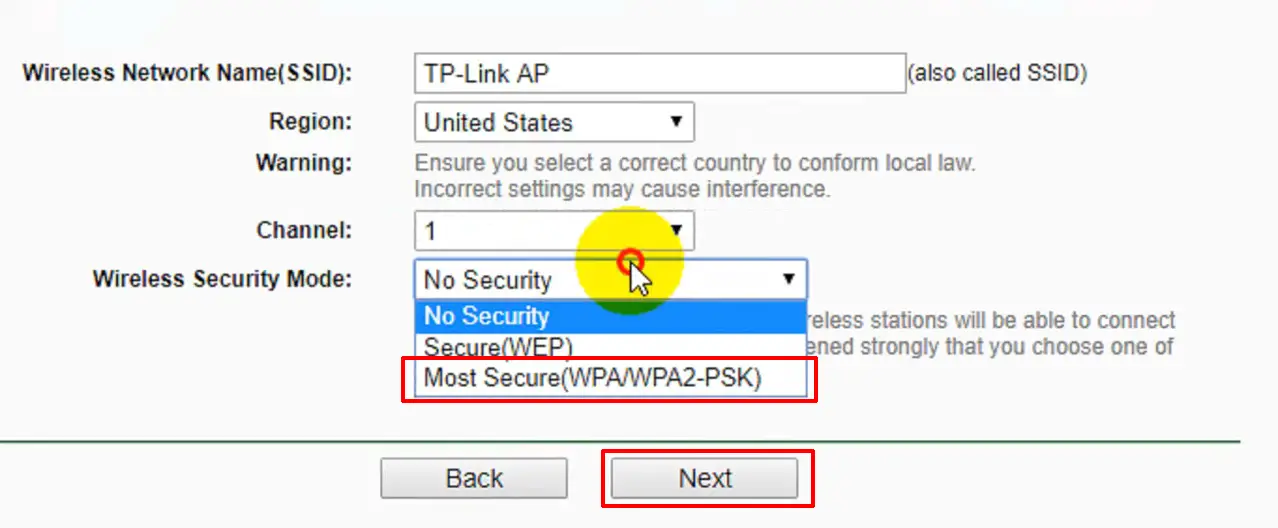
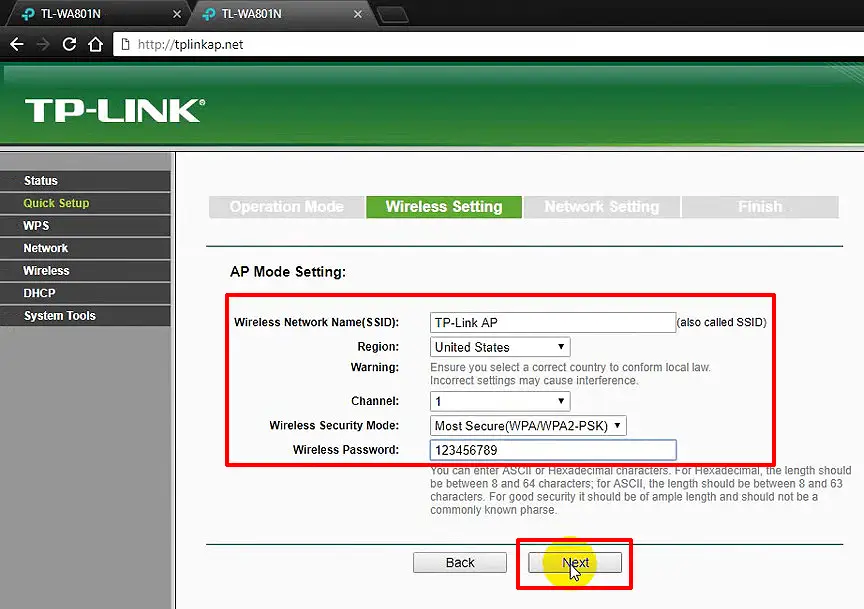
STEP 4 – Select wireless security protocol, and enter the password you want to use to connect to your access point’s wireless network. The recommended protocol is WPA/WPA2-PSK – this is the most secure protocol. Once you enter your password, click on Next.
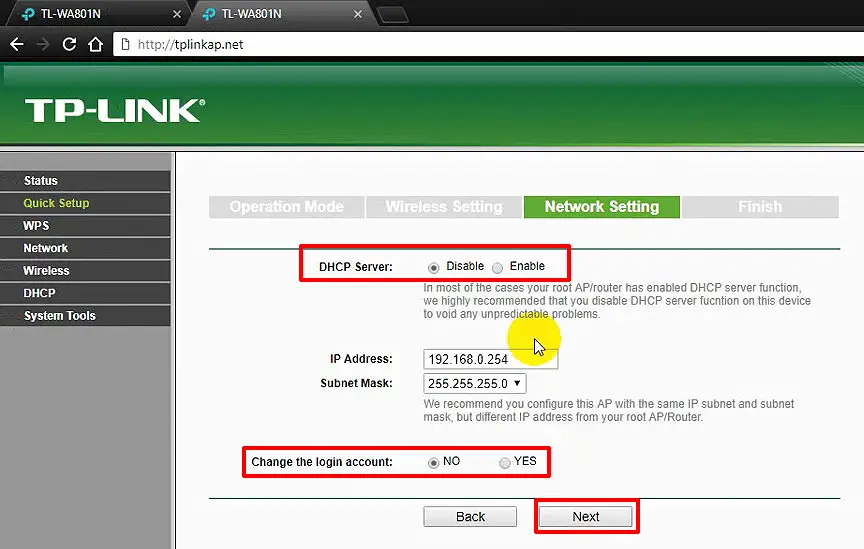
STEP 5 – Network Settings – since we are going to use TL-WA901ND in access point mode, it’s highly recommended to disable the DHCP server inside your access point and leave your router’s DHCP server in charge of address assigning. If you want, you can change your default username and password. You can even change your access point’s default IP address. Finally, click on Next.
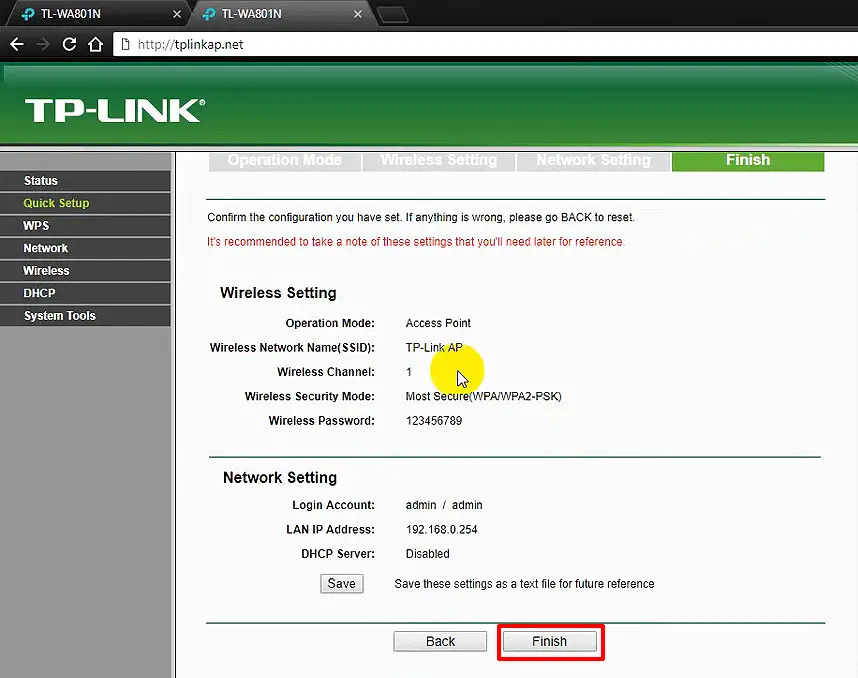
STEP 6 – We are almost there. Check all the settings and, if everything is ok, click on Finish. Wait for the access point to reboot. Once the unit reboots, you can exit the configuration panel, and connect to your access point.
Can 192.168.0.254 Be a Client IP Address?
Yes. Just like any other private IP address, 192.168.0.254 can be a client IP. If you remember our story about the DHCP pool, this address comes from the 192.168.0.0/24 subnet and can be one of the addresses inside the pool only if the router’s default IP is some other address from the same subnet. 192.168.0.1 is one of the addresses from this subnet and it happens to be one of the most common default IP addresses used by numerous routers and other devices.
So, if your default IP is 192.168.0.1, 192.168.0.254 can be one of the addresses in the pool and, consequently, can be a client IP address.
Dynamic IP
A DCHP server inside your router is programmed to automatically assign IP addresses to every device that connects to your router. This automatically assigned address is considered dynamic. This means that the assigned address doesn’t belong to that device – it’s not permanently assigned. The address is leased and will return to the pool when the lease time expires if the device is disconnected. Once it returns to the pool, the same address can be assigned to the next device that connects to your router.
Static IP
The majority of devices on every home wi-fi network do not require one address permanently assigned to them. They will work just fine and will be able to connect to your home wi-fi using dynamic IP addresses.
However, there are some devices (like servers and printers) that must have a permanently assigned IP address (aka static IP address). Static IP addresses must be assigned manually by the network administrator. You can set a static IP in two ways – you can use your device’s IP settings or you can go to your router’s settings and make a DHCP reservation (static lease).
How to assign a static IP address to your printer using your printer’s settings
Note: When assigning static IP through your device’s settings, you should use the address from the same subnet as the default IP, but the address should be outside the DHCP pool.
How to assign a static IP address to your device using DHCP reservation
https://www.youtube.com/watch?v=Relney5cNYY
Note: When assigning static IP through a DHCP reservation, you should use one of the addresses from within the DHCP pool.

Hey, I’m Jeremy Clifford. I hold a bachelor’s degree in information systems, and I’m a certified network specialist. I worked for several internet providers in LA, San Francisco, Sacramento, and Seattle over the past 21 years.
I worked as a customer service operator, field technician, network engineer, and network specialist. During my career in networking, I’ve come across numerous modems, gateways, routers, and other networking hardware. I’ve installed network equipment, fixed it, designed and administrated networks, etc.
Networking is my passion, and I’m eager to share everything I know with you. On this website, you can read my modem and router reviews, as well as various how-to guides designed to help you solve your network problems. I want to liberate you from the fear that most users feel when they have to deal with modem and router settings.
My favorite free-time activities are gaming, movie-watching, and cooking. I also enjoy fishing, although I’m not good at it. What I’m good at is annoying David when we are fishing together. Apparently, you’re not supposed to talk or laugh while fishing – it scares the fishes.
