We all know how important IPv6 is for the present and the future of the internet. IPv4 is running out of addresses, and we need to switch to IPv6 as soon as possible. Huge efforts are being put in worldwide to push this transition forward, but we are not all the way there…yet. However, this shouldn’t stop you from preparing and enabling IPv6 on your router if possible. Before you work on your router, contact your ISP (Internet Service Provider) and check if they support IPv6. If they do, and you have a moderately modern Wi-Fi router, this should be fairly straightforward.
Every router setup journey starts with an admin panel.
CONTENTS
ADMIN PANEL LOGIN
If you’ve set up your router, you should know where to go and what to do. Just in case you haven’t, let’s go through the steps.
To access the admin panel, you’ll need your router’s IP address, as well as the administrator username and password.
Recommended reading:
- TP-Link Router Login and Basic Configuration
- Virgin Media Router Login: An Easy Way to Access and Secure Your Router
- iBall Baton Login: How to access and secure your network
- D-Link Router Login: The First Step In Configuring The Router
- Cisco Router Login and Basic Security Tweaks
If someone else did this for you, contact that person/company to give you the information or look through the papers they gave you after they’ve set up your router. Finding a router’s IP address is easy. Just type “cmd” into the search bar next to the Windows logo on the bottom of your desktop and open Command Prompt. Then type in ipconfig and press Enter. The router’s IP address will be under “Default gateway”, and it is usually something like 192.168.1.1 or some variation on the last two sets of numbers. Once you have the IP address, open any internet browser you are using and type them into the address bar. This will open the login screen where you need to type in the administrator username and password in order to proceed.
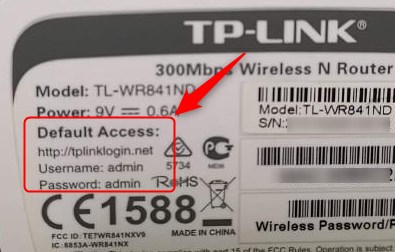
Default administrator username and password are usually printed on the sticker at the back end of the router. However, most people and installers change them for security reasons. If you haven’t, use them to log in. Otherwise, try to figure out who or where can help you get them. If you can’t get to the admin username and password, you’ll have to reset the router to the factory settings and go through the entire setup process all over again.

Ok. Let’s assume you found the login data, and you opened the admin panel. Now what?
Well, this depends on the make and model of the router. With some brands, you’ll need to check the box or click a button labelled “enable IPv6” and nothing else. With some other, you’ll have to do many tweaks to the settings.
In this article, we will use the TP-LINK Admin panel as an example and try to cover as many variants you can come across as possible.
You can have three basic types of connections with your internet service provider – static IP address, dynamic IP address, and PPPoE. If you are not sure what you have, contact your ISP and find out. Also, if you are using static IP or PPPoE, ask for connection details.
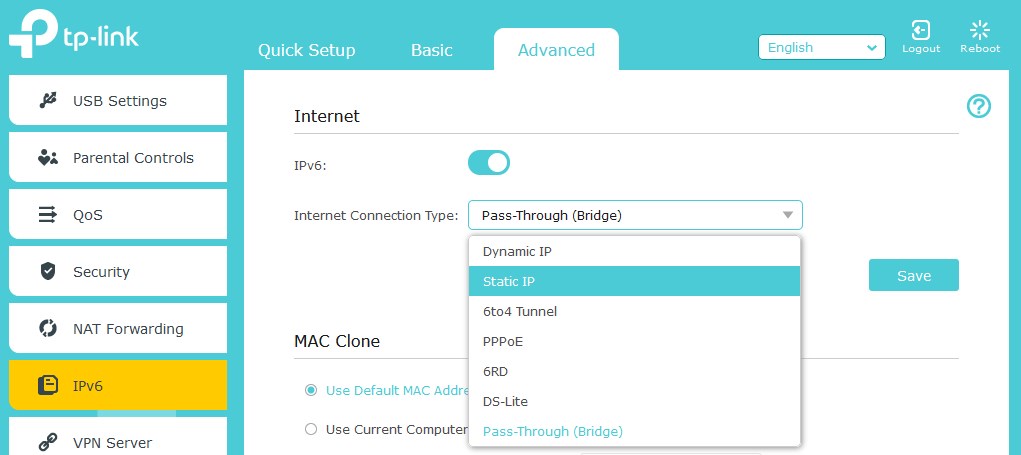
Once you’re in the admin panel (or web-based router interface as TP-LINK calls it), go to the Advanced -> IPv6.
SETUP IPv6 With Static IP Connection
Flip the toggle to enable IPv6 and select the “static IP” from the dropdown box below.

You will be required to fill in the information provided by your ISP.
IPv6 address, Default Gateway and Primary DNS. Once you enter them, click SAVE.
Setup IPv6 With Dynamic IP Connection
If you are connected using dynamic IP, you’re in luck. In most cases, all you have to do is select this option from dropdown box (Dynamic SLAAC/DHCPv6) and click SAVE. If your ISP needs you to fill in additional information, click on “advanced”, fill in the info and then click SAVE.then click RENEW
Setup IPv6 With PPPoE Connection
In case your connection is PPPoE (Point-to-Point Protocol over Ethernet), you will be provided with the username and password. Select the PPPoE from dropbox. If your ISP uses separate accounts for IPv6, you will need to uncheck the box “Use the same session with IPv4 connection” and enter the other set of information for the IPv6. If not, click SAVE, then click CONNECT.
Setup 6to4 Tunnel
If your ISP told you 6to4 tunnel is the type of connection you need, select it from the drop down menu. Additional information can be filled in through the Advanced button. When you are done with entering the information, click on SAVE then on CONNECT.
Setup Pass-Through (Bridge)
Flip the Toggle switch to enable IPv6, then select “pass-through (bridge)” from the drop-down menu. Click SAVE.
Now go to the LAN settings and, if you are a Windows user, check the DHCPv6 or SLAAC+ stateless DHCP box and fill in the Address prefix as provided by your ISP. Click SAVE
Go to the Status and see if everything looks alright.
Since the transition from IPv4 to IPv6 is still in progress, ISPs usually provide IPv6 in a “dual stack” configuration. It essentially means that they will provide both IPv4 and IPv6 addresses simultaneously if you have IPv6 enabled – great. If not, you’ll still get an IPv4 address so you can do your business as usual. This way, all the sites will be supported until the transition is final. Neat, ha?
Summary
As we are getting further and further down the transition from IPv4 to IPv6, it may be a good time to turn on IPv6 on your router. First, check if your IPS supports the IPv6, then do the same for the router. If both support the new protocol, go to the admin panel by entering the router’s IP address into the address bar of your internet browser. Use administrator username and password to log in.
Depending on your router’s make and model, it can be just a matter of clicking on a single button or, in the case of TP-LINK, enabling the IPv6 through the toggle switch, selecting the type of connection you have and filling up the information given by the ISP. Save the changes and renew the address or reconnect if required. Do the same for LAN settings. Save changes and check the status. If everything looks fine, exit the admin panel and enjoy the fact that you made your step through the IPv4 to IPv6 transition.

Hey, I’m David. I’ve been working as a wireless network engineer and a network administrator for 15 years. During my studies, I also worked as an ISP field technician – that’s when I met Jeremy.
I hold a bachelor’s degree in network engineering and a master’s degree in computer science and engineering. I’m also a Cisco-certified service provider.
In my professional career, I worked for router/modem manufacturers and internet providers. I like to think that I’m good at explaining network-related issues in simple terms. That’s exactly what I’m doing on this website – I’m making simple and easy-to-follow guides on how to install, set up, and troubleshoot your networking hardware. I also review new network equipment – modems, gateways, switches, routers, extenders, mesh systems, cables, etc.
My goal is to help regular users with their everyday network issues, educate them, and make them less scared of their equipment. In my articles, you can find tips on what to look for when buying new networking hardware, and how to adjust your network settings to get the most out of your wi-fi.
Since my work is closely related to computers, servers, and other network equipment, I like to spend most of my spare time outdoors. When I want to blow off some steam, I like to ride my bike. I also love hiking and swimming. When I need to calm down and clear my mind, my go-to activity is fishing.
