CONTENTS
Brief Outline
Configuring and managing your router and wireless home network is pretty easy. However, all the configuration is being done from the router’s admin panel and in order to access it you need to know the Wavlink router login steps.
The following article will show you how to login to your Wavlink router using its default IP address and the default username and password.
IMPORTANT: If you have changed the default login details before, you will need to use the new ones to access your router settings.
What You Need:
- Wavlink router
- Network access over WiFi or the network cable
- The Default Wavlink router login details (IP, username and password)
- Smartphone, tablet or PC
Do You Need To Know The Wavlink Router Login Steps?
Well, in most cases users don’t bother with the Wavlink router login and setup. The tech guy comes and installs the router and that’s it. You use the internet and have no problems, right?
But, the problem arises when your home network gets compromised and someone gains access without your authorization. That person can easily access your private files and data shared in the network, and also mess up with your router settings and even block you from your own network. Of course, there are much more serious and even illegal things that someone can do, but we won’t focus on that in this article.
Because of this possibility, it is recommended to learn how to login to your Wavlink router and at least apply some of the basic security steps like:
- changing the default router admin password (this will prevent anyone from accessing the router settings)
- changing the default network name and wireless password or setting up a new one
It is pretty easy to do these changes but first let’s see how to login to the Wavlink router.
NOTE: Some images may be different depending on the router model you are using.
Wavlink Router Login [Explained]
Follow these steps to access your Wavlink router settings. We are pretty sure that you will access the admin dashboard in a minute or two.
STEP 1: Connect To The Network
Only devices that are part of the network can access the router settings. Other devices that are not connected to the network won’t be able to do it.
So, take your device (PC, tablet or smartphone) and either connect to the network over WiFi using your wireless password, or connect your PC to the router using an Ethernet cable. This is the first step you have to take and without it the login process will fail.
STEP 2: Launch A Browser On Your Device
The Wavlink router settings can be accessed using a browser. So, launch the one installed on your device. It doesn’t matter whether it is Google Chrome, Opera, Mozilla Firefox or any other.
STEP 3: Enter The Wavlink Router IP In The URL Bar

Wavlink uses the following login IP/URL as a default one 192.168.10.1 or http://wifi.wavlink.com.
When you enter one of these, the Wavlink router login windows should open. In case the login page doesn’t open, check whether 192.168.10.1 is the default router IP. Here is how you can do it properly: Find the Default Router IP: A Step-by-Step Guide
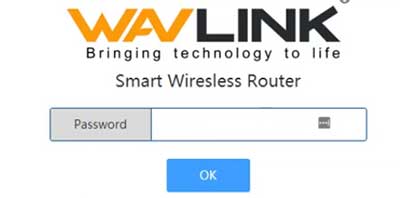
STEP 4: Enter The Wavlink Login Details
Wavlink uses the following default username and password to grant you access to the router settings.
- Default Username: admin
- Default Password: admin
If you haven’t changed these before, use the default ones. Otherwise, use the custom ones you have created. When you enter these details, click OK.
Note: Some Wavlink routers will only ask for a password.

STEP 5: Now You Can Manage Your Wavlink Router Settings
If the login details were correct you will see the Wavlink router admin dashboard. The settings are well organized in different categories, so all you need to do is to search a little and find what you need to customize.
However, in case the Wavlink router admin dashboard doesn’t appear and you get a wrong username/password error, try finding the custom ones if you have written them somewhere, or reset the router to factory settings and then login with the default login details.
Please note that all the changes are being deleted during the factory reset process and you will need to set up the router from the beginning after that.
How To Secure Your Wavlink Router (Basic Level)
The following changes are pretty basic but can drastically boost your router and home network security.
Change The Wavlink Router Admin Password
Changing the router admin password on your Wavlink router will prevent someone already connected to your network to access the router settings.
To change the admin password, you need to login to your Wavlink router first.

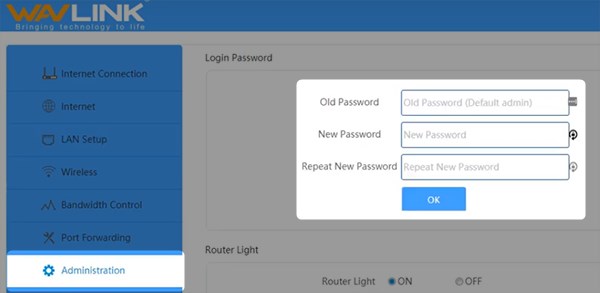
From the menu on the left select Administration.
Now on the right you will see the requested fields that have to be completed.
In the Old Password field enter the old admin password – admin.
In the New Password field enter your new password and then type it again in the Repeat New Password field.
Click OK to save the changes and a message will appear saying Success! Please log in with your new password.
Then you will be logged off when you click on the OK button, so login back in with the new admin username and password.
Change The Wavlink Router Network Name And WiFi Password
As explained above, login to your Wavlink router.
Then select Wireless from the menu on the left.

In the new page you will see the WiFi Name and WiFi Password fields. Enter the new ones there and click the blue OK button to save the changes.
Now you need to connect your wireless devices to the new network name using the new password.
Final Words
As you can see, the Wavlink router login steps are pretty easy to follow. If you have logged in successfully, please take some time and secure your router and the network with a new router password and a strong and unique WiFi password. It will save you from possible problems if anyone enters your network without your permission and messes it up. Applying these changes will definitely last shorter than setting the network from scratch.

Hey, I’m David. I’ve been working as a wireless network engineer and a network administrator for 15 years. During my studies, I also worked as an ISP field technician – that’s when I met Jeremy.
I hold a bachelor’s degree in network engineering and a master’s degree in computer science and engineering. I’m also a Cisco-certified service provider.
In my professional career, I worked for router/modem manufacturers and internet providers. I like to think that I’m good at explaining network-related issues in simple terms. That’s exactly what I’m doing on this website – I’m making simple and easy-to-follow guides on how to install, set up, and troubleshoot your networking hardware. I also review new network equipment – modems, gateways, switches, routers, extenders, mesh systems, cables, etc.
My goal is to help regular users with their everyday network issues, educate them, and make them less scared of their equipment. In my articles, you can find tips on what to look for when buying new networking hardware, and how to adjust your network settings to get the most out of your wi-fi.
Since my work is closely related to computers, servers, and other network equipment, I like to spend most of my spare time outdoors. When I want to blow off some steam, I like to ride my bike. I also love hiking and swimming. When I need to calm down and clear my mind, my go-to activity is fishing.
