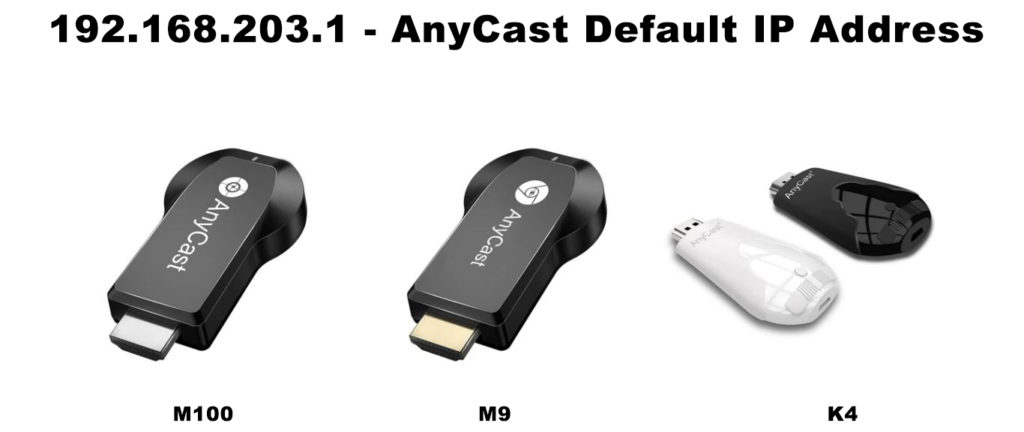
AnyCast is one of the most popular alternatives to Google Chromecast. Its default IP address is the address from our title – 192.168.203.1. To set up this handy little device, you need to use this address. In case you don’t know how to set it up, read this guide and you’ll learn everything there’s to know about AnyCast setup and about IP addresses in general.
CONTENTS
Terminology and Theoretical Framework
If you really want to know more about IP addresses (how to handle them, why are they important, etc.) the following few subchapters are for you.
If you’re just looking for the information about AnyCast setup and the specific address from our title (192.168.203.1), scroll down and check out our guide.
What Are IP Addresses Used For?
IP addresses are used for the identification of devices on a network. Any device connected to any network must have an IP address and that address must be unique – you cannot have two devices connected to the same network with the same IP address. That situation is called an IP conflict and, when it occurs, the devices with the same IP address will either be disconnected or will not be able to communicate (send/receive data) with other devices.
IP addresses are like street addresses or phone numbers. If we want to receive phone calls or mail, we need a unique phone number or street address. If they are not unique, there will be problems. Just like with IP addresses.
IP Protocols – The Form of an IP Address
IP protocols define rules of IP addressing and the basic form of an IP address. IPv4 is the protocol that we use today. There’s also the IPv6 protocol, which is yet to be implemented. This one is designed for future purposes.
All the IP addresses that we use today are IPv4 addresses, and they all look the same as the address from the tile – 192.168.203.1. So, you have four numbers and dots between them. That’s the decimal form of an IP address. Any of those four numbers can be a number between 0 and 255. Why? You’ll find out in a minute.
Besides decimal, there’s also the binary form of an IP address. This one is actually more important, at least for all digital devices. An IP address in binary form consists of 32 bits (1s and 0s). That large string of bits is divided into four parts called octets. Each octet consists of 8 bits.

Every IP address can be converted from binary to decimal form (and vice versa). In other words, each octet can be converted into a number. The lowest number you can make with 8 bits is zero (eight zeros), and the lowest number is 255 (eight ones). Any other combination of eight 1s and 0s is a number between 0 and 255. That’s why every IP address in decimal form consists of 4 numbers, each ranging between 0 and 255.
The total number of combinations of 32 ones and zeros (the total number of IPv4 addresses) is 232. That’s close to 4.3 billion IPv4 addresses. This is definitely a huge number, but it’s still not enough for all devices with internet connectivity in the world.
At the moment, you have more than 10 billion devices that can connect to the internet and just 4.3 billion addresses. So, you can’t give (permanently) a unique IPv4 address to every device in the world. We simply don’t have enough IPv4 addresses for that. As you already know, every device must have a unique address when connected to a network. So, without introducing some kind of fix, using the IPv4 protocol would be impossible. The fix was simple and elegant, and we will talk about it in a few minutes.
Classification of IP Addresses
All 4.3 billion IPv4 addresses are divided into 5 classes. The first three classes (A, B, and C) are used on networks.
Class A addresses are used on large networks with more than a million clients per network (up to 127 networks). Class B addresses are used on smaller networks with more than 65,000 clients per network. Class C addresses are used on the smallest networks with only 254 clients per network.

IP addresses that belong to groups D and E are not used on networks. Class D IP addresses are used for multicast. Class E is reserved for experimental purposes.
Dedicated Blocks of Private IP Addresses
Remember that problem with IPv4 addresses we’ve talked about? Well, the solution we’ve mentioned was the introduction of dedicated blocks of private IP addresses. All the other addresses are public IP addresses.
The difference between public and private addresses is simple. Private addresses are used only on LAN networks and are not routable over the internet. They are practically not used for internet access. Public addresses, on the other hand, are used for internet access and are routable over the internet.
There are three blocks of private addresses, one within class A (10.x.x.x), one within Class B (172.16.0.0 – 172.31.255.255), and one within Class C (192.168.x.x).

The best example of a LAN network, especially for understanding the difference between public and private networks, is your home network. Every device on your home network has a private IP address (every PC, phone, every IP camera, every router, every range extender, etc.). All these devices use private addresses for communication with other devices on the same network. They don’t use these addresses to connect to the internet. At least not directly.
How Do We Connect to The Internet?
Your home network is, again, the best way to explain the purpose of public and private addresses, and the whole process of connecting to the internet.
The heart of your home network is your router. That’s where all the magic happens. Your router has a private IP address. The address assigned to your router is called the default IP address (or the default gateway). It is assigned by the router manufacturer.
Your router gives a unique private IP address to every device that connects to your home network. These addresses come from the so-called DHCP pool, which is a range of addresses that your router holds and leases to devices. All the addresses in the DHCP pool belong to the same subnet as the default address. This means that the first three numbers are the same for every IP address on your network.

Your devices will use these private IP addresses to communicate with the router and with other devices on the same network. But how do your devices connect to the internet?
Besides the default IP address (which is a private address), your router also has a public IP address. Your internet provider assigns this address to your router (and to your home network). When you try to open an app or visit a website on your PC or any other device, the request for internet access is sent from your PC to your router. For this communication, the PC and router use private addresses. When the router receives the request, it uses its public address to find the information you requested and, when it gets it, it sends it to your PC.
So, all devices connected to your network access the internet through your router. In other words, they all use just one public address. That’s how the problem with the insufficient number of IPv4 addresses was solved.
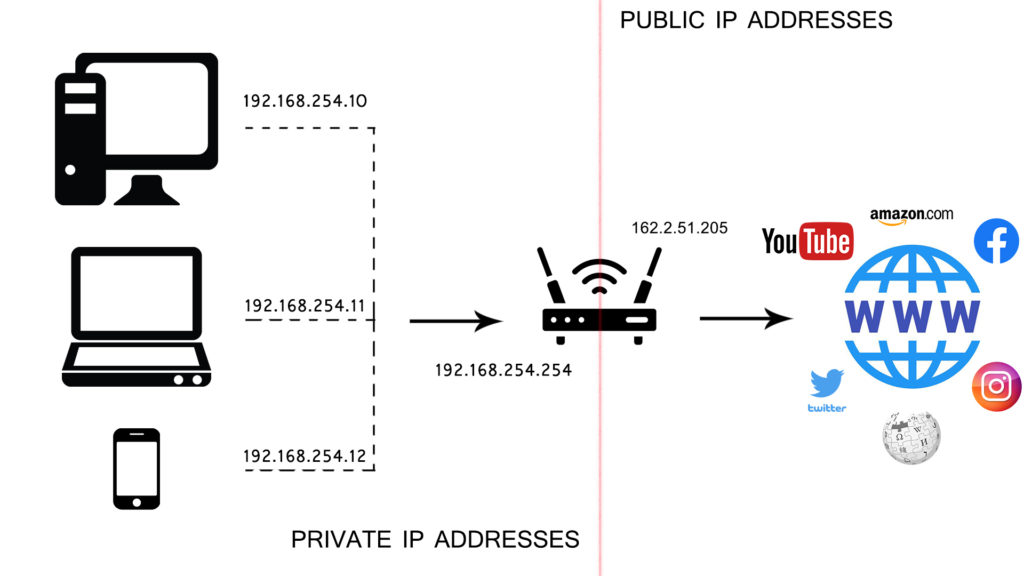
The introduction of private addresses enabled us to use one private IP address on an unlimited number of LANs since they are all independent networks. The only rule is that only one device on a certain LAN can have one private address at any given moment. The introduction of private addresses also allowed us to use only one public IP address for all devices connected to one LAN network.
Static and Dynamic IP Addresses
Every public or private address can be static or dynamic. The terms are practically self-explanatory. Static addresses don’t change – they stay with one device at all times. Dynamic addresses are leased – they will stay with one device until the lease time expires. After that, they can be assigned to some other device, or they can stay with that device.
The Purpose of a Default IP Address
The Default IP address is always a private address. Default IP addresses are assigned to our network equipment by the equipment manufacturers.
Default IP addresses are unique identifiers, just like other private IP addresses. Routers, range extenders, IP cameras, and even streaming sticks come with preassigned default IP addresses. These devices use their default IP addresses to communicate with other devices on the network. Default addresses can be changed but most people don’t change them unless there’s a reason to do so.
Default IP addresses are important for us, users, because we can use these addresses when we want to configure/reconfigure our devices. We can simply type in our default IP address into the browser’s address bar, hit Enter, and open the configuration page. From there, we can do all the setting adjustments we want.
Is 192.168.203.1 a Common Default IP Address? What Devices Use It as a Default IP?
Any private address can be used as a default IP address. In theory. In practice, some addresses are much more used than others. Manufacturers usually assign the first address in a subnet to their network equipment (or at least one of the first three). Some choose to assign the last available address in a subnet. They rarely use an address from the middle of a subnet. The reason is simple – it’s easier for us, users, to manipulate with addresses, handle them, and adjust the DHCP pool if the default IP address is the starting or the ending address in a subnet.
Not even all starting/ending addresses are equally popular. Most network equipment manufacturers will use just a few IP addresses. The most common ones are: 10.0.0.1, 192.168.1.1, 192.168.0.1, 192.168.2.1, 192.168.0.254, and 192.168.1.254.
192.168.203.1 is the first available address in the 192.168.203.0/24 subnet, which makes it a better choice than other addresses from this subnet. Still, our address is not a popular choice among router and network equipment manufacturers.
The only device that uses 192.168.203.1 as a default IP address is AnyCast. AnyCast is a dongle that supports both Chromecast and AirPlay streaming. It also supports DLNA streaming. It’s compatible with iOS, Android, Windows, and macOS. AnyCast is one of the best budget-friendly screen mirroring dongles on the market. In the following chapter, we’ll show you how to set it up and use it.
Setting Up AnyCast Using 192.168.203.1
AnyCast is fairly easy to set up and use. It’s not exactly plug-n-play, but it’s close. In the box, you will find your AnyCast dongle, antenna, and a USB cable. You’re supposed to connect both, antenna and a USB cable to the dongle, and then connect the dongle to your TV using one of the available HDMI inputs. AnyCast uses a USB cable for power supply so you also need to connect the other end of a USB cable to one of the USB ports on your TV. If your TV doesn’t support charging over USB, you will also have to buy a simple 5V/1A USB adapter (not included in the box).
Once you have everything connected, you can turn it on. You will see the welcome screen like in the image below (the look of the Welcome screen may vary depending on the AnyCast model/version).
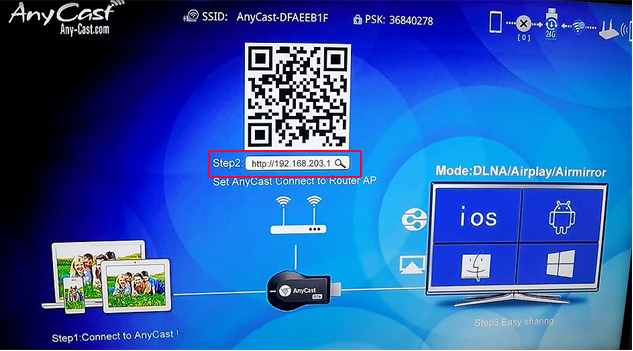
At the top, you will see the information about your dongle’s proprietary Wi-Fi network – network name (SSID) and network password (PSK). You will also see the QR code – scan it with your phone, and you will be redirected to the EZMira app download page. Below the QR code, there’s our address – 192.168.203.1. At the bottom, you will see the setup status.
The first thing you need to do is connect your phone/PC to AnyCast’s proprietary wireless network using the password at the top of the screen. Then, open the browser on your phone/PC/Mac and type in 192.168.203.1. You won’t have to log in – the configuration page will open instantly. You will see the list of settings. What you need to do is tap the first setting – Internet.
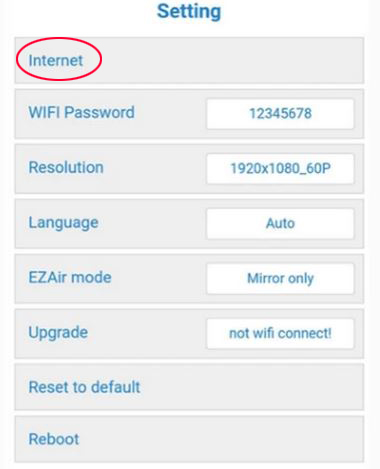
You will see a list of available Wi-Fi networks. You need to connect AnyCast to your Wi-Fi. Select your Wi-Fi, type in the password, and then tap Connect.
Once your AnyCast connects to your Wi-Fi, you can connect your phone to your Wi-Fi, install the EZMira app (iOS/Android) and start using your dongle.
Note: Instead of opening the configuration page in your browser, you can just open the EZMira app (that you have previously installed) and use the app to connect the dongle to your Wi-Fi.
VIDEO TUTORIAL – How to Set Up AnyCast M100
How to Make a Difference Between Fake and Original AnyCast?
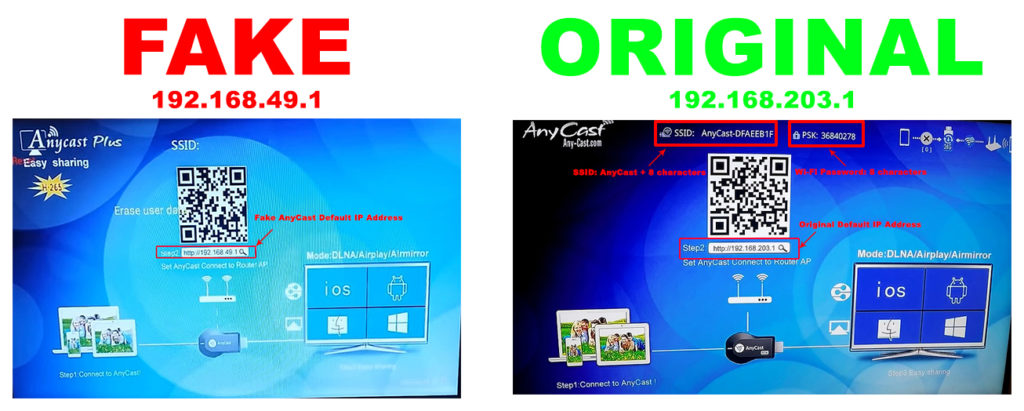
Due to the popularity and ease of use of AnyCast, there’s a bunch of counterfeit models (fake Anycast dongles). We advise you to make sure that you’re buying the original product. Sometimes, the difference between original and fake Anycast is quite obvious, but sometimes, it’s really hard to recognize the fake product. For the full tutorial on how to recognize fake Anycast, visit the official Anycast website.
Some of the most noticeable differences between fake and original AnyCast are different box design, different build quality of the dongle, different default IP addresses (original – 192.168.203.1, fake – 192.168.49.1), different look of the Welcome Screen (wrong SSID and password length, etc.).

Hey, I’m Jeremy Clifford. I hold a bachelor’s degree in information systems, and I’m a certified network specialist. I worked for several internet providers in LA, San Francisco, Sacramento, and Seattle over the past 21 years.
I worked as a customer service operator, field technician, network engineer, and network specialist. During my career in networking, I’ve come across numerous modems, gateways, routers, and other networking hardware. I’ve installed network equipment, fixed it, designed and administrated networks, etc.
Networking is my passion, and I’m eager to share everything I know with you. On this website, you can read my modem and router reviews, as well as various how-to guides designed to help you solve your network problems. I want to liberate you from the fear that most users feel when they have to deal with modem and router settings.
My favorite free-time activities are gaming, movie-watching, and cooking. I also enjoy fishing, although I’m not good at it. What I’m good at is annoying David when we are fishing together. Apparently, you’re not supposed to talk or laugh while fishing – it scares the fishes.

Как подключиться