Very often, internet users have some kind of Wi-Fi problem. Like it or not, Wi-Fi is known for its instability, but we all still appreciate the convenience and freedom it gives us. It’s no surprise since it uses volatile radio waves to operate.
Nevertheless, Wi-Fi remains the most popular type of internet connection since you’re not restricted to a wired connection to a router. However, despite its convenience, some users will face problems with Wi-Fi.
For example, your computer may not be able to find Wi-Fi, while your other devices (like your phone) may not have the same problem. If you encounter the same problem, we have some easy fixes you can try out. Here’s what you can do if your computer can’t find Wi-Fi but your phone can.
CONTENTS
Restart Your Computer
If your computer can’t find Wi-Fi but the phone can, the problem almost certainly lies in the computer rather than anywhere else. There could be an IP identification issue coming from the source of the internet signal – the router. However, we suggest restarting your computer and other related equipment such as the modem and router.
Restarting the computer and related devices will eliminate bugs or other flaws within the system. Firstly, switch off the power and pull out all the power plugs. After a few moments, put the plugs back in and switch the devices on. See if your computer can now find and connect to the Wi-Fi network.
Reinstall and Update Network Drivers
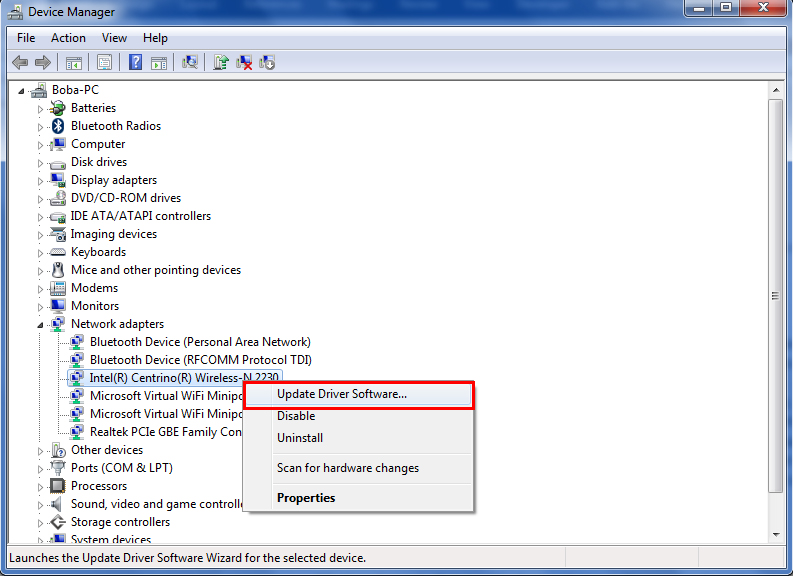
The problem could arise from an error in the network drivers. The drivers could also be outdated. Follow these steps to reinstall the network drivers:
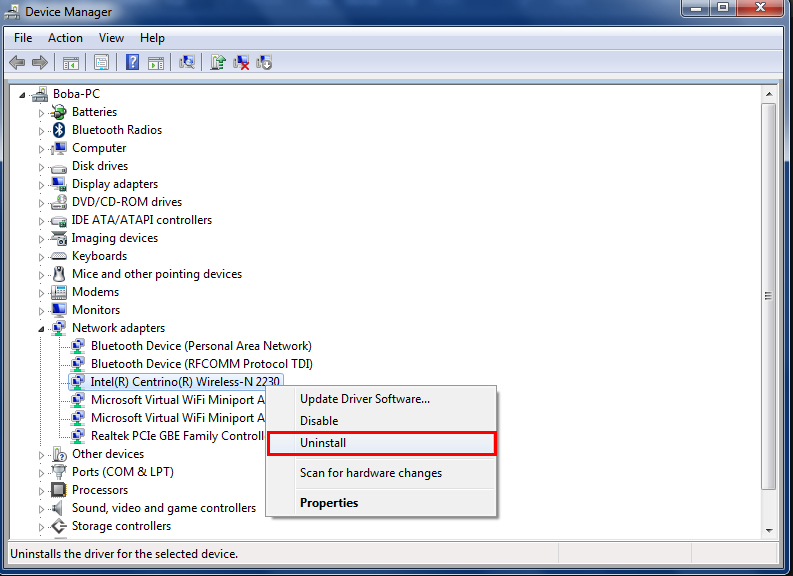
- Right-click on the Windows icon and open Device Manager.
- Double-click on Network adapters.
- Right-click on the wireless network adapter and select Uninstall device option.
- Now you can restart your computer and find out if it can connect to the Wi-Fi network.
Windows normally updates these important network drivers automatically, but that is not always the case. Sometimes, due to the incapability of the generic system, it fails to update the drivers. If that happens, you need to update the network drivers manually. Follow the same steps as above, but select Update driver instead of Uninstall device when you come to the third step. The system will find the latest driver available and install it on your computer.
Troubleshoot Wi-Fi Problems with Windows Troubleshooter
Windows has a built-in troubleshooter that can diagnose and resolve problems. These are the steps to follow:
- Lookup for the Wi-Fi network icon located at the bottom taskbar and click Troubleshoot problems.
- The computer will ask for a choice of the network adapter to diagnose. Choose Wi-Fi.
- The computer will run the troubleshooter, and you need to follow the next few instructions.
- Exit the troubleshooter.
Rename the Wi-Fi Network
There is a possibility that your computer is unable to find Wi-Fi with a certain name. Therefore, you might want to rename the Wi-Fi SSID to something conventional. Ensure you use the usual letter, numbers, and symbols but avoid fancy characters such as emoticons.
In addition, there could be an issue if you hide your Wi-Fi name. Try to unhide it temporarily while connecting.
How to Change SSID (Wi-Fi Name) and Password
Change to 2.4 GHz Band
Most of today’s routers (and gateways) usually offer dual frequency bands – 2.4GHz and 5GHz. Many users prefer utilizing the 5GHz band due to its speed stability, and the fact that it’s less crowded compared to the 2.4GHz band. Likewise, modern devices (phones, laptops, tablets, etc.) can operate using both frequency bands.
However, despite sharing the same frequency with other domestic electronic devices, the 2.4GHz band works better at longer distances, and it can pass the signal through walls easier than the 5GHz band. Furthermore, it can also work with older devices, using previous wireless standards.
Therefore, if you already connect many other devices to the much preferred 5GHz band, try to connect your computer to the internet using the 2.4GHz band and see if it works.
Change the Power Settings
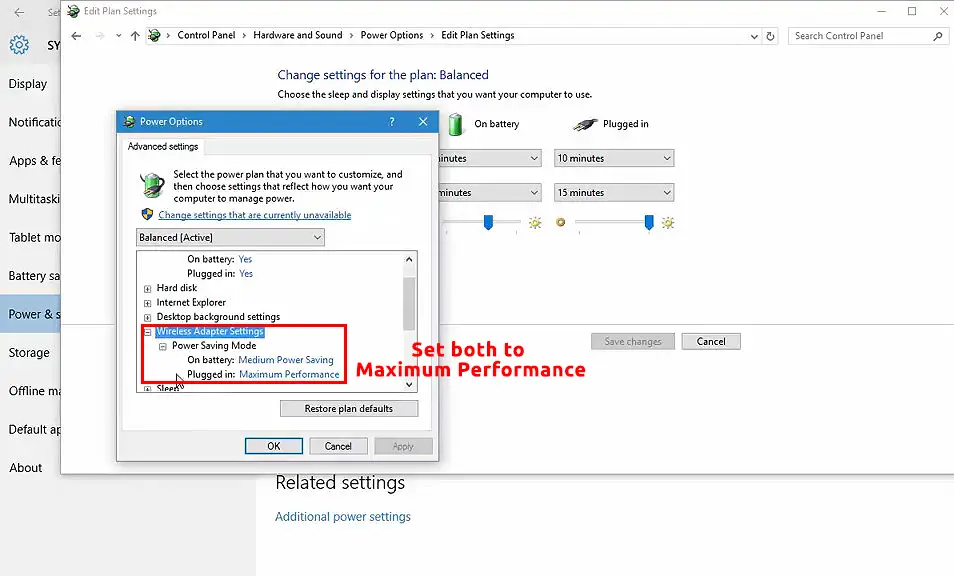
Your computer power settings may be set to power-saving mode. While this improves battery life, it could also have a negative effect on your Wi-Fi connection – it may turn off your Wi-Fi adapter to reduce power consumption. If that happens, your computer won’t be able to find your Wi-Fi network, but other devices will. Stick to the following steps to change the adapter power settings on your computer:
- Lookup for the Battery icon located at the notification section and select Power Options.
- Under Preferred power plan, select Change plan settings
- Then choose Change advanced power settings.
- Select Wireless Adapter Settings and click Power Saving Mode.
- Set it to Maximum Performance.
- Click OK and close the page.
Disable Antivirus Program
No doubt, antivirus programs are one of the most important tools when it comes to the safety of your computer and your data. Considering the high level of malware threats lately, a third-party antivirus solution is a must for all internet users.
However, in an attempt to provide network protection, the antivirus program can sometimes interfere with your Wi-Fi network connection. You can always reinstall the all-important antivirus program if you can fix the problem. Apparently, a logical move is to temporarily disable the antivirus program and try to connect your computer to your Wi-Fi network. If that helps, try using some other antivirus program.
Recovery
Do the following steps to make a recovery:
- In the search box at the bottom-left of the computer screen, type ‘Recovery’ and click on Recovery.
- Select Open System Restore.
- In the dialog box, press Next.
- Choose your preferred restore point.
- Press Next and then click Finish to allow for the restoring process, which takes some time to complete.
- Wait for the system to boot up, and see if your Wi-Fi connection is restored.
How to Use Windows Recovery/Restore Tool to Fix your Wi-Fi Connection (Windows 10)
Alternative Recovery Option
You can also reset the computer in Windows 10 by following this method:
- Press the Windows key and the ‘i’ key simultaneously to come to the Setting page.
- Select Update & Security.
- Find Recovery at the panel on the left and click on it.
- Lookup for Reset this PC and click Get started.
- Select Preserve your data and Restore your PC to its default settings.
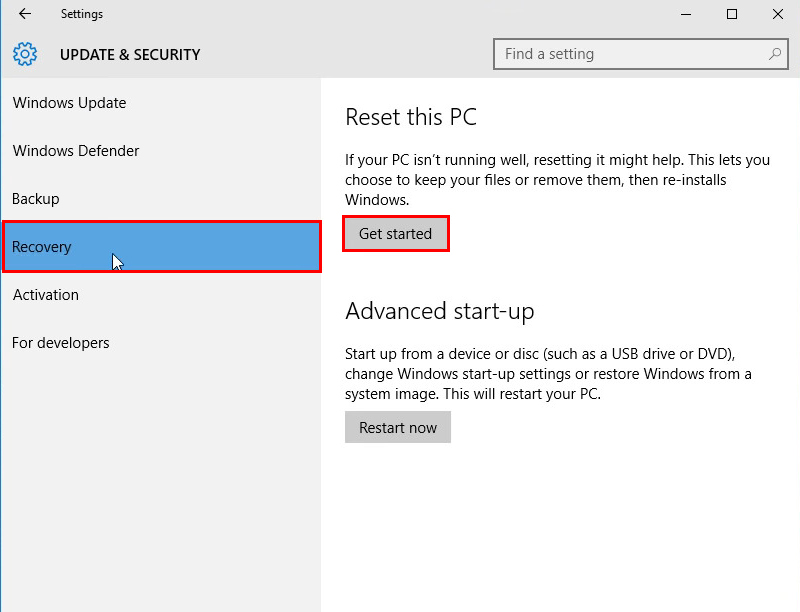
Hopefully, this final method can allow your computer to restore the Wi-Fi network connection.
Conclusion
The next time your computer can’t find Wi-Fi but your phone can, you’d know exactly what to do. Any of our suggested fixes could do the trick, and help your computer to rediscover Wi-Fi. If none of them work, it’s probably time to contact your manufacturer or ISP customer service or technical support for assistance.

Hey, I’m Jeremy Clifford. I hold a bachelor’s degree in information systems, and I’m a certified network specialist. I worked for several internet providers in LA, San Francisco, Sacramento, and Seattle over the past 21 years.
I worked as a customer service operator, field technician, network engineer, and network specialist. During my career in networking, I’ve come across numerous modems, gateways, routers, and other networking hardware. I’ve installed network equipment, fixed it, designed and administrated networks, etc.
Networking is my passion, and I’m eager to share everything I know with you. On this website, you can read my modem and router reviews, as well as various how-to guides designed to help you solve your network problems. I want to liberate you from the fear that most users feel when they have to deal with modem and router settings.
My favorite free-time activities are gaming, movie-watching, and cooking. I also enjoy fishing, although I’m not good at it. What I’m good at is annoying David when we are fishing together. Apparently, you’re not supposed to talk or laugh while fishing – it scares the fishes.

