
Your router is undoubtedly one of the most important components of your network infrastructure.
It is the central unit of your wired or wireless network, managing internet traffic between your ISP and the connected devices.
Most network settings are configured through the router, ensuring your internet connectivity is stable and secure.
Even though your router doesn’t have a physical control panel, you can quickly access its web-based panel from within the network by entering its IP address on a browser.
While accessing your router within the network is easy, doing the same remotely when you’re away from home can be head-scratching if you don’t know how to go about it.
This post explains how to access your router from the internet and why it might be necessary to do so even when you’re far away.

CONTENTS
- Step 1 – Find Your Router’s Private IP Address
- Step 2 – Find Your Router’s Public IP Address
- Step 3 – Enable Remote Web-based Management
- Step 4 – Specify the Router’s Port Value for Remote Access
- Step 5 – Set Up Dynamic DNS
- Step 6 – Access Your Router Remotely
- Reasons to Access Your Router from the Internet
- Conclusion
Step 1 – Find Your Router’s Private IP Address
Your router has two IP addresses, including a private IP address assigned by the manufacturer and a public IP address from your ISP.
Routers use the private or LAN IP address to communicate with all the connected devices within the same wired/wireless network.
Besides, this IP address allows you to access your router’s web-based control panel from your home network to view network info, change settings, and enable remote access.
The four most common private IP addresses assigned to your router are:
- 192.168.0.1
- 192.168.1.1
- 10.0.0.1
- 10.0.1.1
If you are unsure of your router’s default IP, you can use your phone or laptop to find it.
Follow these steps to check your router’s IP address via your connected Android device:
- Go to Settings
- Tap Network & Internet
- Select Your Wi-Fi Network and tap to connect
- Tap the SSID network name
- Check your router’s IP address under Network details

For iOS devices:
- Go to Settings
- Tap Wi-Fi
- Connect to your current Wi-Fi network
- From Wi-Fi settings, tap the “i” next to the Wi-Fi network name
- Scroll down to Router to see your router’s IP address

Finding your IP address using your connected Windows PC:
- Type CMD on the search bar to launch Command Prompt
- Run Command Prompt as an Administrator
- Type IPCONFIG in the Command Prompt window
- Press Enter
- Check your router’s IP address next to Default Gateway

How to Find Your Default Gateway on macOS
Step 2 – Find Your Router’s Public IP Address
Your router uses the public IP address or WAN address assigned by your ISP to connect to the internet.
This IP address holds the key to accessing your router from the internet. You must type it on your browser to access your router’s settings remotely.
Public and Private Addresses Explained
Fortunately, finding your router’s public IP address is easy as long as you have its private IP address. Simply:
- Launch your preferred web browser
- Enter your router’s private or LAN IP address on the browser’s URL bar to access the control panel
- Enter the default login credentials (usually printed at the back of the router)
- Depending on your router’s interface, select Status or Advanced
- Scroll down to System Information or Router Information (or sometimes WAN information) to check your router’s public (WAN) IP address
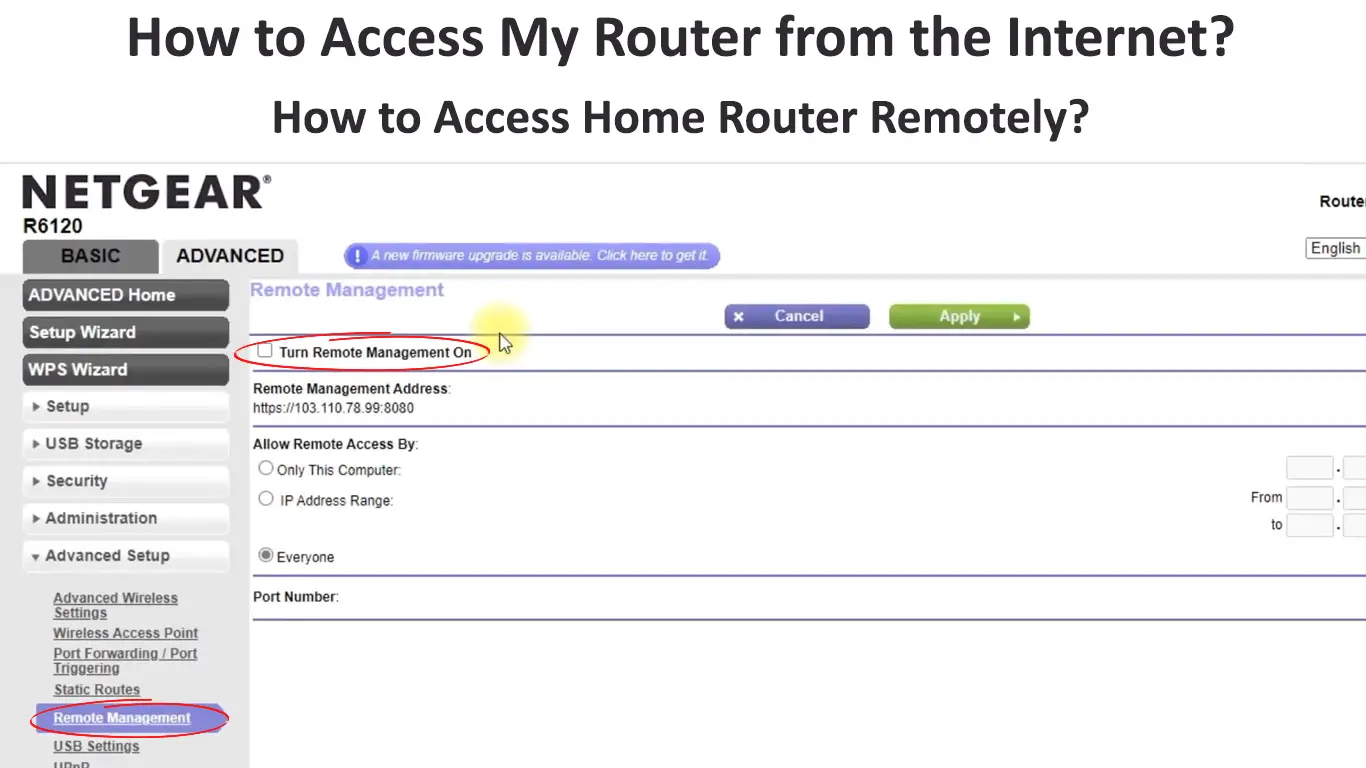
Step 3 – Enable Remote Web-based Management
All routers have a remote sharing or remote web-based management setting that determines whether or not you can manage your router through the internet.
By default, this setting is usually off to prevent unauthorized remote access and secure your network.
Nevertheless, you must enable remote sharing in advance if you want to access your router from the internet, and this is only possible from your home network.
Here are the steps:
- Launch your preferred browser
- Type your router’s default IP address into the URL bar
- Your router’s web-based management page will load
- Enter the login credentials (usually printed on a sticker at the back of the router)
- Depending on your router interface, select Administration, Settings, Security, or System Tools
- Scroll down to Remote Web-based Management or System Configuration
- Check the box next to Remote Web-based Management to enable the function

NETGEAR Router

TP-Link Router
- Click OK or Save to apply changes
- Exit your router’s control panel
Step 4 – Specify the Router’s Port Value for Remote Access
Enabling the remote management feature is not enough for you to access your router from the internet.
You must specify the port on your router that you want to use for remote access.
Routers have several standardized ports, but you can only use one port for web-based administrative access.
Each port has an assigned number reserved for various networking protocols, and the default value for your remote access port is 8080 or 80.
To access your router from the internet, you must enter the router’s public IP address and the specified port number on a browser, separated by a colon (see the image).

Step 5 – Set Up Dynamic DNS
The public IP address assigned to your router by your ISP is dynamic. It changes every time you reset or restart your router.
Your router’s public IP address can also change when your ISP pushes a firmware update that requires a restart.
The constant changes can pose a problem, preventing you from accessing your router from the internet.
It can be difficult to tell your router’s current public IP address if you are far away from home.
The good news is that you can make your router’s public IP address static (unchangeable), but the bad news is that you have to pay extra for this service.
Most people prefer to enable and set up a dynamic DNS to bypass this problem without paying a dime.
A dynamic DNS is a service that allows you to create a custom hostname linked to your router’s public IP address.
If your public IP address changes, dynamic DNS will automatically update the new address and map it to your custom hostname, allowing you to access your router remotely.
Follow these steps to set up Dynamic DNS:
- Access your router’s web-based control panel
- Depending on your router’s setting page, select Advanced
- Look for Dynamic DNS or DDNS
- Enable DDNS
- Select your preferred Dynamic DNS service provider and register
- Create your custom hostname
- Copy and paste the custom hostname into the router settings
- Click OK or Save to apply changes
Step 6 – Access Your Router Remotely
Now that you have a custom hostname and port number, you can access your router from anywhere in the world through the internet.
Launch your preferred browser and enter your hostname and port number as follows:
“customhostname:port number”
For example, “myhomenetwork.ddns.com:8080”
How to Access Your Router Remotely
Reasons to Access Your Router from the Internet
Accessing your router from the internet allows you to check the status of your connection and manage your network.
You can troubleshoot and fix network issues, kick out intruders, and enforce parental controls remotely from your router’s web-based management panel.
Here’s a list of what you can do once you access your router from the internet:
- Check your internet connection status
- Change Wi-Fi name and password
- Reboot your router
- Back up configuration settings
- Access a NAS device remotely
- Enforce parental controls
- Block freeloaders and intruders
Conclusion
Accessing your router from the internet gives you high-level control over your wired or wireless network.
You can conveniently troubleshoot and fix network issues, change security settings, kick out freeloaders, and access your NAS remotely.
The best part is that you don’t have to be tech-savvy to perform these tasks. Follow our simple guide to access your router from the internet within minutes.

Hey, I’m Jeremy Clifford. I hold a bachelor’s degree in information systems, and I’m a certified network specialist. I worked for several internet providers in LA, San Francisco, Sacramento, and Seattle over the past 21 years.
I worked as a customer service operator, field technician, network engineer, and network specialist. During my career in networking, I’ve come across numerous modems, gateways, routers, and other networking hardware. I’ve installed network equipment, fixed it, designed and administrated networks, etc.
Networking is my passion, and I’m eager to share everything I know with you. On this website, you can read my modem and router reviews, as well as various how-to guides designed to help you solve your network problems. I want to liberate you from the fear that most users feel when they have to deal with modem and router settings.
My favorite free-time activities are gaming, movie-watching, and cooking. I also enjoy fishing, although I’m not good at it. What I’m good at is annoying David when we are fishing together. Apparently, you’re not supposed to talk or laugh while fishing – it scares the fishes.