If you live in a crowded area you already know that there is a huge number of available wireless networks. Most of these networks are secured in one way or another. Occasionally, you may see an unsecured network. You may even decide to connect your computer to this network. Maybe because your home Wi-Fi doesn’t work. But what happens if your computer won’t or can’t connect to that unsecured Wi-Fi network.
Although connecting to such a network should be pretty straightforward, in some cases, your computer won’t connect.
In this article, we will explain how to allow your computer to connect to unsecured Wi-Fi.
So, let’s begin.
CONTENTS
Why Is the Wi-Fi Network Unsecured?
Well, there are several different reasons why a specific wireless network was left unsecured.
For example, most cafes, libraries, airports, and so on, let people connect to their wireless networks. In reality, this is a good option to make people spend more time there, do some research, or just fight boredom while they are waiting.
On the other hand, some wireless networks are protected with MAC filtering. These networks will show up as unsecured, but in reality, only specific devices can connect to them.
To be more precise, when you use MAC filtering, you take the MAC address of a specific device and grant this device access to the wireless network through the router’s settings. There is no need to protect such networks with a password because you won’t be able to connect to it until the MAC address of your device is added to the list of allowed devices.
How to Know If a Wi-Fi Network Is Unsecured?
Although it is generally not recommended to connect to an unsecured Wi-Fi network, there are situations when we simply have to do that.
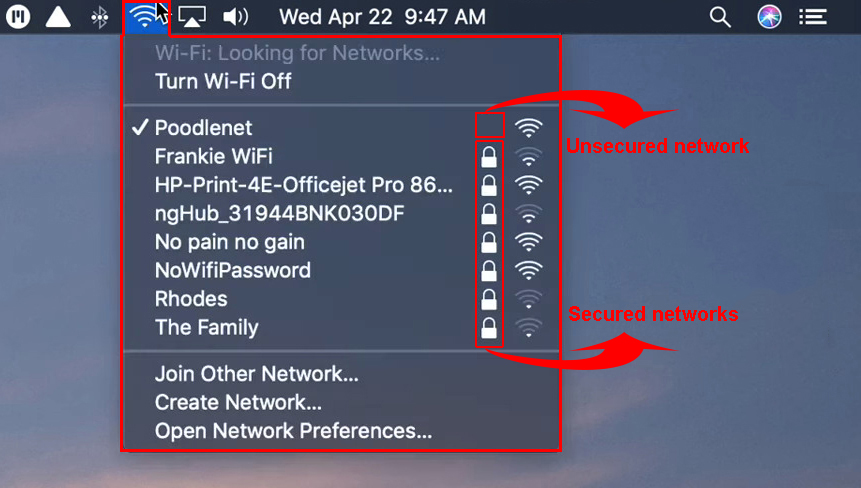
In case you get into such a situation, it is highly recommended not to enter any personal details or access your bank account, or any other important accounts or services. Here are a few signs that will help you identify an unsecured Wi-Fi network:
- It doesn’t use any encryption.
- You might be asked to enter some information.
- There is no lock at all or the lock is greyed out.
- In most cases, the internet connection speed on these networks is super-slow.
Risks of Connecting to Unsecured Public Wi-Fi Networks
How to Connect to An Unsecured Network?
As we have said before, connecting to an unsecured Wi-Fi network should be pretty simple.
Windows 11
If you are using Windows 11, simply click on the network icon in the taskbar. Then click on the Wi-Fi icon to enable it. Now click on the right-pointing arrow next to the Wi-Fi icon. Click on the unsecured network. You should see a warning message saying “Other people might be able to see info you send over this network”. Click the Connect button and wait till the computer connects to the network.
MacBook
Click on the Apple logo icon at the top of the screen. Select System Preferences. Now, find the Network icon and click on it. In the pane on the left click on Wireless and from the Network Name list select the unsecured network. Click on it and you should connect.
What to Do If the Computer Won’t Connect to Unsecured Wi-Fi?
In some cases, your computer will refuse to connect to the unsecured Wi-Fi although you have done everything right. If the Wi-Fi network isn’t protected with MAC filtering, here are a few things to do to allow it to connect.
Use Another Web Browser
In most cases, when we log in to an unsecured network, we have to open our web browser and eventually accept the Guest Access policy or at least click the Login button.
Having that in mind, it is possible that specific browser settings are preventing you from connecting to unsecured Wi-Fi. Therefore, we recommend trying to connect using another web browser.
If that doesn’t help, launch the browser in incognito mode and see whether this solves the problem. If you already have the browser icon in the taskbar, right-click on it and select New Incognito Window (in Chrome) or New private window (Mozilla Firefox).
Restart Your Computer
Another simple solution is to restart your computer. It is a simple and highly effective solution so let’s try it right away.
In Windows 11, click the Windows Start button and then the Power icon on the right. Click on Restart. The computer will shut down and then power up again. Try to connect to the unsecured Wi-Fi now.
Recommended reading:
- How to Find Out Who Is Using My Wi-Fi? (5 Ways to Check Who Is on Your Wi-Fi)
- How to Connect a Non-Wi-Fi Device to Wi-Fi? (Ways to Turn Your Non-Wi-Fi Device into a Wi-Fi Device)
- How to Turn ON and OFF Wi-Fi on A Modem? (Two Easy Ways)
On your MacBook click the Apple logo icon at the top, and then click on Restart. Click on Restart again in the popup window. Try to connect your MacBook when the computer boots up again.
Disable Auto-Connect
Let’s say that you have connected to this network before. You are now within range again, but something has changed and you can’t connect. We recommend disabling the auto-join or auto-connect feature on your device.
Windows 11
Press the Windows Logo button and the letter I on the keyboard to open Settings.
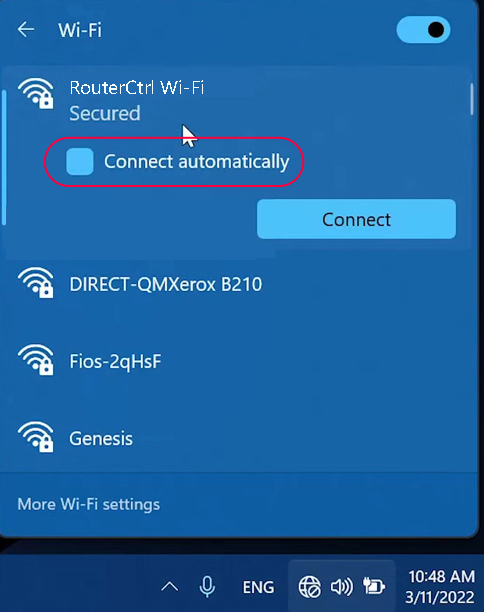
Click on Network & Internet on the left and then select Wi-Fi. In the new window click on Manage known networks. Find the network name and click on it. Make sure that “Connect automatically when in range” is unchecked.
macOS
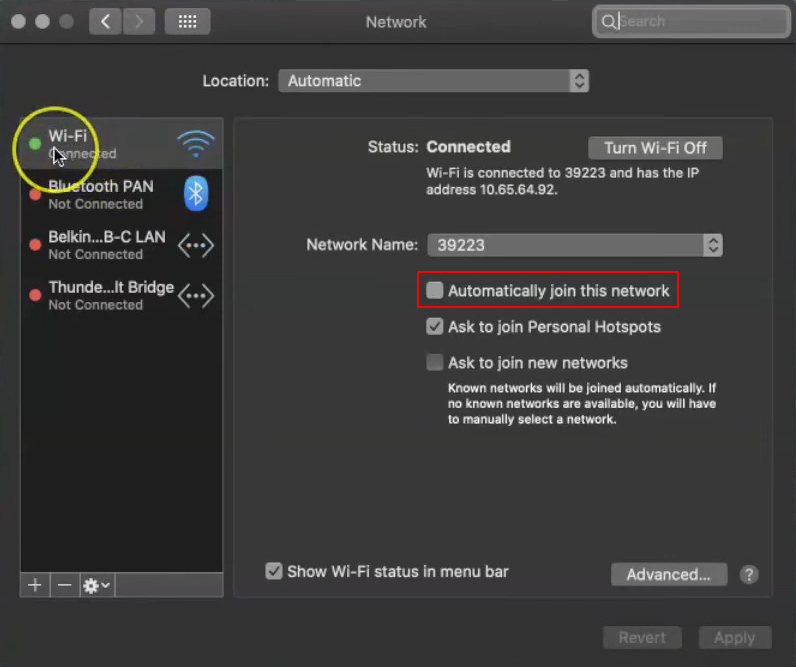
Click on the Apple icon and then on System Preferences. Click on the Network icon.
Click on Wi-Fi, and make sure that “Automatically join this network” is unchecked.
Disable Your Popup Blocker, Antivirus, and Firewall
Sometimes your popup or ad blocker software or your antivirus or firewall can be overprotective and stop you from connecting to the unsecured Wi-Fi network.
To check whether one of these programs is causing the problem, we recommend disabling them temporarily. Try to connect your computer then and see what happens.
How to Disable Popup Blocker (Google Chrome)
Disabling Popup Blocker (Mozilla)
Flush Your DNS Cache
Windows 10/11
Using the Command Prompt on your Windows 10 or Windows 11-powered computer is simple if you know the right commands.
First, launch the Command Prompt as an administrator.
The next step is to copy/paste and execute the following command:
ipconfig /flushdns
When you copy this command, just right-click with your mouse in Command Prompt to paste it. Then hit the Enter key.
Restart your computer and then try to connect again.
MacBook
Depending on the Mac OS version you are running on your MacBook, you can try different commands.
Run the terminal.app.
Then type sudo killall -HUP mDNSResponder and click the Enter/Return button. If prompted, type the admin password.
Manually Set Up the DNS Settings
In this case, instead of letting things be done automatically, we are going to use the Google Public DNS IP addresses: 8.8.8.8 and 8.8.4.4.
Windows 11/10
Open the Control Panel. If you don’t know another way to do it, type Control Panel in the search bar.
Now click on Network & Internet and then open the Network Sharing Center.
Click on Change adapter settings on the left.
Right-click on the Wi-Fi adapter and select Properties.
Find and click on Internet Protocol Version 4 (TCP/IPv4) and click on Properties.
Click the radio button next to Use the following DNS server addresses and type the Google Public DNS IPs: 8.8.8.8 and 8.8.4.4.
Click OK.
Check whether your Windows computer connects to the unsecured Wi-Fi network now.
How to Change DNS Server (Windows 10)
macOS
Click on the Apple logo icon, select System Preferences, and then click on the Network icon.
Click on Wi-Fi and then click on Advanced. Now click on the DNS tab.
Click on the + symbol to add/replace any existing addresses.
Then click on OK, and Apply.
Test your connection.
How to Change DNS Server in macOS
Final Words
We believe this post has covered everything you need to know about connecting your computer to an unsecured Wi-Fi network. Connecting to such a network is pretty simple, but if your computer refuses to connect you can try the solutions given in this article.
If the network is secured with MAC filtering, then you won’t be able to connect. But if it isn’t, the solutions presented here should help.

Hey, I’m Jeremy Clifford. I hold a bachelor’s degree in information systems, and I’m a certified network specialist. I worked for several internet providers in LA, San Francisco, Sacramento, and Seattle over the past 21 years.
I worked as a customer service operator, field technician, network engineer, and network specialist. During my career in networking, I’ve come across numerous modems, gateways, routers, and other networking hardware. I’ve installed network equipment, fixed it, designed and administrated networks, etc.
Networking is my passion, and I’m eager to share everything I know with you. On this website, you can read my modem and router reviews, as well as various how-to guides designed to help you solve your network problems. I want to liberate you from the fear that most users feel when they have to deal with modem and router settings.
My favorite free-time activities are gaming, movie-watching, and cooking. I also enjoy fishing, although I’m not good at it. What I’m good at is annoying David when we are fishing together. Apparently, you’re not supposed to talk or laugh while fishing – it scares the fishes.

