
Are you experiencing issues when trying to connect your Android device to Wi-Fi automatically? There is no need to panic! Today, we’re presenting you with a list of requirements that need to be met for the Android device to automatically connect to Wi-Fi. Once you fulfill all of them, you will never have to worry about this issue again!

CONTENTS
Will Every Android Connect to an Available Wi-Fi Network Automatically?
The ability of your Android device to automatically connect to a nearby wireless network saves time and enables you to use the internet connection whenever you want. Every Android device out there can join a network on its own whenever it’s within the range of that network.
However, some conditions need to be fulfilled for the connection to be successful. If these requirements are not met, your Android won’t connect to Wi-Fi automatically. So, your task will be exploring all of these conditions and making sure you fulfill them!
1. The Wi-Fi is On
If the Wi-Fi feature on your Android phone is turned off, your device won’t connect to any network on its own. Furthermore, you won’t even be able to go through this process manually until you turn the Wi-Fi feature on.
You can turn on Wi-Fi on your device by navigating to its settings. Then, you should go to the Connections section and choose Wi-Fi. There, you can turn the feature on as well as search for nearby available networks you can join.

You can also swipe down from the top of your screen to access Wi-Fi. You’ll see various options including the Wi-Fi icon. When you tap on it, you’ll turn the Wi-Fi on.
![]()
2. The Connection was Previously Established
Your Android device can’t connect to a network automatically unless it was connected to this Wi-Fi before. That’s because your gadget has a way of remembering networks and their passwords. Without this step, your Android won’t be able to connect to a Wi-Fi network on its own. So, you’ll need to first join a specific network and enter its password. After that, your Android device should connect to the same Wi-Fi wherever it’s nearby.
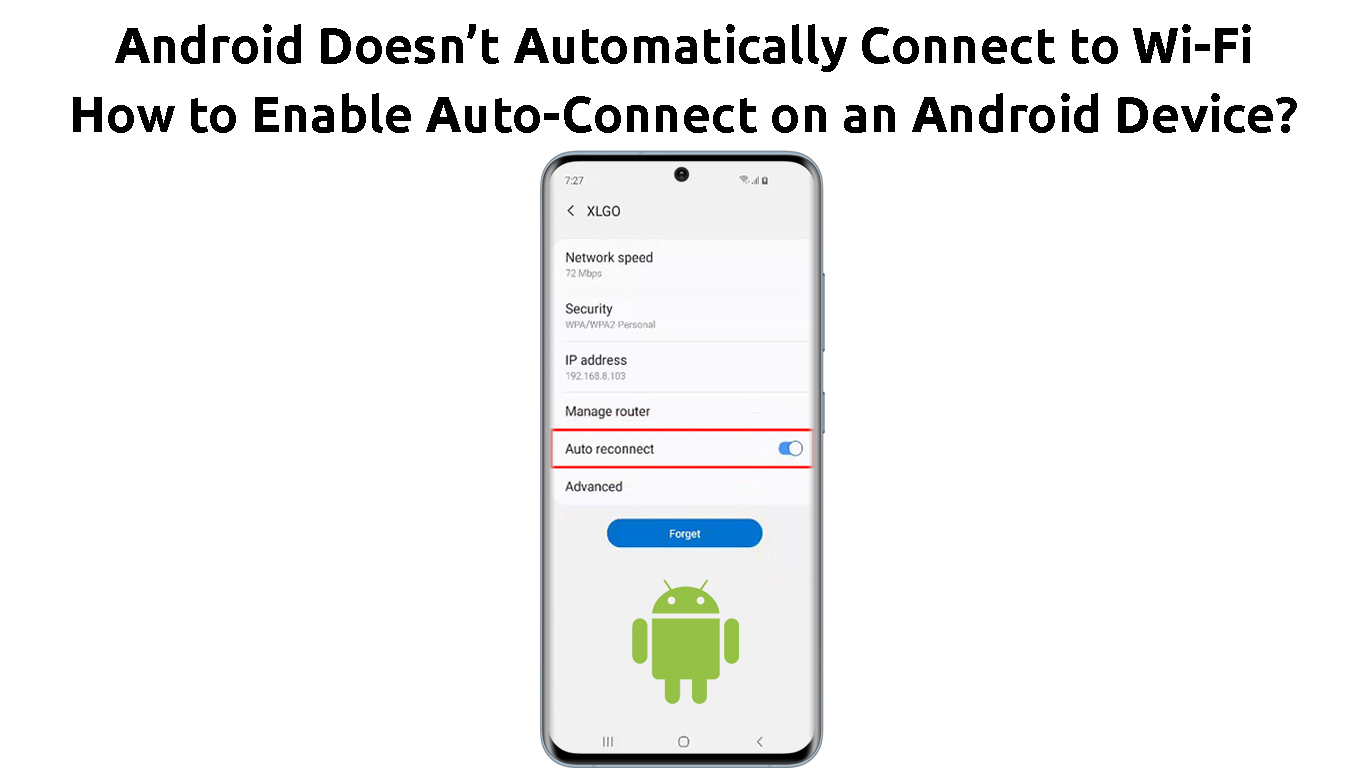
3. The Auto-Connect Feature is On
An Android 11 update came with a special feature that changed the way Android devices function when they detect a familiar Wi-Fi network. This update introduced the Auto-connect feature. When this feature is off, your Android device won’t connect to the network it has previously joined automatically.
Thus, you may have turned this feature off at some point which is why your device isn’t connecting to a network you previously connected to. Luckily, you can turn the feature back on in the internet settings of your gadget.

4. The Signal is Strong
The signal of a wireless network you want to connect to has to be strong enough for your Android device to connect to it automatically. Your Android will automatically join the Wi-Fi with the strongest signal. If that’s not the case with your network, chances are, the connection won’t be successful.
Even when there aren’t any stronger networks available nearby, your device likely won’t connect to a weak Wi-Fi and would switch to your mobile data. That is why you should make sure that the signal coming from your router is strong and stable.
You can do that by removing obstructions that may be causing interference between the router and your Android device. Large objects can interfere with the signal your router emits, which is why it’s wise to move them away. In addition, walls, corners, and floors are major signal obstructors as the signal tends to bounce off of them before reaching your device. That makes it much weaker.
Bluetooth devices and appliances that work on a similar frequency as your Wi-Fi network, such as baby monitors and microwaves can also cause interference. You should turn the Bluetooth feature off on gadgets you’re not using and keep the rest of the devices away from your Android device and the router.
5. The Internet Connection is Stable
If there is no internet connection, there will be no connection at all! Your Android gadget won’t connect to a network that’s not working properly. Therefore, you should double-check the state of your internet connection to make sure that your Android can connect to Wi-Fi without issues.
The easiest way to check whether your internet is working properly is to try accessing the network on another device. If the connection is established and you can perform various online activities, you have to worry about the internet connection. On the other hand, in case the connection is poor or unstable, you may have to go through a few extra steps to fix it before proceeding.
You can fix your internet connection by resetting your router. But before that, you may want to try a simple power cycle. So, you’ll have to unplug it from the power source. After a minute or two, you can plug your router back in.
In case that doesn’t work, you may want to check for potential outages in your area. You’ll do that by going to the official website of your internet provider or contacting customer support.
Lastly, you might have to perform a factory reset. A factory reset will revert your router back to its original settings, and you’ll have to set up your network all over again. Usually, the reset button is located at the back, and it has to be pushed using a sharp, thin object.
You’ll need to hold the button for about ten seconds or until the lights start flashing. After resetting, you can connect to the router using an Ethernet cable and access its configuration page on your browser. Once you log in, you can configure the router all over again.

6. Your Android is Working Properly
The essential aspect of getting your Android to automatically connect to Wi-Fi is having a device that’s working properly. Bugs or outdated software can reduce your Android’s performance, making it difficult to conduct basic tasks including connecting to a network.
In case your device is working properly, the issue might be with the outdated software version. You can update the system by going to the settings of the gadget. Then, you should tap on System and choose System update. You should follow the on-screen steps to download and install an update.
How to Update Software on a Samsung Phone
If you suspect that your Android is not working properly, you may have to restart it. You can do that by holding the Power button for up to ten seconds. The power menu will appear. You should choose the Restart option and wait until your phone or tablet is back up and running before you start using it.
How to Restart a Samsung Phone
Something may have gone wrong the first time you connected the Android device to your Wi-Fi network. As a result, your gadget is unable to establish a solid connection despite working properly. You may be able to fix that by simply forgetting the network and connecting to it once again.
You should go to the Wi-Fi section of your Android device and tap on the name of the network you wanted to join. Then, you should tap Forget. To make sure that there aren’t any bugs preventing the connection, you can restart the Android device. Then, you can try connecting to the Wi-Fi once again.
How to Forget a Wi-Fi Network on a Samsung Phone
Final Thoughts
If you want your Android device to connect to Wi-Fi automatically, some requirements must be met. Luckily, by following our guide, you’ll easily create the perfect conditions that will allow your Android device to easily connect to any wireless network on its own!

Hey, I’m Jeremy Clifford. I hold a bachelor’s degree in information systems, and I’m a certified network specialist. I worked for several internet providers in LA, San Francisco, Sacramento, and Seattle over the past 21 years.
I worked as a customer service operator, field technician, network engineer, and network specialist. During my career in networking, I’ve come across numerous modems, gateways, routers, and other networking hardware. I’ve installed network equipment, fixed it, designed and administrated networks, etc.
Networking is my passion, and I’m eager to share everything I know with you. On this website, you can read my modem and router reviews, as well as various how-to guides designed to help you solve your network problems. I want to liberate you from the fear that most users feel when they have to deal with modem and router settings.
My favorite free-time activities are gaming, movie-watching, and cooking. I also enjoy fishing, although I’m not good at it. What I’m good at is annoying David when we are fishing together. Apparently, you’re not supposed to talk or laugh while fishing – it scares the fishes.