Kali Linux is an open-source Linux distribution. It’s mostly used for activities related to security. That is why the most common uses for Kali Linux include security research, computer forensics, penetration testing, and reverse engineering. Kali is an extremely complicated system used by experts. That is why it’s not the best option for beginners.
Sometimes, even the most well-versed people benefit from a bit of help! So, today we’re explaining how to get your device to automatically connect to a Wi-Fi network in Kali Linux!

CONTENTS
Can You Automatically Connect to a Wi-Fi Network in Kali Linux?
The simple answer is yes, your device can connect to Wi-Fi in Kali Linux automatically. The automatic connection will be established as soon as you successfully connect to a wireless network. Then, once the device is back in the range of that Wi-Fi network and the network uses the same password, your device will automatically connect to it.
However, for the process to be successful, you have to properly connect to a wireless network. We’ll teach you how to do that within the next couple of minutes!
Ways to Connect to a Wireless Network in Kali Linux
The Easiest Way to Connect to Wi-Fi in Kali Linux: the Taskbar
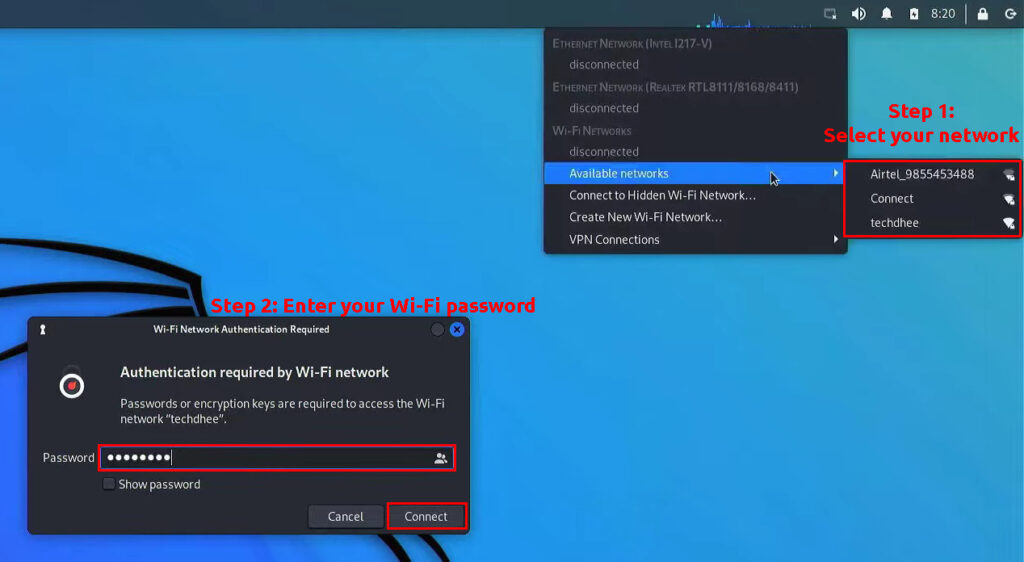
The easiest way to connect to Wi-Fi in Kali Linux is by using the icons on the taskbar. Due to its simplicity, this method is the one you should probably try out first. However, you won’t be able to access the network settings by just pressing the icon in question. So, in case you have an issue, you won’t be able to solve it there. Still, it’s worth trying out as it will take you a few seconds to connect to a network.
Your first step will be finding the Network icon in the taskbar. The Network icon sort of looks like a weirdly shaped rectangle or a screen. If you are not connected to the network, it may have an x on the bottom right side.
Once you find the icon, you should right-click on it. The system will display the options. You’ll find the Enable Wi-Fi one there. Once you mark this option, the system will display a range of available networks. You should find yours and enter the credentials to connect. In many cases, your device will automatically connect to the network it has been previously connected to. In case it doesn’t, you may have to enter network settings or try another method.

Using the Terminal to Connect to a Wi-Fi Network in Kali Linux
As we mentioned, using the Network icon is not the only way to connect to a wireless network in Kali Linux. Other methods are a bit more complicated, but you’ll have full control and access to network settings.
- Using the Combination of iwhilst and nmcli Commands
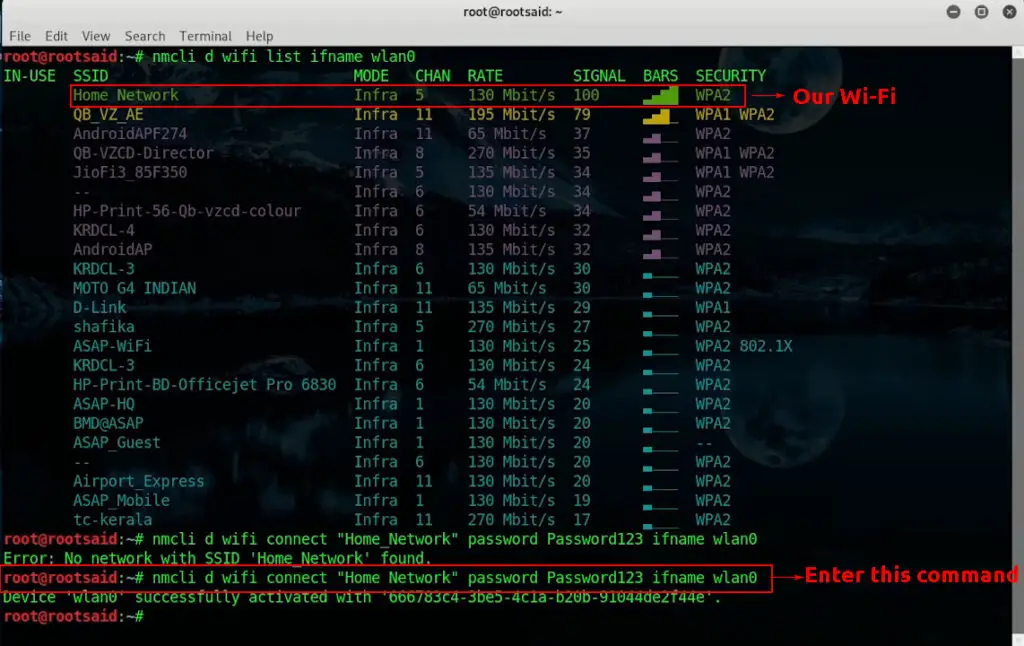
Firstly, you should scan for available networks and get the info on the one you want to connect to. That’s because you’ll need the network’s ESSID to complete the connection.
You’ll scan for available networks using the iwhlist command. You should go to the terminal by pressing the Ctrl, Alt, and T keys. Then, you’ll need to type iwhlist, and then write the name of your network. You’ll complete the command by typing scan. You’ll then see the list of available networks and data about them. When you choose the one you can connect to, you should remember its ESSID and then move to the next step.
Your next step will be using the nmcli command. This command is a pretty simple one and it lets users connect to the network and easily access the Network Manager. The option is accessed from the command line.
To use the command, you’ll need to type nmcli d wifi connect and then write the ESSID of the network you want to connect to and its password. The device will connect to a wireless network of your choosing.

- Accessing More Extensive Settings Using the nmtui Command
If you’re looking for a more interactive form of accessing Network Manager, you may want to use the nmtui command. Even though it’s a more complicated command, the nmtui is extremely easy to access and navigate.
You’ll only need to type nmtui in the terminal to run it. Then, you should wait until the system displays a menu. In the menu, you can use the arrows on your keyboard to navigate to the Activate a connection option. When you do, you should press Enter. You’ll see all the available networks.
Once you find the network you want to connect to, you should navigate to it again using the arrows and press Enter. As soon as the system connects to the Wi-Fi network, you can choose the Back option and then go to Quit.
Connect to Wi-Fi in Kali Linux Using the nmtui Command
What to Do If the Device Cannot Connect to a Wi-Fi Network
Your device not connecting to a Wi-Fi network could be a sign of a more serious problem. But, before you panic, you may want to try out a few simpler solutions.
- Disconnecting and Reconnecting to the Network
Sometimes, a simple re-connection to a network can fix your problem. You should go to the terminal and type IP a command to view the network adapter settings.
When the info gets back to you, you’ll have a few options. If a device is already connected to a network but the connection isn’t working, you should first disable it. You can do that by typing sudo ifconfig followed by the name of your network. You’ll complete the command by adding Down. Then, you should re-enable the connection by typing the same command. But, instead of Down, you should type Up.
In case the situation was different when you completed the IP a command, you may have to enable the connection first. If that doesn’t work, you can move to the next tip.
- Detecting the Network Drivers
A huge reason why your device won’t connect to a wireless network is due to drivers not being detected. Thankfully, it will be pretty easy to re-install the wireless drivers to the device. You’ll have to type this command:
sudo apt-get install kali-linux-wireless
How to Install Wi-Fi Drivers in Kali Linux
Is It Possible to Connect to More than One Wi-Fi Automatically in Kali Linux?
Just like with any system and any device in the world, connecting to more than one network at the same time is impossible and pointless. However, it is possible to have your system remember the credentials of more than one wireless network and connect to one when it’s within range. Your device should be able to do that on its own once you successfully connect to a network.
If for some reason, you can’t automatically connect to one or more networks, you should go to the network options. You’ll do that by following any of the alternative connection methods we showed you.
Aside from the ways we mentioned above, you can also use kalipi-config tool. In most cases, you should already have access to it. If you don’t, you can install and run it. Once you do, you’ll see a menu with a full list of options. You should click on Network Options to set up every network you want to connect to.
In Conclusion
Your device should automatically connect to any Wi-Fi network you already entered the password for if it’s within range. The only important thing to note is that you’ll have to properly connect it to the network in the first place. Luckily, you have more than one way of doing that in Kali Linux and the process is pretty easy if you follow our simple steps!

Hey, I’m Jeremy Clifford. I hold a bachelor’s degree in information systems, and I’m a certified network specialist. I worked for several internet providers in LA, San Francisco, Sacramento, and Seattle over the past 21 years.
I worked as a customer service operator, field technician, network engineer, and network specialist. During my career in networking, I’ve come across numerous modems, gateways, routers, and other networking hardware. I’ve installed network equipment, fixed it, designed and administrated networks, etc.
Networking is my passion, and I’m eager to share everything I know with you. On this website, you can read my modem and router reviews, as well as various how-to guides designed to help you solve your network problems. I want to liberate you from the fear that most users feel when they have to deal with modem and router settings.
My favorite free-time activities are gaming, movie-watching, and cooking. I also enjoy fishing, although I’m not good at it. What I’m good at is annoying David when we are fishing together. Apparently, you’re not supposed to talk or laugh while fishing – it scares the fishes.
