
The Internet is a staple accessory in many homes today. With more people working remotely, it is essential to have a reliable internet connection. Hence people can connect two routers via an Ethernet cable to extend internet coverage in their homes. The concept is popularly known as cascading routers.
However, this does not mean hooking up the routers, and you are done. To successfully connect two routers, you have to update the configuration settings for a working connection. Keep reading as we look into cascading routers and why the cascaded router IP address should be a WAN-side subnet.

CONTENTS
What Are Cascading Routers?
A cascade entails connecting two routers using an Ethernet cable. Cascading routers, therefore, entails a primary router connected to a gateway/modem. The primary router then connects to the secondary router.
Cascading routers is the equivalent of bridging routers. The difference is that bridging uses a wireless connection while cascading is done using a wired connection.
Cascading routers can be done in two ways: LAN to LAN and LAN to WAN
LAN to LAN
In this cascading type, the two routers connect via their LAN ports. Specifically, an Ethernet cable runs from the primary router’s LAN port to the secondary router’s LAN port.

A Local Area Network (LAN) involves a connection within a local geographical area. Therefore, a LAN connection can connect computers within schools, hospitals, or business organizations.
A LAN-to-LAN cascade bypasses some of the secondary router’s features, thus making it work purely as a bridge between connected devices and the primary router.
Some of the features this connection bypasses include Network Address Translation (NAT), the firewall, and its general routing capabilities.
Features that are not disabled by such a connection are the Dynamic Host Configuration Protocol (DHCP) and the Internet Gateway Device Protocol (IGDP).
Notably, the primary router takes over all the functions that the secondary router does not.
For this connection to work, you need to disable the secondary router’s DHCP settings to ensure the secondary router acts as an access point and not a router.
How to Cascade LAN to LAN
Assign the Routers
The initial step is to decide which router will be the primary router and which one will be the secondary router. It is advisable to use the more advanced or newer router as the primary router. A more capable router as the primary router will ensure you enjoy all its capabilities, including improved speeds.
Once you assign the routers, disconnect all devices from the routers so you can free some IP addresses and facilitate a faster configuration.
While at it, also note the primary router’s IP address. If you don’t know how to, the process is explained in detail below.
Access the Secondary Router’s Settings Page
Ensure you connect a computer or laptop to the secondary router, preferably using an Ethernet cable. Then enter the second router’s IP address into the address bar of your preferred browser.
While accessing the administration page, ensure the secondary and primary routers are not connected.
If you do not know the secondary router’s IP address, it is usually on a label on the back or bottom of the router.
Alternatively, press Windows + R on your Windows operating system, type CMD into the textbox, and hit enter. Then in the command prompt window, type ipconfig and hit enter.
Your IP address will be the number next to the Default Gateway.

To find your router’s IP address on Mac, open the applications folder and double click on Utilities.
Next, launch the Terminal app and enter netstat -nr|grep default.
The IP address will be next to “Default.”

Once you have the IP address, enter it into the search bar of your preferred browser and hit enter. When prompted for the username and admin password, key them in, and you are on the router’s administration page.
If you do not know the password and admin username, google your router’s brand name followed by username and password. For instance, you could search NETGEAR Nighthawk’s default user name and password.
Change the Secondary Router’s IP Address
Locate the secondary router’s Local IP address, generally under basic setup settings.
If the primary and secondary routers share an IP address change the fourth group of digits.

For instance, if the primary router’s IP address is 192.168.1.1, change the secondary router’s IP address to 192.168.1.2.
You can use any number from 1to 254; however, ensure that the number you choose is higher than that of the primary router.
A higher number would ensure the routers are out of each other’s IP range hence less chance of IP conflicts.
Disable DHCP Settings on the Secondary Router
Locate DHCP settings on the secondary router and disable them.
The purpose of DHCP is to assign IP addresses to devices. But this function will be managed by the primary router only. Remember – the secondary router in this setup is just an access point.
You could leave the DHCP settings enabled on the secondary router; however, that could cause problems. Both routers might assign the same IP address to different devices simultaneously, causing an IP address conflict, thus hindering connectivity.
Remember to save settings so that they can be operational.

Connect the Ethernet Cable to the Primary Router
The final step is to disconnect the ethernet cable from your computer and connect it to the LAN port of the primary router.
Therefore, ensure that the primary router has a cable running from its LAN port to the secondary router’s LAN port. Both routers should now be able to share a connection and provide internet access.
In the above type of setup, you could name the secondary router’s wireless SSID the same as the primary router’s network name.
LAN to WAN
In this type of connection, the LAN port of the primary router connects to the WAN port of the secondary router.

A Wide Area Network (WAN) connection is a combination of different LAN networks, thus enabling information sharing in a wider geographical area.
Telecommunication companies generally provide Wide Area Networks. A LAN to WAN cascade would allow you to have a new separate network from the already existing one.
A WAN to LAN cascade ensures that both routers maintain their routing capabilities.
Therefore, the two routers will function separately, albeit sharing a connection. You will have two separate network broadcasts in your home or business environment.
How to Cascade LAN to WAN
Note the IP Address of the Primary Router
The initial step is to note the IP address of the primary router. That way, we can easily compare it with the secondary router’s IP to see if they are similar.
If both routers share an IP address, change the third group of numbers in the secondary router’s IP address.
For instance, if they both share 192.168.0.1, change the secondary router’s IP to 192.168.2.1.
Enable DHCP
DHCP settings are always automatically enabled in most routers. So, your task would be to confirm your router’s DHCP settings are enabled.
Connect LAN to WAN
The final step is to connect the ethernet cable from the primary router’s LAN port to the secondary router’s WAN port.
You could consider restarting your devices to ensure that the connection works as you want.
Always ensure you click Save whenever you change your router settings before proceeding to the next steps.
IP Addresses
To adequately understand what a subnet is and why the WAN-side of the cascaded router should be a subnet, we first need a little information about IP addresses.
An Internet Protocol (IP) address is a string of numeric characters identifying devices on a computer network. It uses the Internet Protocol to identify said devices.
Therefore, an IP address ensures information sent from a particular computer or network reaches its destination. Additionally, the address ensures the responding device knows exactly where to send the required information.
The network interprets IP addresses from binary digits (bits) to more familiar decimal numbers that are easier to understand.
IP addresses contain numbers from 0 to 255 because IP addresses initially had a 32-bit limit. That means the possible combination of IP addresses was approximately 4 billion (28), which seemed hard to reach in the initial days of internet connectivity.
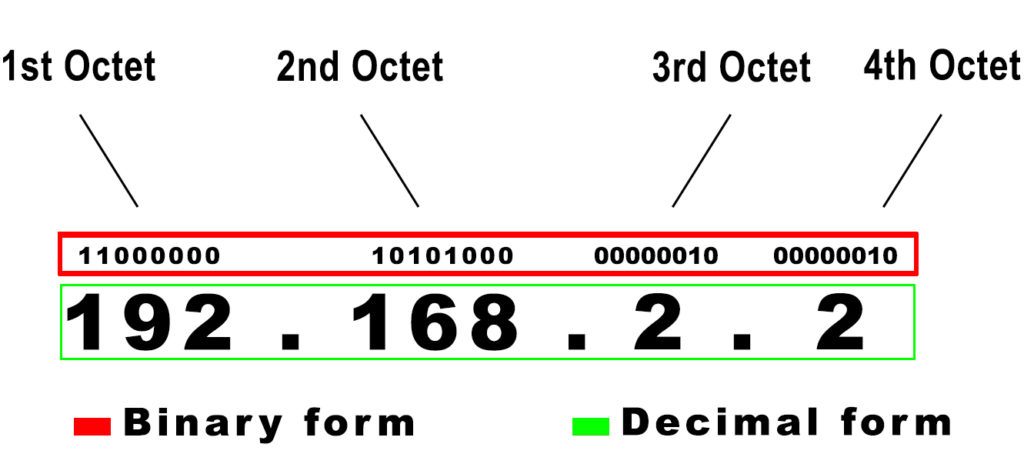
Example of an IP Address
IP addresses are divided into two groups – public and private IP addresses.

A public IP connects your devices to the WAN side of the Internet, while a private IP facilitates LAN side connections.
The subdivision ensures the conservation of the available IP addresses and enhances your device’s security on the Internet.
What is a Subnet?
Essentially a subnet is a network within a network (subnetwork). Therefore, a subnetwork is the division of an IP address so that information does not have to go through unnecessarily long channels to reach its destination.
Unnecessary long channels, in this case, means using a new IP address when the connection can use the available address to achieve the intended results.
Specifically, a subnet allows devices to share an internet connection seamlessly.
Hence a WAN side subnet would ensure your cascaded routers share a connection without the secondary router needing a new public IP address. Instead, it would forward all WAN IPs to the primary router. The primary router will then forward them to the gateway.
A subnet then uses a subnet mask to identify parts of an IP address since IP addresses have information identifying the device and network.
Consequently, the 32-bit subnet mask sets all host bits to zeros and network bits to ones. Then, when data packets arrive at the gateway and are sent to the primary router, it uses a subnet mask to determine the data packets’ destination.
Precisely, a subnet mask delivers data to the subnetwork responsible for handling that specific data coming from the gateway.
Hence when cascading routers, the WAN side should be a subnet to allow data packets to reach their specific destinations.
Additionally, a WAN side subnet would ensure there are no IP address conflicts, a situation that could cause connectivity issues and, in the worst scenario, hinder internet access.
Conclusion
The above information should help you extend internet coverage in your home or office. The cascading process is beneficial to people with old routers who do not know what to do with them.
Also, if you do not wish to go through the cascading process, consider purchasing Wi-Fi extenders, switches, or access points. These devices will enhance your network range and are easier to set up compared to cascading routers.

Hey, I’m Jeremy Clifford. I hold a bachelor’s degree in information systems, and I’m a certified network specialist. I worked for several internet providers in LA, San Francisco, Sacramento, and Seattle over the past 21 years.
I worked as a customer service operator, field technician, network engineer, and network specialist. During my career in networking, I’ve come across numerous modems, gateways, routers, and other networking hardware. I’ve installed network equipment, fixed it, designed and administrated networks, etc.
Networking is my passion, and I’m eager to share everything I know with you. On this website, you can read my modem and router reviews, as well as various how-to guides designed to help you solve your network problems. I want to liberate you from the fear that most users feel when they have to deal with modem and router settings.
My favorite free-time activities are gaming, movie-watching, and cooking. I also enjoy fishing, although I’m not good at it. What I’m good at is annoying David when we are fishing together. Apparently, you’re not supposed to talk or laugh while fishing – it scares the fishes.