
Many people are still unaware that they can set their Wi-Fi network either as a public or private network. It is a very important differentiation, and you’d be surprised to find users having no clue about their existence, let alone how to change networks from Public to Private and vice-versa in Windows 10.

There are always two default security and sharing settings when you log in to your Wi-Fi network in Windows 10 – public and private. They are meant for what the names suggest.
Everyone would have come across that you can set your Wi-Fi networks as public or private when you first set up the internet connection. And you can always change your preference anytime you like. You will find a simple step-by-step guide on how to change from one mode to another below.
Before that, let’s understand what they are and when or where they’re suitable to use.
CONTENTS
Private Network
A private network lets other devices discover your device on their networks. You’d generally use a private network for a trusted network, such as the one for home or office use. In this setup, your device can share files and printers. It’s useful to set your network to a ‘Private Network’ when you are certain that you can safely use it at home or the office.
Public Network
Obviously, a public network offers a connection when you’re on the move and need to connect to the internet in public places, such as cafes, hotels, and hangout places. You don’t want your device’s name to flash all over the public network, and you should set up your device network to ‘Public to ensure your device and data safety. Your device cannot share any files or printers in this setup for obvious reasons.
Recommended reading:
- How to Fix Xbox Not Connecting to Wireless Network?
- Wi-Fi Keeps Connecting to Wrong Network (4 Easy Fixes)
- Wi-Fi Network Could Not Be Joined (7 Ways to Fix It)
Now that you know when to use a private or public network let’s find out how easy it is to switch them around.
Switching from Public to Private Wi-Fi Networks
Follow these steps when you first connect to the internet:
- Look for the Wi-Fi network icon on the bottom-right of the Windows 10 screen and click on it.
- It will list down a number of popular and strong Wi-Fi networks. Select your desired network and select ‘Connect’.
- Key in the password and press ‘Next’.
- Windows 10 will prompt a choice whether you want other devices to see your network name, with two network setups.
- Public Network – other devices cannot find your device on the network list. Click ‘No’
- Private Network – other devices can see your device on the network list. Click ‘Yes’
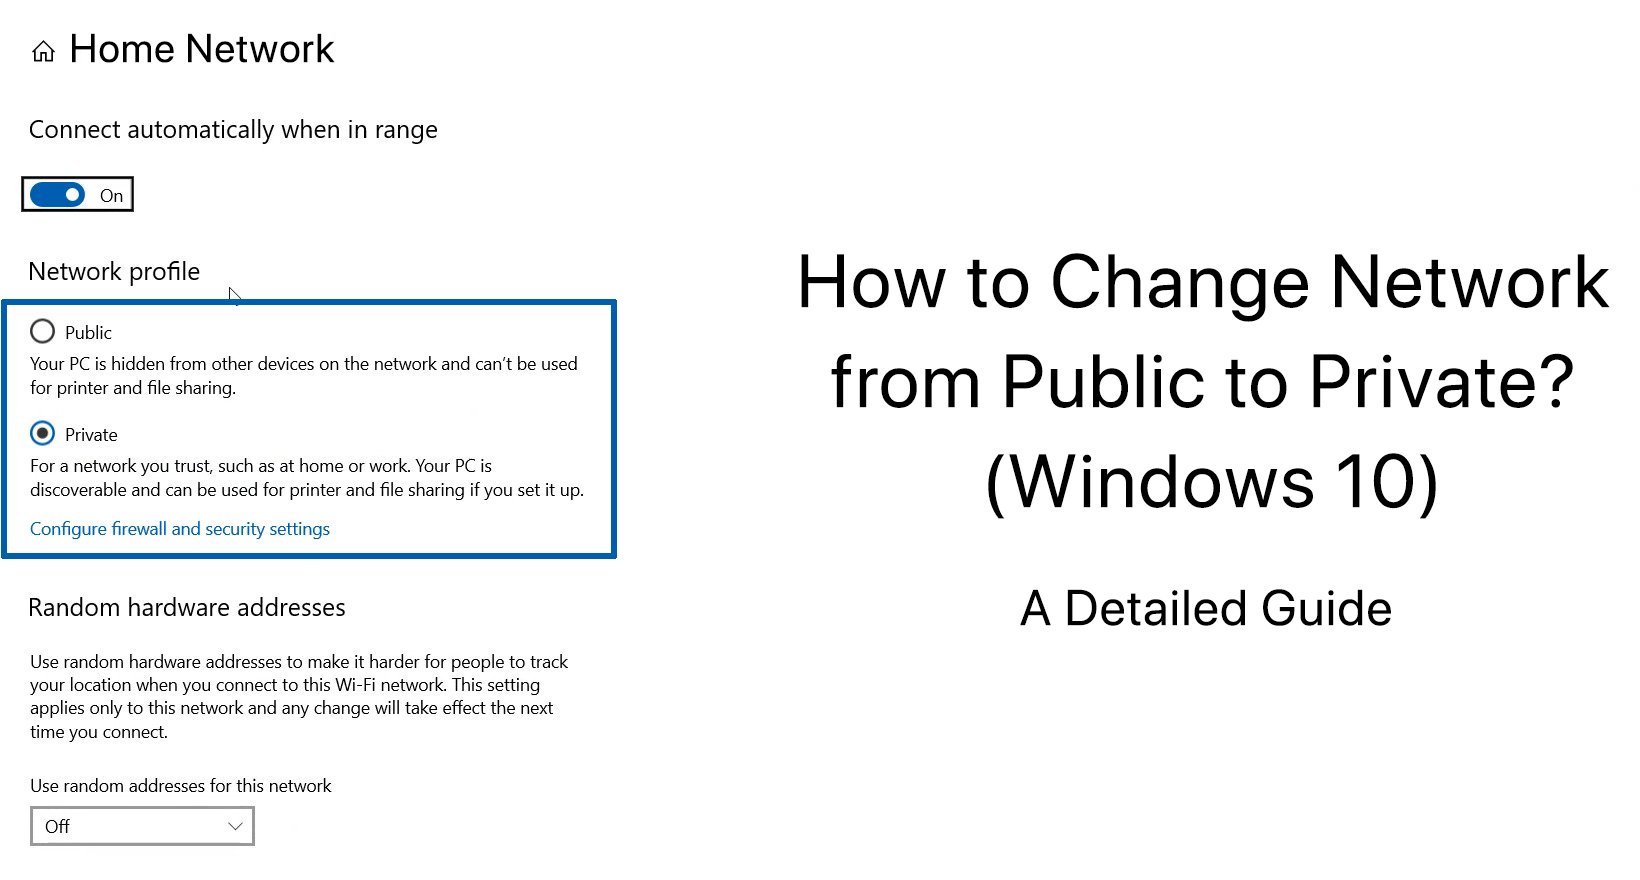
The Next Time you Want to Change Wi-Fi network to Public or Private, Follow These Simple Steps:
- Go to the same Wi-Fi icon on the bottom-right of the screen.
- Lookup and choose the Wi-Fi network that you want to use, and select ‘Properties’.
- Finally, under Network Profile, choose Public or Private.

Switching from Public to Private on Wired Ethernet Networks
For some internet users, a wired Ethernet connection still gives the best experience since it provides a more robust, faster, and more stable internet connection compared to the unpredictable wireless Wi-Fi connection – at least until Wi-Fi 7 can really prove it can replace the Ethernet.
Follow these steps to change your network from public to private on an Ethernet connection:
- Go to the Start Menu and click on the Settings icon.
- Then select ‘Network & Internet’.
- From the list of networks available, select ‘Ethernet’.
- Find your Ethernet network and click on it
- Finally, select ‘Private’ in place of ‘Public’, and you’re now on Private Network.
How to Change Network Settings from Public to Private on Wired Ethernet Networks
Switching from Public to Private Network Using PowerShell
Microsoft PowerShell is a task automation quick fix and configuration management system. It works with a command-line shell and a scripting language used to automate management and formatting systems. Although this somewhat semi-technical description might scare you off, you can actually do simple formatting like switching from public to private network with PowerShell.
These are the steps you need to do:
- Right-click on the Windows button on the bottom-left of the computer screen.
- Choose Windows PowerShell (Admin) – you need to log in as an admin in order to perform the switching.
- PowerShell will leave a prompt, and all you need to do is type this: net user administrator /active:yes, then press the <Enter> key to launch PowerShell.
- Next, you will need to list the current network name. Type: Get-NetConnectionProfile, then press the <Enter> key. The existing network will be listed here.
- Now you can switch your network status from public to private by typing this: Set-NetConnectionProfile -Name “NetworkName” -NetworkCategory Private.
But don’t forget to replace “NetworkName” with your actual network name.
How to Switch from Public to Private in Windows 10 Using PowerShell
Conclusion
If you have read the first few paragraphs of this post, you’ve got to be proud of yourself for having a basic internet connection knowledge that not many people are aware of – what public and private networks are and when to use them. It’s even better if you reach up to this line, which means you know how to change the network from public to private in Windows 10.
With that awareness, it’ll not be a surprise if it could trigger your willingness to increase the security of your internet connection network. With security breaches increasing in recent years, just as fast as IT technology develops, it’s a smart move to have a look at your network security, even if you have already set up a private network at home.

Hey, I’m Jeremy Clifford. I hold a bachelor’s degree in information systems, and I’m a certified network specialist. I worked for several internet providers in LA, San Francisco, Sacramento, and Seattle over the past 21 years.
I worked as a customer service operator, field technician, network engineer, and network specialist. During my career in networking, I’ve come across numerous modems, gateways, routers, and other networking hardware. I’ve installed network equipment, fixed it, designed and administrated networks, etc.
Networking is my passion, and I’m eager to share everything I know with you. On this website, you can read my modem and router reviews, as well as various how-to guides designed to help you solve your network problems. I want to liberate you from the fear that most users feel when they have to deal with modem and router settings.
My favorite free-time activities are gaming, movie-watching, and cooking. I also enjoy fishing, although I’m not good at it. What I’m good at is annoying David when we are fishing together. Apparently, you’re not supposed to talk or laugh while fishing – it scares the fishes.