Every time we connect our Windows 10 computer to a wireless network, it creates a profile for that network and saves it. Generally, the information about this network is its SSID or network name, the encryption type used by the network, its wireless password, and some other network-related info.
If you carry your laptop with you all the time and you connect it to various networks, Windows 10 creates and stores the network profile for each network. So, the next time you are in the range your laptop will connect automatically.

CONTENTS
Why Should You Clear Saved Wi-Fi Networks?
Although it is a pretty useful feature, sometimes it can cause some issues, especially when the wireless password for a specific network changes and it tries to connect using the old wireless password. If that happens to you, the best solution is to clear the Wi-Fi connection in Windows 10, or to be more specific – forget it. Another situation is when your computer automatically connects to the wrong network instead of the one you want. The best way to prevent this from happening is to forget all the other networks in range.
In the next few paragraphs, we are going to show you how to clear a Wi-Fi connection in Windows 10. Since this can be a pretty time-consuming process if you have dozens of saved networks, there is also a way to clear all the Wi-Fi networks in Windows 10.
Best Ways to Clear a Wi-Fi Connection in Windows 10
Clearing or forgetting a Wi-Fi connection in Windows 10 is pretty simple. We are going to guide you through the four ways to forget a network in Windows 10, and you can choose the one that suits you best.
NOTE: To clear all Wi-Fi connections in Windows 10, just repeat the steps for every Wi-Fi network that has been saved.
Clear a Wi-Fi Network from The System Tray
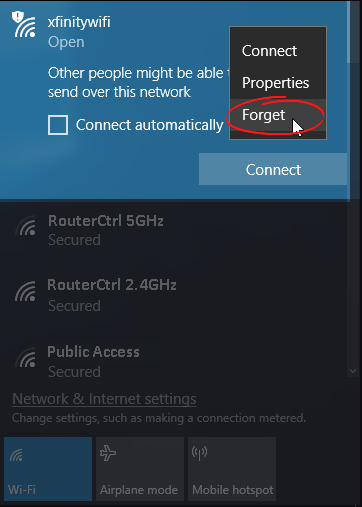
If you want to forget the wireless network you are currently connected to, you can easily forget it from the system tray. Also, if there are several different wireless networks in range, and you want your computer to connect to just one, forgetting all the others can be done in this way:
- Click on the Wi-Fi icon in the system tray.
- The list of available networks will appear.
- Right-click the one you want to forget and select Forget from the list.
- This will clear the Wi-Fi network and your computer won’t connect automatically the next time it’s in range. However, if you want to connect again to this network, you will have to enter the password.

IMPORTANT: When you forget a network, it will still appear on the list of available networks.
You can repeat these steps for each network you want to clear from Windows 10.
How to Forget a Wi-Fi Network Using the Settings App
Another way to remove Wi-Fi networks one by one is with the help of the Settings app.
- On your keyboard press the Windows logo button and the letter “I”.
- The Windows Settings app will open.
- Click on Network & Internet.
- Click on Wi-Fi in the left-hand pane.
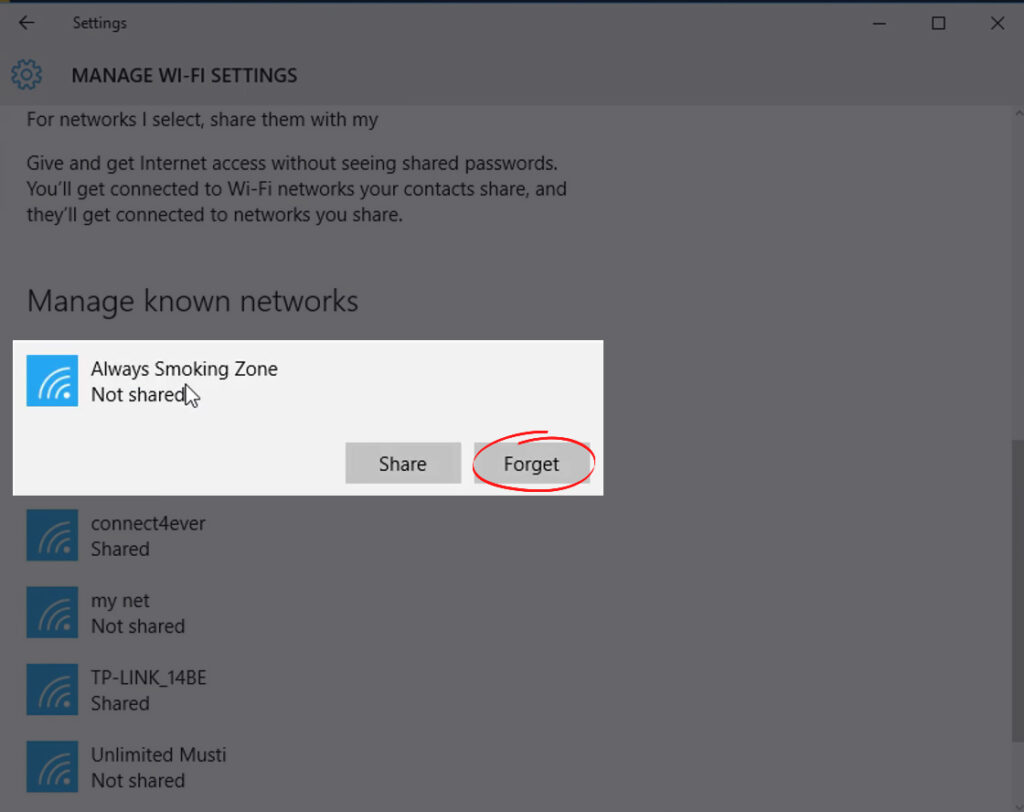
- Now click on Manage known networks.
- All the networks you have connected to before will be listed here. You can click on each of them now and select Forget.

How to Delete a Wi-Fi Network in Windows 10
How to Forget a Wi-Fi Network Using the Command Prompt (Or PowerShell)
If you have too many Wi-Fi networks, finding the one you want to remove can be pretty boring. Because of that, we will see how to clear one specific network using the Command Prompt now. And the best thing about the Command Prompt is that you can clear all saved Wi-Fi networks at once.
You can also use PowerShell with the commands listed below. Just make sure to launch it as administrator.
- Launch the Command Prompt as administrator. Click the search icon in the taskbar and type “cmd”. When the Command Prompt icon appears, run it as administrator. Click Yes when prompted.
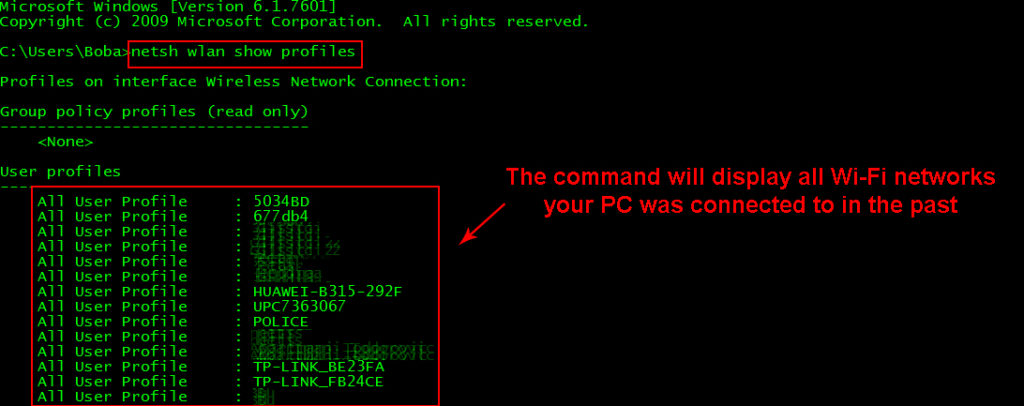
- Copy/Paste this command into Command Prompt
netsh wlan show profiles
This command lists all the Wi-Fi networks your computer has been connected to.

- Now copy/paste or type this command
netsh wlan delete profile name=”Wi-Fi_name”
This command will delete a specific Wi-Fi network, you just have to replace Wi-Fi_name with the Wi-Fi network name listed in the previous command.

- If you want to clear all the Wi-Fi networks use this command:
netsh wlan delete profile name=*
Close the Command Prompt after you run this command.
NOTE: Since this command deletes all the Wi-Fi networks you will be disconnected from the current one and you will have to log in again.
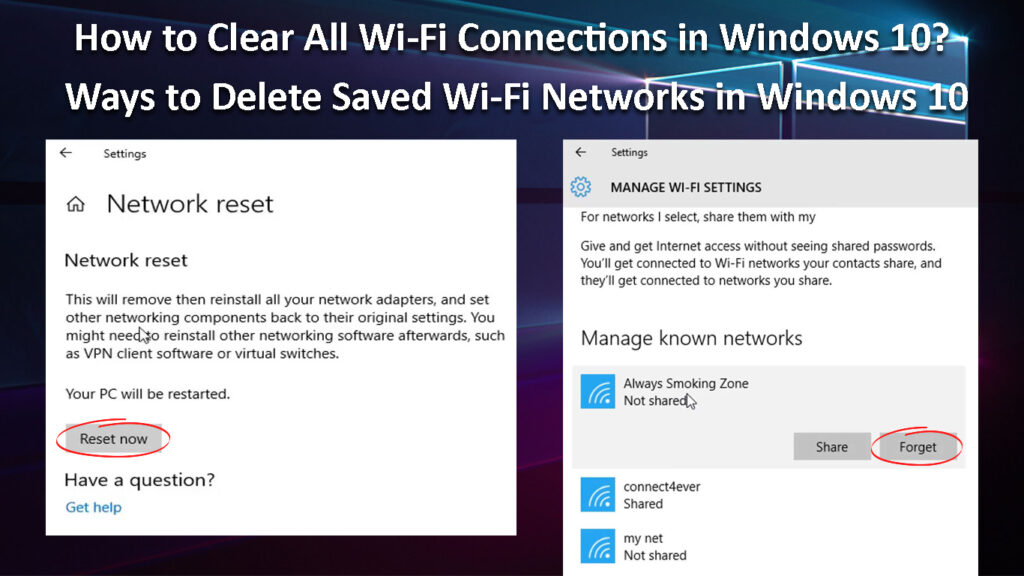
How to Reset All Network Settings in Windows 10 (Delete All Saved Wi-Fi Networks at Once)
Final Words
These are the ways to clear a Wi-Fi network from Windows 10 or to clear all Wi-Fi connections. If you have a few saved networks you can delete them one by one; however, if you want to clear all of them, use the last command. It will save you some time and you will achieve your goal – clearing all the Wi-Fi networks in Windows 10.
As you can see, the ways to clear all the Wi-Fi networks in Windows 10 are not too complicated and you don’t need any advanced tech knowledge to do it. Just make sure to choose the method that suits you best.

Hey, I’m Jeremy Clifford. I hold a bachelor’s degree in information systems, and I’m a certified network specialist. I worked for several internet providers in LA, San Francisco, Sacramento, and Seattle over the past 21 years.
I worked as a customer service operator, field technician, network engineer, and network specialist. During my career in networking, I’ve come across numerous modems, gateways, routers, and other networking hardware. I’ve installed network equipment, fixed it, designed and administrated networks, etc.
Networking is my passion, and I’m eager to share everything I know with you. On this website, you can read my modem and router reviews, as well as various how-to guides designed to help you solve your network problems. I want to liberate you from the fear that most users feel when they have to deal with modem and router settings.
My favorite free-time activities are gaming, movie-watching, and cooking. I also enjoy fishing, although I’m not good at it. What I’m good at is annoying David when we are fishing together. Apparently, you’re not supposed to talk or laugh while fishing – it scares the fishes.
