Sometimes, your computer might decide to test your patience with constant disconnection from the Wi-Fi. Whether the disconnection lasts for a few seconds and reconnects or disconnects and stays that way, it is bound to push you to the extremes. Together, we will look for the possible causes and provide solutions for you to have smoother gaming, working, or streaming experience.

CONTENTS
Not Just Yet!
Before changing settings and updating drivers, consider trying quick fixes that do not require much effort but are effective.
As a precaution, check that the router power cable has a proper connection. Also, ensure that the router and the modem Ethernet cable connections are tight.
Confirm that your computer is within range of the router. If not, move closer to the router.
Remove objects between your router and computer and ensure the router is free from covering with things like clothing or books.
Additionally, restart your router, modem, and computer to see if that fixes any temporary problems.
If none of the above is causing your problem, then it is time to try more intrusive methods, and hopefully, one will work for you.
The other causes for constantly dropping Wi-Fi could be:
Power-Saving Mode
Your computer’s power-saving mode is essential in preventing energy wastage. It works by stopping some computer functionalities when they are not in use. On some occasions, the feature can be responsible for your computer’s problems.
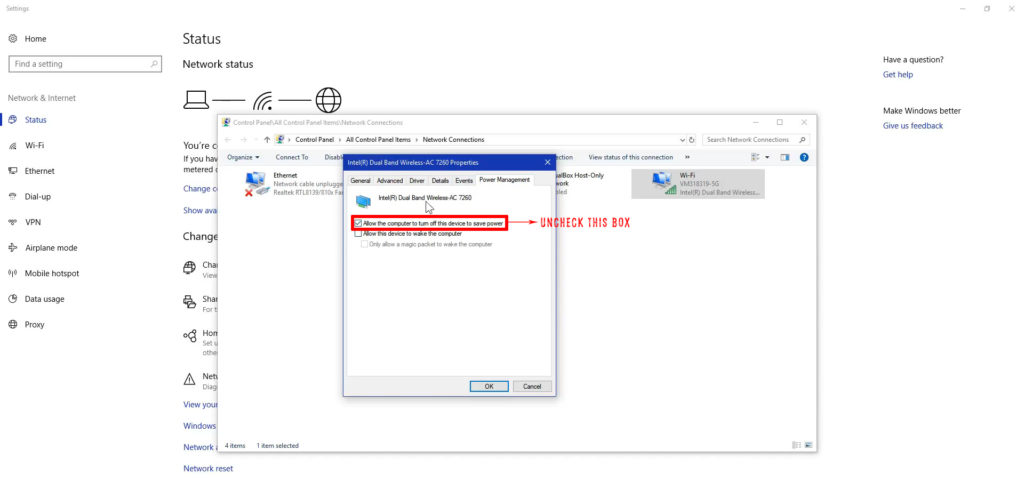
Here’s how to turn off the power-saving feature in Windows 10:
- Press Windows + R and in the pop-up box, enter the command ncpa.cpl and Enter.
- Go to wireless network properties by right-clicking on your current Wi-Fi network.
- Select Configure and uncheck the box that says Allow the computer to turn off this device to save power under the power management tab.
- Click on ‘OK’ to save the settings.

Observe your Wi-Fi connection, and hopefully, it works fine now. If not, let us move to another possible cause.
Outdated Drivers
Although Windows automatically updates all your drivers whenever there is a new system update, you might want to check for new drivers manually.
A manual driver update would fix broken drivers and allow you to resolve any driver issues that might cause an unstable connection.
To update the network driver;
- On the taskbar, click on the search icon, and in the text box, search for Device Manager.
- Next, select the Network Adapters option and double-click on the wireless adapter option.
- Click on the driver tab and update the driver.
- The other options, e.g., rollback driver, are if your connectivity issues begin as soon as you install an update.
- You can also choose to uninstall and reinstall the wireless adapter if the problem persists, even after trying the first two options.
The Wi-Fi Autoconfig Service
If anyone accidentally or intentionally disables this service, it may result in abnormal network connection behavior.
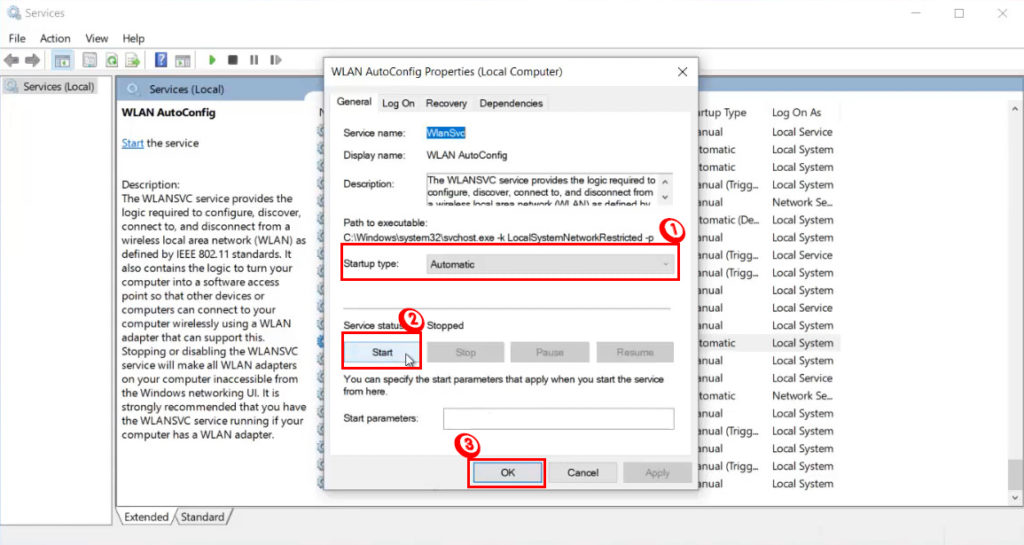
The steps below illustrate how you can easily enable the service on your Windows computer.
- Press the shortcut Windows + R to open the run functionality. In its search box, enter the command services.MSC and select ok.
- Next, find WLAN AutoConfig and right-click on it. Select Properties in the open window.
- Under the General tab, select the drop-down menu next to the Startup Type option.
- On the option>select automatic, click on apply, and select ok.
- Confirm if your computer is still dropping Wi-Fi; if it is, restart it and try these steps one more time.

System Update
On rare occasions, your computer’s system update could be incompatible with the Wi-Fi router because of a more recent update.
Both your computer and router require system updates from time to time. Usually, Windows updates automatically, but if yours did not happen for whatever reason, you could do it manually.
A quick way to get to the update window is to search system updates in the search bar.
From there, you can choose to confirm that Windows can automatically install updates with the update settings.
You can also click on check for updates if there are new pending updates for your computer.
Do not forget to check for a firmware update for your router. To do this, you should use an Ethernet connection to log into the network’s administration page. After you log in, you can follow the procedure that works for your router as there are various models.
Antivirus or VPN Program
If you have recently done an app installation with network access, that could be the cause. Programs such as VPNs and Antiviruses have your best interests at heart, but sometimes, they go rogue.
However, before rushing to uninstall the antivirus program, you should scan your computer for possible threats or malware affecting your connection.
Uninstalling the programs should come last, especially if you have tried disabling their network security feature and the connection still refuses to work.
To uninstall an interfering program, search for the Control Panel in the search bar and select it. Then click on programs>uninstall a program. Double click on the culprit program to remove it from your computer.
Public Network Settings
If your home Wi-Fi identifies as a public network instead of a private network, it is bound to cause connection problems, including slowing down your internet.
Select settings from the Start menu and go to Network and Internet to change these settings.
Next, click on Wi-Fi, then manage known networks.
Click on your network connection to forget it so that you can reconnect.
When reconnecting after entering your password, the system will ask you whether you want your computer to be discoverable or not, select yes.
Wi-Fi Sense
This step is mainly for anyone using an outdated Windows version, specifically version 1803 and the previous versions of Windows 10.
According to their statement, Windows removed the feature because of low uptake, and it was expensive to manage. For those still with the feature, you can disable it by following these steps:
- Click on the Windows icon and then select Settings to get to Network and Internet.
- Select Manage Wi-Fi settings and scroll to the Wi-Fi Sense option on the Wi-Fi section.
- Toggle the “Connect to networks shared by my contacts” option to off and restart your computer.
As you go through various settings, ensure that you have a data backup and a start restore point should you experience additional problems.
How to Disable Wi-Fi Sense in Windows 10
Conclusion
After going through a myriad of possible solutions, hopefully, you can now rest easy. Wi-Fi connectivity problems tend to reoccur, so ensure you know what solution works for you now in preparation for the next time. Just in case… If the problem persists, consider visiting a technician or contacting your device manufacturer.

Hey, I’m Jeremy Clifford. I hold a bachelor’s degree in information systems, and I’m a certified network specialist. I worked for several internet providers in LA, San Francisco, Sacramento, and Seattle over the past 21 years.
I worked as a customer service operator, field technician, network engineer, and network specialist. During my career in networking, I’ve come across numerous modems, gateways, routers, and other networking hardware. I’ve installed network equipment, fixed it, designed and administrated networks, etc.
Networking is my passion, and I’m eager to share everything I know with you. On this website, you can read my modem and router reviews, as well as various how-to guides designed to help you solve your network problems. I want to liberate you from the fear that most users feel when they have to deal with modem and router settings.
My favorite free-time activities are gaming, movie-watching, and cooking. I also enjoy fishing, although I’m not good at it. What I’m good at is annoying David when we are fishing together. Apparently, you’re not supposed to talk or laugh while fishing – it scares the fishes.

