The internet signal passes through your router first before reaching your devices. As you already know, various threats come from the internet, such as viruses and malware. You’d probably recognize such threats and know how to handle them, but what about your children?
These days children know how to do all kinds of things on the internet, probably due to online exposure early in their lives. However, they could be trapped, unknowingly, by numerous online threats in the forms of malware, phishing efforts, hostile websites, and uncountable other threats from the internet.
Therefore, it’s crucial to safeguard your home Wi-Fi network from such threats and monitor your children’s online activities. It’d be intelligent to ensure your router has the best security system to keep such threats at bay. In addition, you can also keep your children’s online actions under surveillance using the router’s parental control features.
Continue reading this guide on how to configure parental controls on your TP-Link, NETGEAR, or Linksys routers.
CONTENTS
TP-Link
If you have a TP-Link router, follow this method to set up parental controls:
Firstly, find your router’s IP address.
- Normally, it’s stated at the back of your router.
- If it’s not there, use the following steps:
- Go to the search box at the bottom-left of your monitor.
- Type in “cmd” and press the <Enter> key.
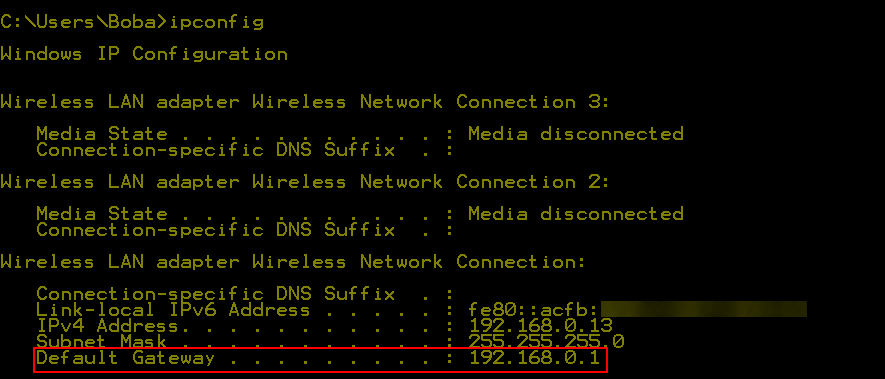
- You will come to the Command Prompt page. Enter “ipconfig” and <Enter> to proceed.
- The IP address of your router is at the “Default Gateway.”
The next step is to get into your router’s admin page settings. Follow these steps:
- Enter your router’s IP address on the browser’s address bar.
- Enter the username and password to log in. Find the credentials at the back of your router (typically, the default username and password are “admin” and “admin”).
- Check the Parental Controls box on the left.
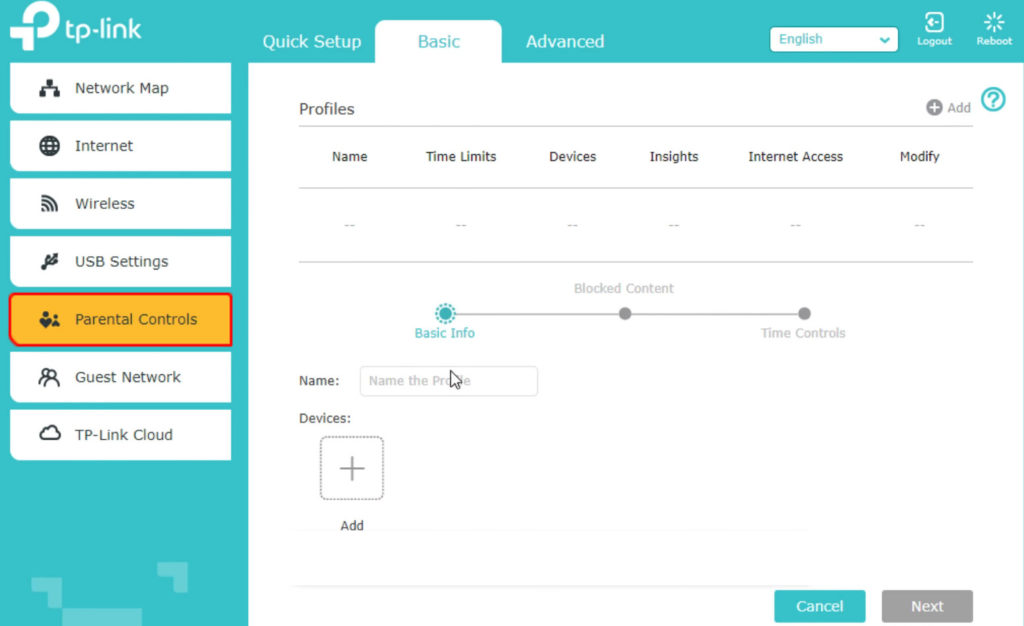
- At the top portion, you can enter the MAC Address of the Parental PC with the MAC address of the current PC used in configuring the router.
- On the first page, you can specify the IP addresses of the devices you want to control, or you can simply select the devices for which you want to create rules.
- Next, you must specify the time for the controlled devices to be allowed an internet connection.
- Check the period in the drop-down menu applicable to each day or week.
- Through parental controls, you can also specify websites you want to block
TP-Link Router – Introduction to Parental Controls
NETGEAR
NETGEAR is another famous router brand. Here are the steps to configure parental controls on your NETGEAR router.
Recommended reading: How to Backup and Restore Router Configuration Settings (Step-by-Step Guide)
Firstly, if you want full access to NETGEAR’s Smart Parental Controls for mobile devices, you will need to download and install the NETGEAR Nighthawk App or the Orbi app and then pay to unlock premium parental control features. Without premium features, you will only be able to create profiles, pause/un-pause the internet for those profiles, filter content by age/category, and see browsing history.
NETGEAR’s Smart Parental Controls
If you want to set time limits, bad times, block certain content, or monitor kids’ online activities, you will have to pay a monthly fee. There’s a 30-day trial period so you can try the app before making a purchase. If you want to use your PC/Mac to adjust parental controls, you will also have to install the Nighthawk app on your phone.
Apparently, that’s the way things work now with NETGEAR routers. Before Smart Parental Controls, there was the Circle app, and before the Circle app, there was the NETGEAR Genie app and Live Parental Controls.
Setting up Parental Control for Your Home Wi-Fi Network
- Launch the NETGEAR Nighthawk app.
- Select Parental Controls by clicking the button on the menu.
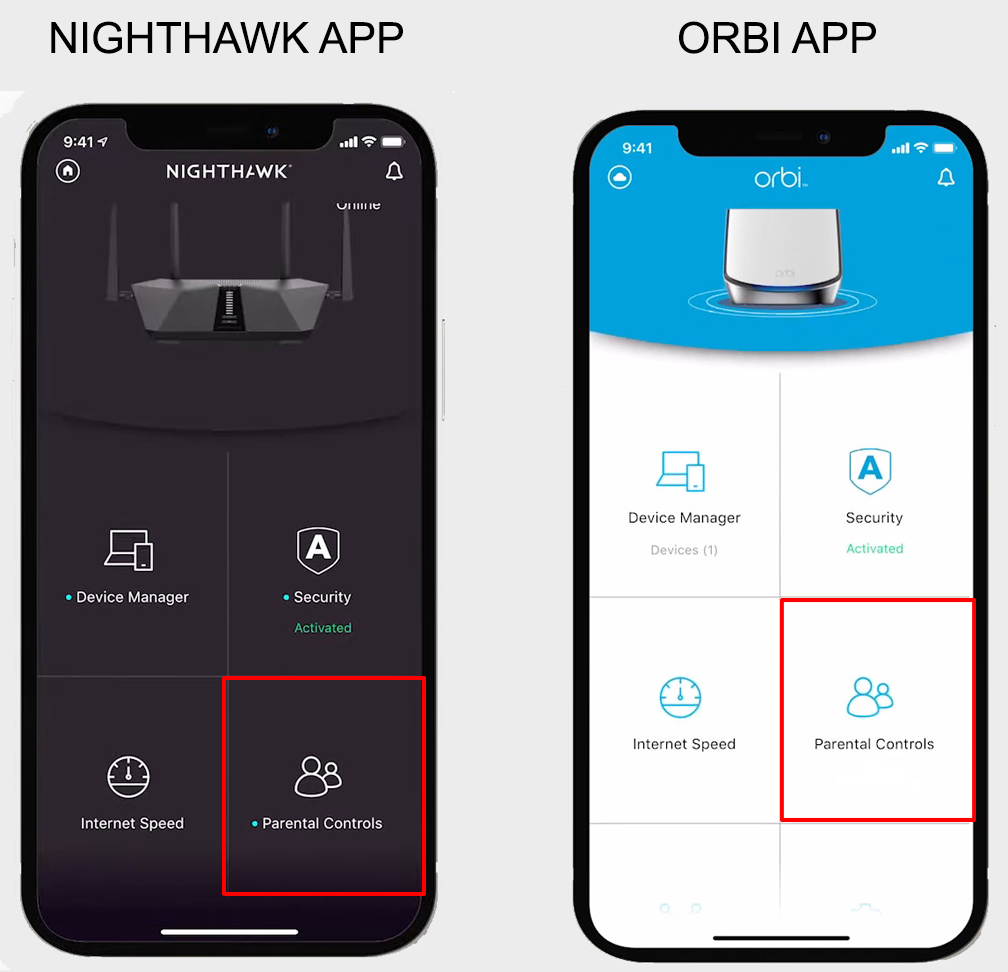
- When you open the parental controls, you can start using basic settings (create profiles, assign devices to those profiles, set filtering level for each profile, and pause the internet for those profiles). If you want, you can start a free trial with Smart Parental Controls. After 30 days, you will have to decide whether you want to pay for premium features or not.
Linksys
The last router brand we are going to configure parental controls for is Linksys. Follow this method to do it on your smartphone:
- Download and install the Linksys app.
- Launch the app and look for ‘”Parental Controls” by scrolling down the screen.
- Through the Linksys app, you can set the filtering based on the device.
- Select the device.
- On the “Block site”, add restricted websites which you don’t want your child to visit and save them.
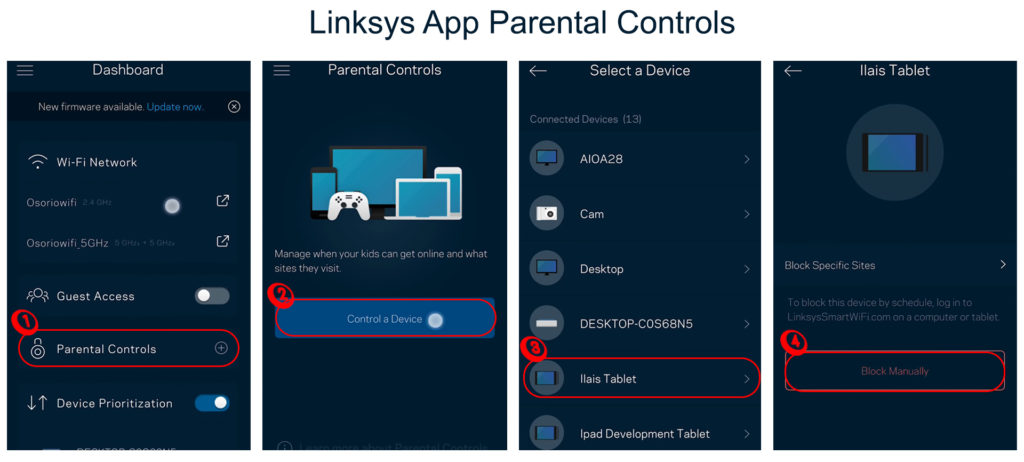
- You can also find a one-action button to block your child’s access to the internet. It’s the large button named “block access”. Push the button once to activate the function.
For more settings and parental control options, you have to use your router’s web-based configuration manager (aka Smart Wi-Fi Platform). There, you can create Wi-Fi schedules, bedtime schedules, etc. Follow these steps to run it on a computer:
- Firstly, you need to go to the Linksys Smart Wi-Fi platform. You can restrict the devices allowed to connect to the internet at certain times (up to 14 devices).
- Next, look up your router’s IP address. Typically, it’s printed at the back of your router. You need this address to log in to your Linksys router.
Follow these steps to log into your router’s platform:
- On your browser’s address bar, type in the IP address of your router.
- Type in the username and password. You can find them on the same sticker on the back of your router (the default username is usually “admin”, and the password is “password”).
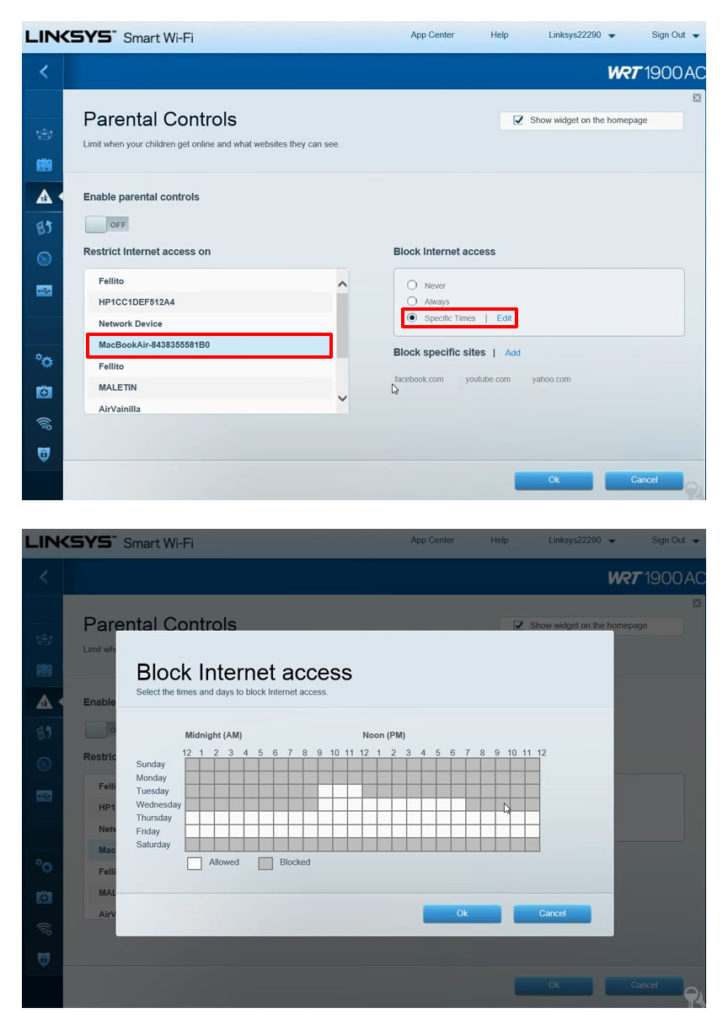
- Select Parental Controls from the menu.
You can find three options on how to configure the parental controls.
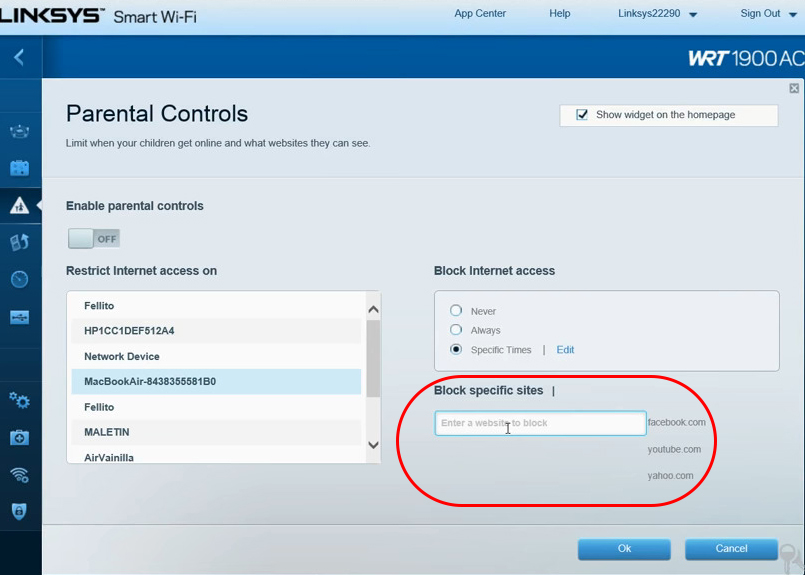
Block Certain Websites on Selected Devices
With this control option, you can block whatever websites you don’t want your children to access. Select “Add” and type in the website URL that you wish to block.
Restrict Internet Access on Selected Devices
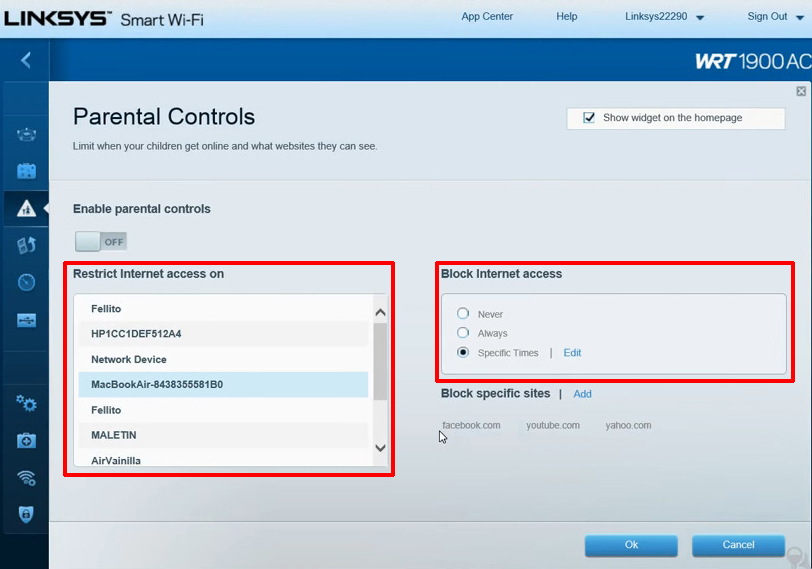
With this option, you can limit internet access to certain devices:
- Select “Never” to allow the device to access the internet at all times. That said, you can still restrict visitation to certain websites on the said device.
- Select “Always” to block internet access from the selected device completely.
Restrict Internet Access on Selected Times
Select “Specific Times” to specify the times when your selected device is not allowed to access the internet.
Conclusions
Online security has been a hot topic along with new technologies and upgraded device features in the digital world. As new technological developments flourish, online threats have been progressing at a similar pace. In this regard, children are the most vulnerable internet users since they’re very active online, but they might not be aware of the danger.
If you’re not familiar with your router’s parental control features, this guide has laid out the methods for configuring parental controls on your router. While parental controls are not foolproof, they help you monitor your children’s online activities and reduce their exposure to malicious content.
The features and control levels are not the same for all router brands and models. However, each brand/model has its own set of features and controls users may find suitable for their needs to monitor their children’s online activities.

Hey, I’m Jeremy Clifford. I hold a bachelor’s degree in information systems, and I’m a certified network specialist. I worked for several internet providers in LA, San Francisco, Sacramento, and Seattle over the past 21 years.
I worked as a customer service operator, field technician, network engineer, and network specialist. During my career in networking, I’ve come across numerous modems, gateways, routers, and other networking hardware. I’ve installed network equipment, fixed it, designed and administrated networks, etc.
Networking is my passion, and I’m eager to share everything I know with you. On this website, you can read my modem and router reviews, as well as various how-to guides designed to help you solve your network problems. I want to liberate you from the fear that most users feel when they have to deal with modem and router settings.
My favorite free-time activities are gaming, movie-watching, and cooking. I also enjoy fishing, although I’m not good at it. What I’m good at is annoying David when we are fishing together. Apparently, you’re not supposed to talk or laugh while fishing – it scares the fishes.

