It would be pretty boring and frustrating to have to enter the wireless password whenever you get back home or get to work. This makes the automatic connection to saved Wi-Fi networks a pretty handy feature for most devices. Although it is already set up for most devices, in some cases we have to set up the automatic connection manually.
In the next few paragraphs, we are going to show you how to do it on your Windows machine, MacBook and iPhone, and Android phones. At the same time, we are going to give a tip or two about what to do when your device refuses to connect automatically.
So, let’s begin!
CONTENTS
How to Join Wi-Fi Networks Automatically?
NOTE: Before you enable the auto-join feature you need to make sure that the Wi-Fi connection is secured. It is recommended to avoid connecting to unsecured and public wireless networks.
At the same time, your device has to be connected to the network at least once so it can save the wireless password.
iPhone
To use the auto-join feature on your iPhone or iPad Wi-Fi must be enabled, otherwise, it won’t connect automatically.
Unlock your iPhone and tap on the Settings icon.
Now tap on Wi-Fi.
Tap on the info icon next to the network name you are currently connected to.
Make sure that Auto-Join is enabled. If it isn’t, tap on the ON/OFF swipe button.
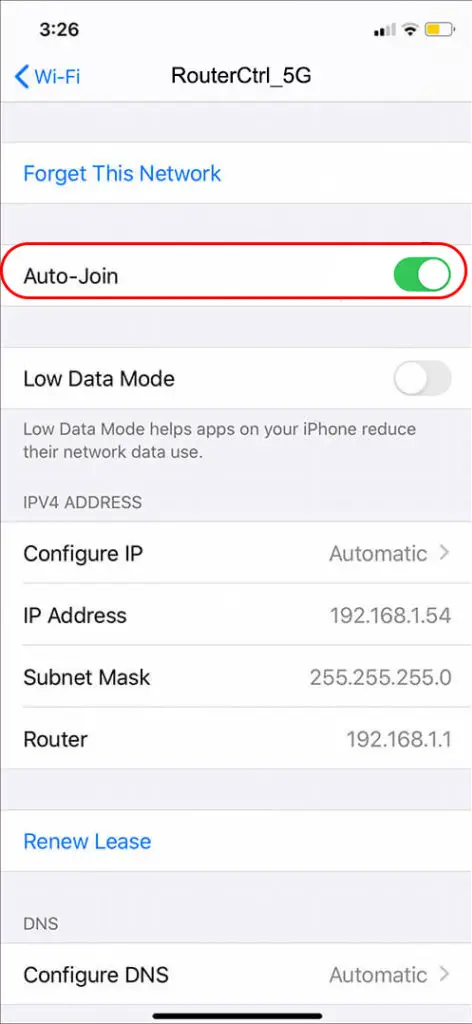
With this option enabled, whenever your device gets within the wireless network range it will connect automatically without the need to enter the wireless password.
Android
The auto-join feature on Android-powered devices works almost the same as on iPhones and iPads.
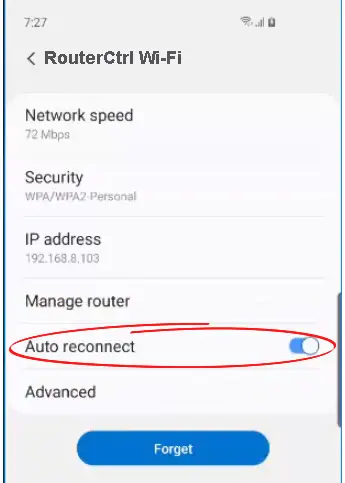
Unlock your Android phone and tap on the Settings icon. You can swipe down from the top of the Home screen and click on the little gear icon to open Settings. Now tap on Connections. Then tap on Wi-Fi. Tap on the gear icon next to your network name. You will see the “Auto reconnect” section and the toggle on/off button. Make sure it is on.
Windows 11
On your Windows 11 computer click on the Wi-Fi icon at the bottom-right of the desktop.
Now click on the little arrow next to the Wi-Fi icon.
Click the info icon (Properties) next to the network name your computer is connected to.
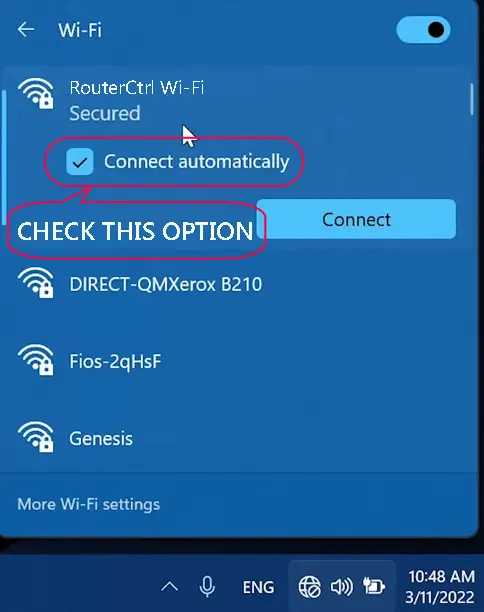
If necessary scroll up a little and see whether the checkbox next to Connect automatically when in range is checked. If it isn’t, check the checkbox and that’s it. The next time your laptop is in range it will connect automatically to that network.
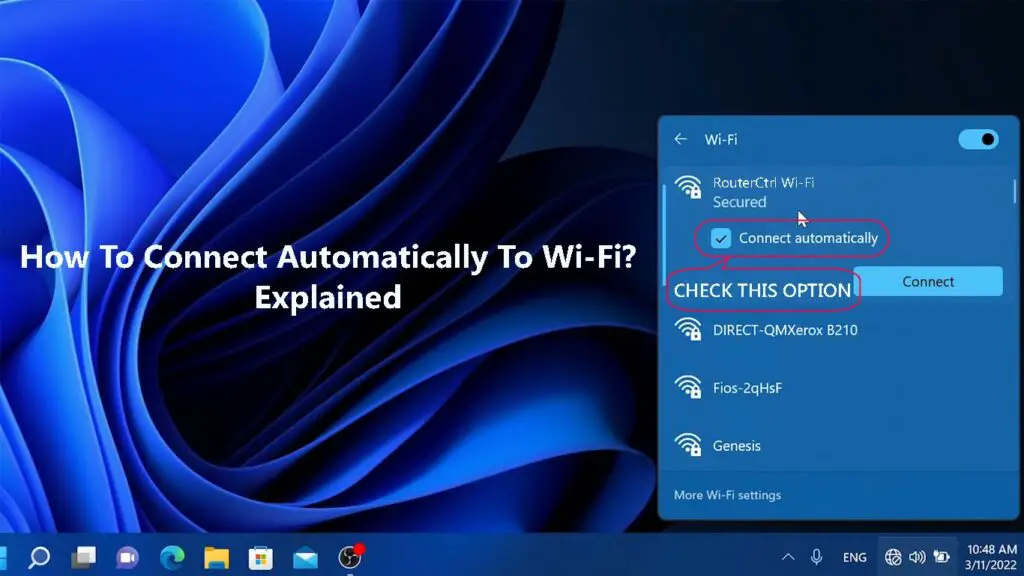
Another way to enable the auto-join feature in Windows 11 is to click on the Wi-Fi icon in the bottom-right of the desktop and click on the arrow next to the Wi-Fi icon. Click on Disconnect. Now you will see an option to connect again and make sure to check the checkbox next to Connect automatically. Now click Connect.
MacBook
Enabling the auto-join feature on your MacBook is pretty easy as well. In fact, you can also prioritize the Wi-Fi networks if there is more than one available.
Click on the Apple icon in the top-left of the screen and then click on System Preferences.
Now click on Network.
Click on Wi-Fi in the left column and check whether Automatically join this network under the network name is checked.
If you have more than one network in your office or household, you can easily set up what is the preferred network your MacBook should connect to.
While you are still in the Wi-Fi window click on Advanced. In the Preferred networks panel, drag the one you want your device to connect to to the top of the list.
Click OK and then Apply.
How to Join a Wi-Fi Network Automatically on a MacBook
What to Do If Your Device Won’t Connect Automatically?
There are situations when your device won’t connect automatically although you know you have been connected to the network before. If this happens to you, here are a few things to try and fix the problem.
Is Your Device in Range?
When your device is not in range or the signal it receives is extremely weak, it will fail to connect automatically.
So, logically, you have to get closer to the router and then see what happens. Once the signal is good enough your device should connect without any issues.
Also, make sure that the router is turned on.
Restart the Device
In some cases, a glitch in the system will stop your device from connecting automatically. The easiest thing to do in this case is to restart the device.
Use the power button if you are restarting your smartphone, or click on the Start button and select Shut Down if you are on Windows. MacBook users can click the Apple icon and choose Shut Down from the menu.
Once the device boots up it should try to connect automatically. If it doesn’t, try the next solution.
Forget the Network and Reconnect
Your device will fail to connect automatically if you have changed the Wi-Fi password. It will try to connect using the old wireless password and of course, it will be unsuccessful.
In this case, it is best to forget the network and reconnect. Of course, you need to have the new wireless password ready.
Windows 11 – Left-click on the Wi-Fi icon in the taskbar, then on the arrow next to Wi-Fi. Right-click on the network name and select Forget from the list.
Forget Wi-Fi Network on Windows 11
Mac OS – Click on the Apple icon in the top bar, then select System Properties. Now click on Network. Click on Wi-Fi. From the Network name list select the one you want to forget. Click on Advanced. From the Preferred Networks list select the one you want to forget. Click the minus sign (remove) and then click on remove if asked. After that, you need to click on OK and then Apply.
Forget Wi-Fi Network on macOS
Android – Swipe down from the top of the screen with your finger and long press the Wi-Fi icon. Now tap on the little gear icon (Settings) next to the network name and in the new window look for the Forget button at the bottom of the screen. It looks like a small recycle bin. Click on Forget and that’s it. You can reconnect now with the correct password.
Forget Wi-Fi Network on Android
iPhone – Tap on the Settings icon, then on Wi-Fi. Tap on the network name and finally tap on Forget This Network. Tap on Forget in the popup window.
Forget Wi-Fi Network on an iPhone
Check the Power Options
If you are having this problem on your laptop it is good to check the Power Options.
On Windows 11, click on the start button, and in the Search bar at the top type “device manager”.
Find Network adapters in the list and click on the arrow in front of it to expand it.
Right-click on your Wi-Fi adapter and select Properties.
Click on the Power Management tab and click on the box next to “Allow the computer to turn off this device to save power” to remove the check mark.
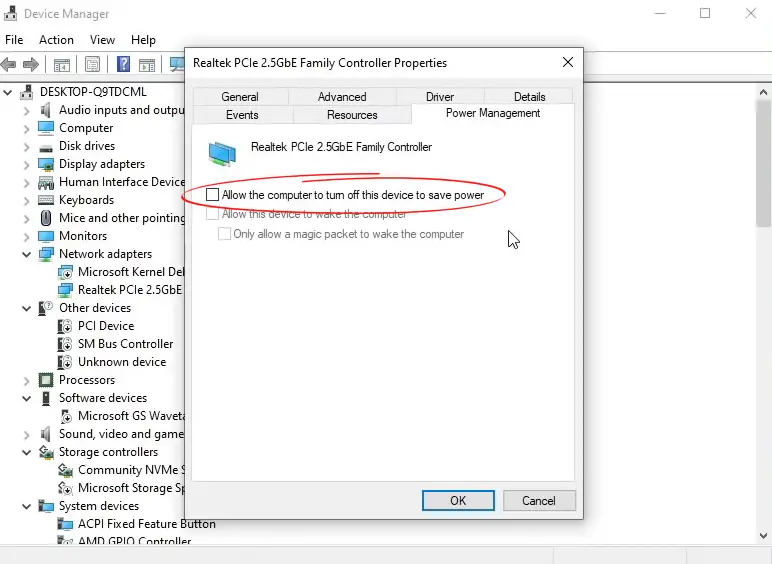
Click OK.
When you do this, your computer should connect automatically when you restart it or turn it on.
Check Whether Auto-Join Is Enabled
We have explained thoroughly how to enable auto-join on Windows, Mac OS, Android, and iPhones/iPads.
Follow the steps described above to check whether auto-join is enabled. In case it isn’t, enable it and see what happens.
Restart Your Wireless Router
An error or a glitch in your wireless router configuration can prevent the device from connecting to the Wi-Fi automatically. The easiest way to clear such glitches is to power cycle the router.
Recommended reading:
- Am I Connected to Wi-Fi or Ethernet? (What’s the Difference?)
- How to Sign In to Wi-Fi Network On iPhone? (Step-by-Step Guide)
- Can’t Connect to Flight Wi-Fi On Phone? (Troubleshooting Tips)
Simply unplug the power cable of the router from the wall, leave it disconnected for a few minutes and then plug it back in. When the router boots up, check whether the device has connected to the wireless network.
Final Words
We hope that you now know how to connect automatically to Wi-Fi no matter whether you are using a Mac OS or Windows-powered device, an Android smartphone or tablet, or an iPhone/iPad.
The steps are pretty simple and if everything works properly, there should be no problems for your device to connect to the network automatically when in range.
On the other hand, if you notice that your device can’t connect, and you know that it should, then the solutions provided here should help you fix the problem and make the device connect automatically as before.

Hey, I’m Jeremy Clifford. I hold a bachelor’s degree in information systems, and I’m a certified network specialist. I worked for several internet providers in LA, San Francisco, Sacramento, and Seattle over the past 21 years.
I worked as a customer service operator, field technician, network engineer, and network specialist. During my career in networking, I’ve come across numerous modems, gateways, routers, and other networking hardware. I’ve installed network equipment, fixed it, designed and administrated networks, etc.
Networking is my passion, and I’m eager to share everything I know with you. On this website, you can read my modem and router reviews, as well as various how-to guides designed to help you solve your network problems. I want to liberate you from the fear that most users feel when they have to deal with modem and router settings.
My favorite free-time activities are gaming, movie-watching, and cooking. I also enjoy fishing, although I’m not good at it. What I’m good at is annoying David when we are fishing together. Apparently, you’re not supposed to talk or laugh while fishing – it scares the fishes.
