With the Dish Joey, you can connect to the Hopper DVR and have access to your recordings and TV guide from any room in your house. With this receiver, you get the convenience of a user-friendly Hopper interface on any TV, plus the ability to watch, record, and pause shows.
DISH’s Joey makes it easy to connect your Hopper DVR. You can start watching a show in one room, and then pick up where you left off later on in another room. Additionally, the Joey lets you watch all your recorded shows on any TV, so every television in your home is a potential entertainment center.
To enjoy the full potential of your Joey, connect it to your home’s Wi-Fi network. Once connected, you’ll be able to use all the great features of your Joey, such as the on-screen TV guide, Dish Explorer and more.
CONTENTS
How to Connect A Dish Joey To Wi-Fi?
A Dish Joey can be connected to your home’s Wi-Fi network in just a few simple steps.
- First, make sure that your Dish Joey is properly plugged into an electrical outlet and connected to your TV.
- Once the Joey is powered on, press the Menu button on your remote control.
- Press the appropriate arrow keys on your remote control to select Settings, then press the Select button.
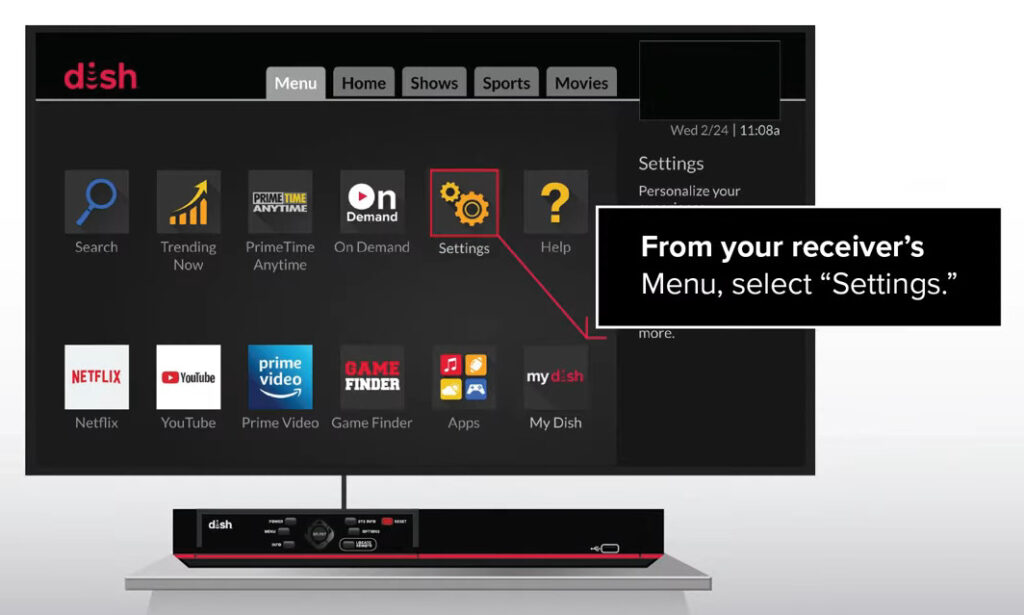
- Select “Network” from the Settings menu and then choose “Internet.”
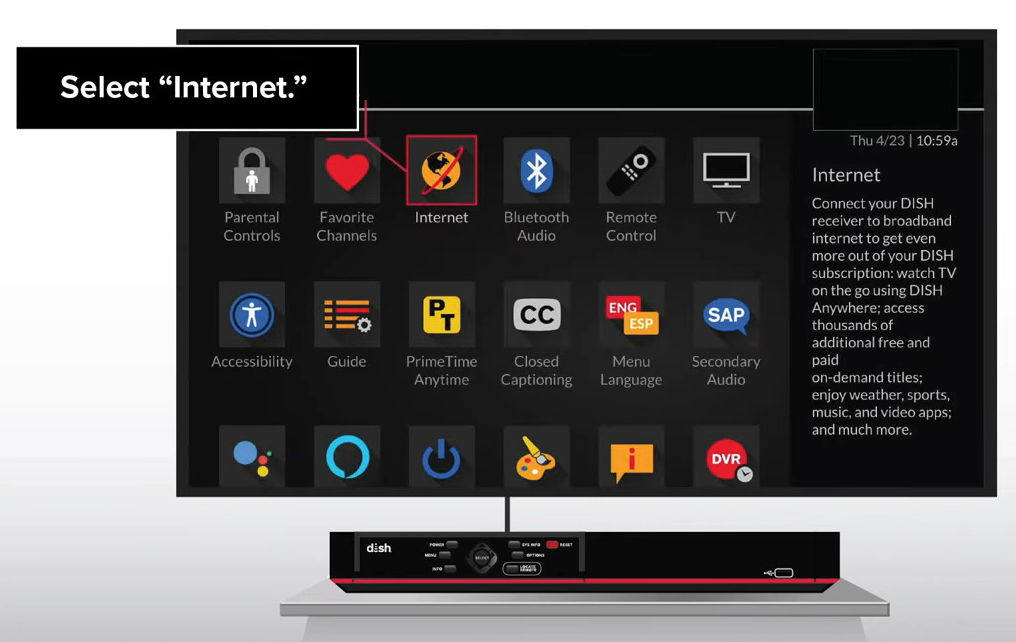
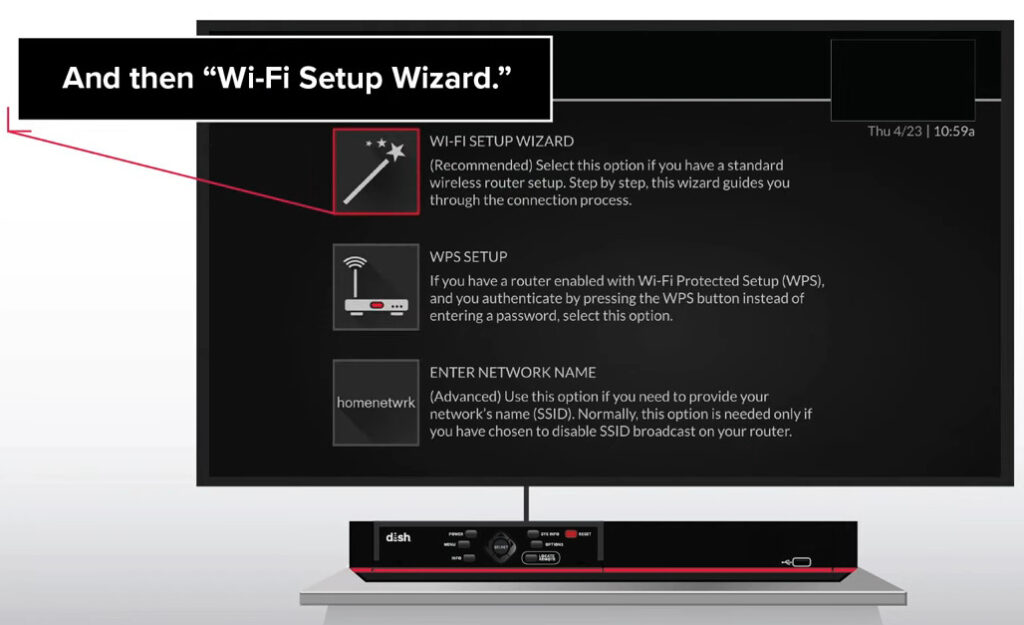
- From the “Internet” settings, Select “Wireless Setup” followed by “Wi-Fi Wizard.”
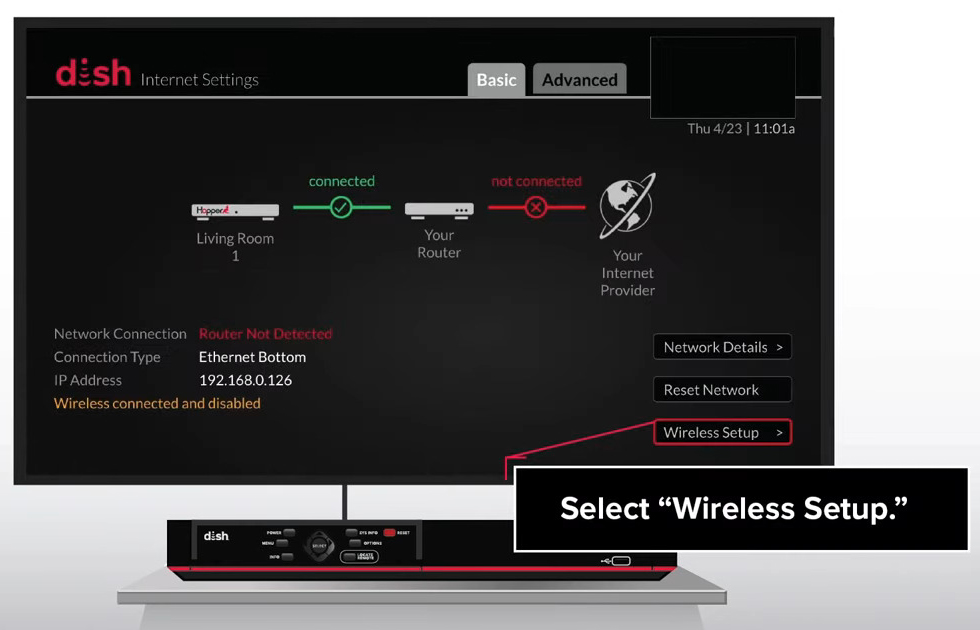
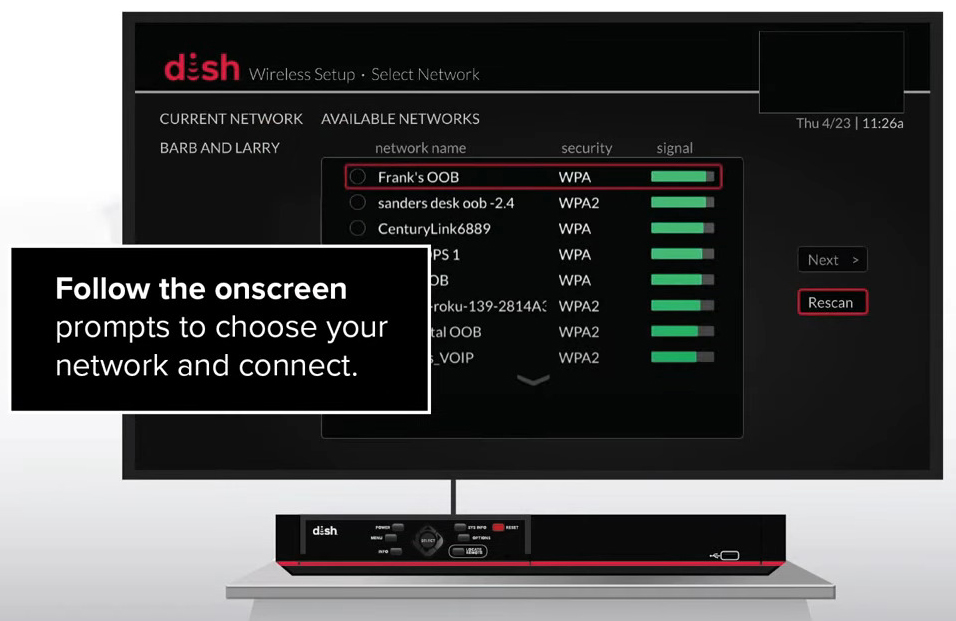
- A list of available Wi-Fi networks will be displayed. Select your network from the list and enter the password in the password section.
- Once you are connected to your Wi-Fi network, Joey will perform a system update. This may take a few minutes.
- Once the system update is complete, your Dish Joey will be connected to your home’s Wi-Fi network, and you’ll be able to enjoy all the great features it has to offer.
How to Connect Your Dish Joey to Wi-Fi
At times, your Dish Joey may fail to connect to the internet. If this happens, there are some troubleshooting tips that may help.
How To Troubleshoot A Dish Joey That Will Not Connect To the Internet
A Dish Joey that won’t connect to the internet can be a frustrating problem. Fortunately, there are several troubleshooting steps you can take to fix the issue.
Reset the Hopper
Before we explore other potential solutions, let’s check if the issue is with the Hopper. The Hopper is the receiver that distributes the streaming signal to Joeys set up in different areas of your home or office.
If your Dish Joey is not connecting to the internet, you can try resetting the Hopper. To reset the Hopper:
- Disconnect the Hopper from the power source.
- Wait for 30 seconds, then plug back the Hopper’s power cord back into the power switch.
- Press the Power button on the front of the Hopper to turn it on.
- Wait for minutes for the Hopper to restart.
- After the restart process is over, try connecting your Dish Joey to the internet again.
Troubleshooting Your Dish Hopper
Check Your Internet Connection
If resetting the Hopper didn’t work, then the next thing you should consider checking is your internet connection. Ensure that your router is turned on and that all the cables are properly plugged in.
If you’re using a wireless connection, check to see if there are any possible interference issues around the router. Interference can be caused by things like microwaves, cordless phones, and other devices that emit radio frequencies.
Check The Cables
If you’re using a wired connection, check the Ethernet cable to make sure it’s properly plugged into the Hopper and your router. Check all the other cables as well to make sure they’re secure.
Bring the Joeys Close to the Hopper
If you’re using a wireless connection, try bringing the Joeys closer to the Hopper. The further away Joeys are from the Hopper, the weaker the signal will be.
To check if the Joeys are too far from the Hopper, press and hold down the SAT button on the remote control. While you are doing this, keep an eye on the blinking lights on the Hopper; it is reconnecting to any Joeys that were previously linked to it.
Recommended reading:
- Can Company See the Phone When Connected to Wi-Fi? (Ways to Protect Your Privacy when Connected to Company Wi-Fi)
- How to Connect Asus Desktop to Wi-Fi? (Establishing Wi-Fi Connection in Simple Steps)
- How to Connect StarSat Receiver to Wi-Fi? (Here’s What You Need to Do)
After the lights start blinking, you can release the SAT button and proceed to the Joeys. While approaching the Joeys, take note of the beep frequency, as it will indicate whether they are too distant from the Hopper and need to be repositioned.
If you hear one beep per second coming from your Joey, it means that the device is too far away from the hooper.
Troubleshooting Wireless Joey’s Wi-Fi Connection
Contact the Customer Support
If you’ve tried out all of the above steps without success, the next step you should take is to contact Dish Joey customer support. They will be able to help you troubleshoot the issue and determine if there is a problem with your account or equipment.
How to Connect Dish Joey To TV
Use the appropriate RCA or HDMI cables to connect your replacement receiver to its corresponding port(s). Plug one end of the power cord that came with your Joey into an outlet, and plug the other end into your Joey. If you don’t do this, then your TV will turn off.
Finally, set your TV to a blank setting, and then press the Input or button on your TV remote to change the inputs. Doing this should bring up the Dish Network menu on your TV. If not, then you need to check your TV’s input settings.
Wireless Joey – DIY Setup
Frequently Asked Questions
Question: I connected my Dish Joey to the internet, but I’m still having problems with the connection. What can I do?
Answer: There are a few possible solutions that could fix the issue. First, try restarting your modem and Dish Joey. If that doesn’t work, try connecting your Dish Joey to a different wireless network. Finally, if you’re still having trouble, you can try connecting your Dish Joey using a wired connection.
Question: How do I connect my Dish Joey to the internet?
Answer: Press the Menu button of your Dish Joey remote, then select Settings. Select Network Setup, then Wireless Setup. Select the Wi-Fi network you intend to connect to and key in the Wi-Fi password.
Question: Is the Hopper 3 Wireless?
Answer: With the Wireless Joey, you can bring an expansive television world with you wherever you go. The Hopper 3’s wireless access point allows for up to three Joey Receivers in different locations, so whether you’re inside or outside your RV, you can still watch your favorite shows. Plus, with a Joey Receiver, you can even stream or record content directly to your Hopper 3.
Question: Why is my Dish Joey not working?
Answer: There are many reasons why your Dish Joey could not be working. First, your Joey may be disconnected. If the power cord has been removed, plugging it back in could solve the problem. Second, the Dish Joey is not working because it’s getting a weak signal from the Hopper. Third, the Dish Joey may need to be updated.
Question: Why does my Dish Joey say the router is not detected?
Answer: If you are experiencing a router not detected error, there are a few steps that you can take to troubleshoot the problem. First, make sure that your modem and router are both turned on. Second, reboot your router by unplugging it and then re-plugging it back in.
Conclusion
A Dish Joey is a great way to watch TV in multiple rooms, but it can be frustrating if you can’t connect it to the internet. Fortunately, you can try the troubleshooting tips discussed in this article to fix the issue.
We hope this post was helpful to you and that you can now enjoy your Dish Joey without any issues. If you have any further questions, please feel free to reach out to the Dish customer support team.
The customer support team will be more than happy to help you troubleshoot the issue and determine if there is a problem with your account or your Dish Joey equipment.

Hey, I’m Jeremy Clifford. I hold a bachelor’s degree in information systems, and I’m a certified network specialist. I worked for several internet providers in LA, San Francisco, Sacramento, and Seattle over the past 21 years.
I worked as a customer service operator, field technician, network engineer, and network specialist. During my career in networking, I’ve come across numerous modems, gateways, routers, and other networking hardware. I’ve installed network equipment, fixed it, designed and administrated networks, etc.
Networking is my passion, and I’m eager to share everything I know with you. On this website, you can read my modem and router reviews, as well as various how-to guides designed to help you solve your network problems. I want to liberate you from the fear that most users feel when they have to deal with modem and router settings.
My favorite free-time activities are gaming, movie-watching, and cooking. I also enjoy fishing, although I’m not good at it. What I’m good at is annoying David when we are fishing together. Apparently, you’re not supposed to talk or laugh while fishing – it scares the fishes.
