Internet connectivity is integral to most human activities in our present world. The pandemic forced many jobs and schools to operate online, pushing our internet reliance further. The downside is accessing a stable and reliable network that can sustain you through an online class, meeting, or streaming can be expensive. This is because cellular data packages are costly, and many people cannot afford monthly Wi-Fi subscriptions.
As a workaround, people rely on public networks that are usually free on the condition that they are on premises that offers Wi-Fi services. Organizations and businesses also use public networks to attract clients and ensure existing clients are content, thanks to the value-added service.
Although public networks are common and easy to connect, they can pose challenges when trying to access the internet through a laptop. Most people are accustomed to using public networks on their phones; thus, they are unfamiliar with how to connect to public networks on their laptops.
Fortunately, this article illustrates how you can connect to a public network on Windows and Mac laptops. Keep reading as we will also briefly state measures you can take to force the login page to pop up if it refuses, as it usually does in some instances.

CONTENTS
How to Connect to Public Wi-Fi on Windows 10
Most laptops use the windows 10 OS as the Windows 11 OS is yet to be available for all devices. You can connect to any public Wi-Fi by following the steps below:
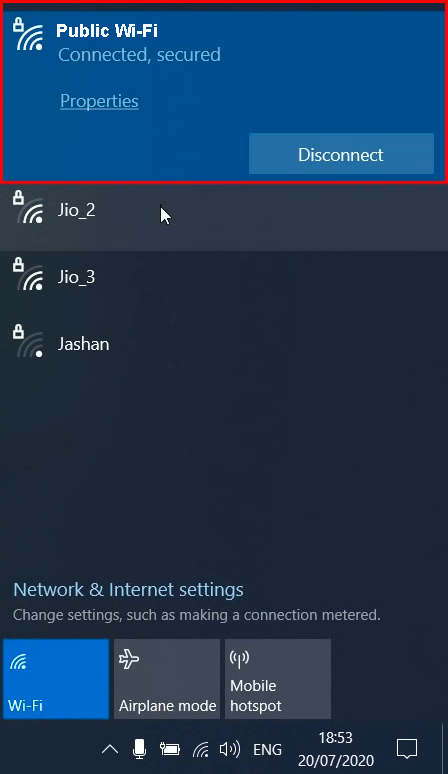
- Ensure the laptop is on and not connected to any network, then click on the Network icon on the taskbar. If you cannot see the icon, click on the Up arrow in the taskbar to access it.
- A list of the available Wi-Fi networks will appear; search for the SSID of the public network you want to connect to.
- Click on the public Wi-Fi SSID, then Connect and enter the password if prompted.

- The device will ask if you want the computer to be discoverable by another PC on the network; click NO since it is a public network, and you are done.
Note that clicking Connect will redirect you to a sign-in page if the public Wi-Fi is set to require users to sign in. The page will also have a check box you should tick that shows you have accepted the terms and conditions of connecting to the public Wi-Fi.
This feature ensures network security and that only credible clients use Wi-Fi.
If that is the case with your network, it will automatically redirect you to a sign-in page once you click Connect in step 3 above.
Recommended reading:
- How to Connect a POS Machine to Wi-Fi (Can You Connect a POS Machine to Wi-Fi?)
- How to Connect Astro NJOI to Wi-Fi? (Follow These Steps)
- How to Connect Govee Lights to Wi-Fi (Detailed Instructions)
When redirected, simply key in the necessary credentials and click Connect or something similar, depending on how the sign-up page frames it.
You can also connect to a public Wi-Fi by clicking on the Windows icon, then navigating Settings>Network & Internet>Wi-Fi> clicking on the slider to turn on Wi-Fi. Next, click on Available Networks and select the public SSID you wish to connect to.
Connecting a Windows 10 Laptop to a Hotel’s Public Wi-Fi
How to Connect to Public Wi-Fi on Windows 11
The process slightly differs from Windows 10. For Windows 11:
- While the laptop is on, open Quick settings by clicking on Network, Sound, or Battery icons situated at the task bars far right corner.
- Enable Wi-Fi by clicking on the left side of the Wi-Fi icon. Ensure it is highlighted in the system’s current theme color and not grey as a quick way to confirm Wi-Fi is on.
![]()
- Click on the > symbol next to the Wi-Fi icon to access the list of available wireless networks around you.
- Locate your preferred public network and click on it, then click Next
- At this juncture, the laptop will prompt you to enter a password or redirect you to a sign-in page.
- If prompted to enter a password, do so, then click Next or Connect. If the laptop redirects to a website sign-in page, enter the necessary information and click Connect.
Alternatively, you can connect to public Wi-Fi by navigating Settings > Network & Internet > toggle the slider on Wi-Fi to ON. Then, click Wi-Fi> Show Available Networks, select the public Wi-Fi you want to connect to, and click Next.
How to Connect to Public Wi-Fi on a Mac Laptop
The steps below will help you connect to a public Wi-Fi network on a Mac device.
- Ensure the device is on, then click on the Wi-Fi icon on the menu bar
- Click on Other Networks to view the APs broadcasting around you, and click on the SSID of the public network you want to connect to.
- Enter the password if prompted, click Join, or you might be redirected to a sign-in page on your device’s browser.
- If a web page pops up, enter the credentials to access the public Wi-Fi.
If you cannot see the Wi-Fi icon on the menu bar, you can include it by clicking the Apple icon and selecting System Preferences > Dock & Menu Bar. Next, navigate Wi-Fi > Show Wi-Fi status in the menu bar.
The video below illustrates the procedure of connecting to a Wi-Fi network on a Mac, which is similar to connecting to a public Wi-Fi network.
Connecting Mac to Wi-Fi
What Is the Public Wi-Fi Password?
Connecting to a public Wi-Fi is as easy as illustrated above, but some users have difficulties accessing the correct password for encrypted public networks.
The password is usually on the pay stub/receipt you get when you make a purchase. The password could also be posted on a noticeboard or the wall, or sometimes the attendant or manager is the only person who knows the password.
Public Wi-Fi networks that redirect to a sign-in page might require an access code that could be printed on your receipt. Once you enter the code and accept the terms and conditions of connecting to the network, you can access the internet.
Your laptop will ask if you wish to connect to the Wi-Fi network automatically; ensure this option is unselected because it exposes you to attackers, especially when you are connected but not utilizing the internet.
Sometimes the sign-in page might fail to load, and some steps you can take to force it to load. They are stated below.
How to Force the Sign-in Page of a Public Wi-Fi to Load
Here’s what you can do to force the sign-in page:
- Enable your web browser to allow pop-up pages and redirecting.
- Disable your VPN program as it tends to block public Wi-Fi or unsecured networks.
- Visit the sign-in page via a different browser.
- Open the sign-in page in incognito mode.
- Disable third-party DNS servers on your device, and if it fails, perform a restart.
Here is a video on more measures Windows 10/11 users can take to force the login page to load.
Ways to Force the Public Wi-Fi Login Page
Conclusion
Public Wi-Fi should always be considered unsecure because it is easy to access such a network. Therefore, only use it when necessary and take all the necessary precautions to keep your sensitive data safe.
The precautions can include; using a VPN program, visiting HTTPS encrypted sites, and updating your OS, firewall, and drivers.

Hey, I’m Jeremy Clifford. I hold a bachelor’s degree in information systems, and I’m a certified network specialist. I worked for several internet providers in LA, San Francisco, Sacramento, and Seattle over the past 21 years.
I worked as a customer service operator, field technician, network engineer, and network specialist. During my career in networking, I’ve come across numerous modems, gateways, routers, and other networking hardware. I’ve installed network equipment, fixed it, designed and administrated networks, etc.
Networking is my passion, and I’m eager to share everything I know with you. On this website, you can read my modem and router reviews, as well as various how-to guides designed to help you solve your network problems. I want to liberate you from the fear that most users feel when they have to deal with modem and router settings.
My favorite free-time activities are gaming, movie-watching, and cooking. I also enjoy fishing, although I’m not good at it. What I’m good at is annoying David when we are fishing together. Apparently, you’re not supposed to talk or laugh while fishing – it scares the fishes.

