A Starsat Receiver is a TV signal receiver that can be connected to a TV to receive digital television signals. The Receiver decodes the digital television signal and then sends it to the TV.
While the Starsat Receiver can be used without an internet connection, connecting it to Wi-Fi can open up a whole new world of fun and entertainment.
In this article, we’ll show you how to connect your Starsat Receiver to Wi-Fi to take advantage of its full potential.
CONTENTS
The Process of Connecting a Starsat Receiver to Wi-Fi
To connect a Starsat Receiver to a TV, you will need the following:
- A Starsat Receiver
- HDMI cable
- TV that is compatible with the Receiver
Once you have all of the required equipment, the process of connecting your Starsat Receiver to Wi-Fi is fairly simple.
- First, make sure that your Starsat Receiver is turned on.
- Once the router is properly connected, turn it on.
- Now, use the HDMI cable to connect your Starsat Receiver to the TV.
- Once the connection is made, turn on the TV and select the appropriate HDMI input.
- When you select the right HDMI input, you should see the Starsat Receiver main menu where you can select any of the available 5 options, including the “Installation Option,” “Edit Channel Option,” “Settings Options,” “Games Option” and the “Expansion Option.”
- Note that the “Wi-Fi Option” that we need is missing. If your Starsat Receiver is relatively old, the “Wi-Fi Option” will always be missing. To install the “Wi-Fi Option” to your Starsat Receiver, you will need to download a new software version from the official Starsat website and then update your Receiver through a USB flash drive. If your receiver already has the Network/Wi-Fi option, you can skip the software update section.
- Here is how to go about it:
- Download the new Starsat Receiver software from either http://swdw.net or http://cwdw.net
- Once the file has been downloaded, extract it to your desktop and transfer it to your USB flash drive. You will use the USB flash drive to update your Starsat Receiver.
- Now that you have the new software on your USB flash drive. Plug the USB flash drive into the USB port of your Starsat Receiver. Use the USB port located on the front right-hand side of your Starsat Receiver.
- Now, scroll to the “Expansion” option using your Starsat Receiver remote control and click on it.
- Click on the “USB” option.
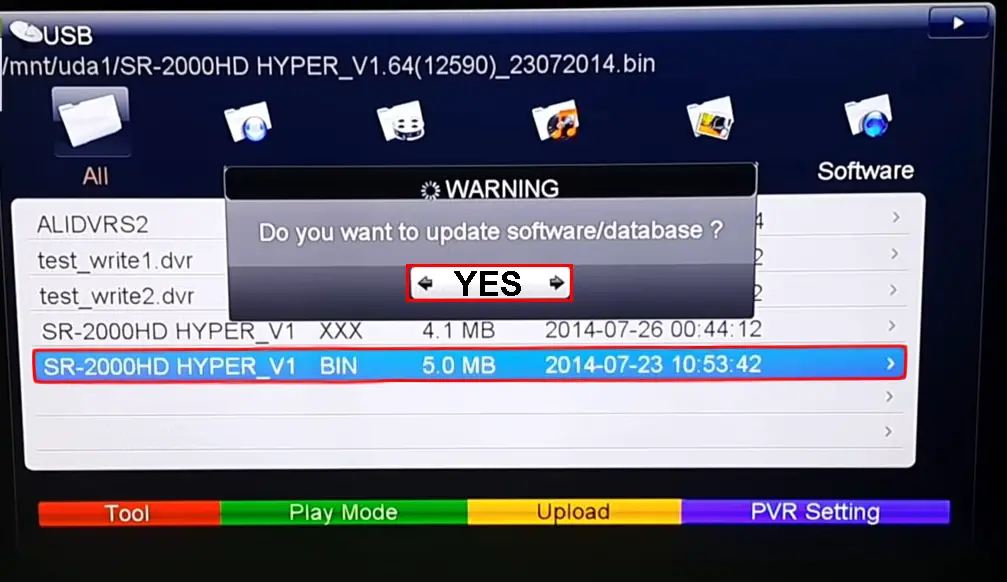
- A list of files in the USB file will be displayed. Select the “Bin” file and press the “Blue” okay button on your remote control.
- Once you have clicked on the “Bin” file, a pop-up message will appear asking you if you want to update your Software/database. Select the “Yes” option using the right and the left arrows on your remote control and then press the “Blue” okay button.
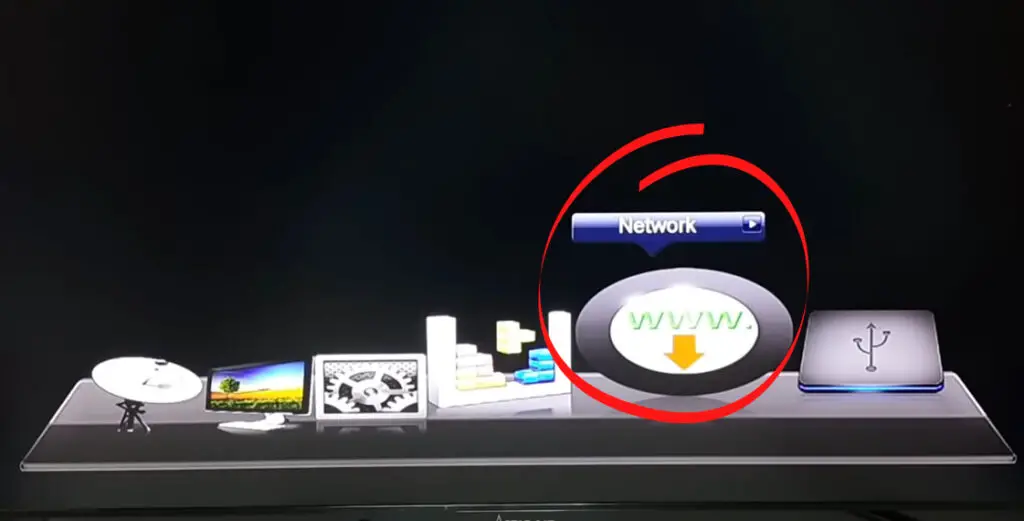
- Your Starsat Receiver will now start updating. Once the update is completed, your Starsat Receiver will reboot, and the “Wi-Fi Option” with a “WWW” sign will now be available in the main menu.
- After the software upgrade, you will need to restore the Starsat Receiver to “Factory Default” before you can start connecting it to a Wi-Fi network. A Factory reset will help ensure that your Starsat Receiver is properly synchronized with the new software.
- To reset your Starsat Receiver to factory default, go to the “Installation” option on the main menu and click okay.
- A pop-up option will be displayed, requiring you to input a pin. Enter the default “0000” pin and proceed.
- New options under the “Installation” menu will now be displayed. Select the “Factory Default” option and press OK. Then, select “All” and press OK. When asked if you want to continue, select “Yes” and press OK.
- All of your settings will now be reset to default, and your Starsat Receiver will reboot automatically.
- Set up your preferred language, and then press okay.
- Now, select the “WWW” option on the main menu and click okay.
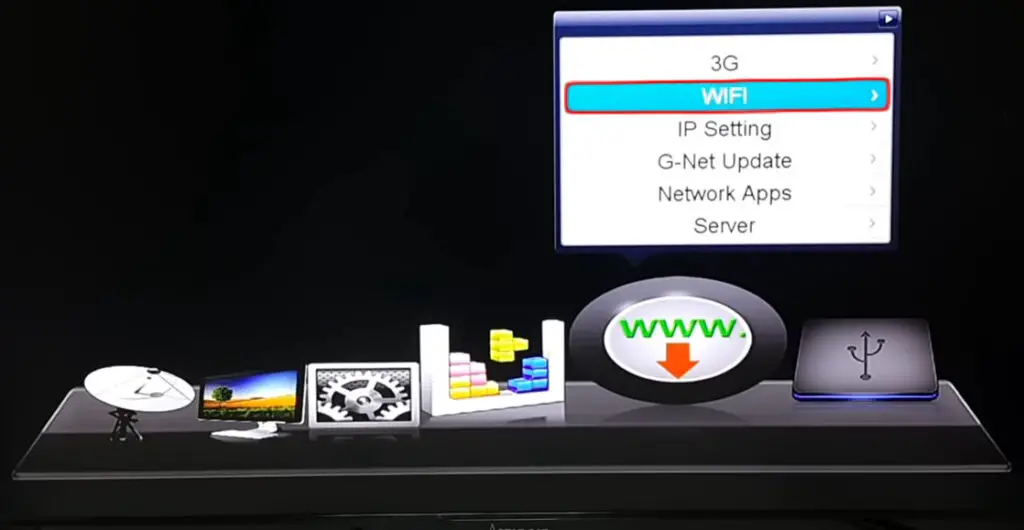
- Several internet connection options will be displayed. Select the “Wi-Fi” configuration option and click on it.
- Before you can proceed to the next page, insert the provided Starsat USB Wi-Fi antenna into the “Wi-Fi” port of the Receiver. The “Wi-Fi” port is located on the back of your Starsat Receiver.
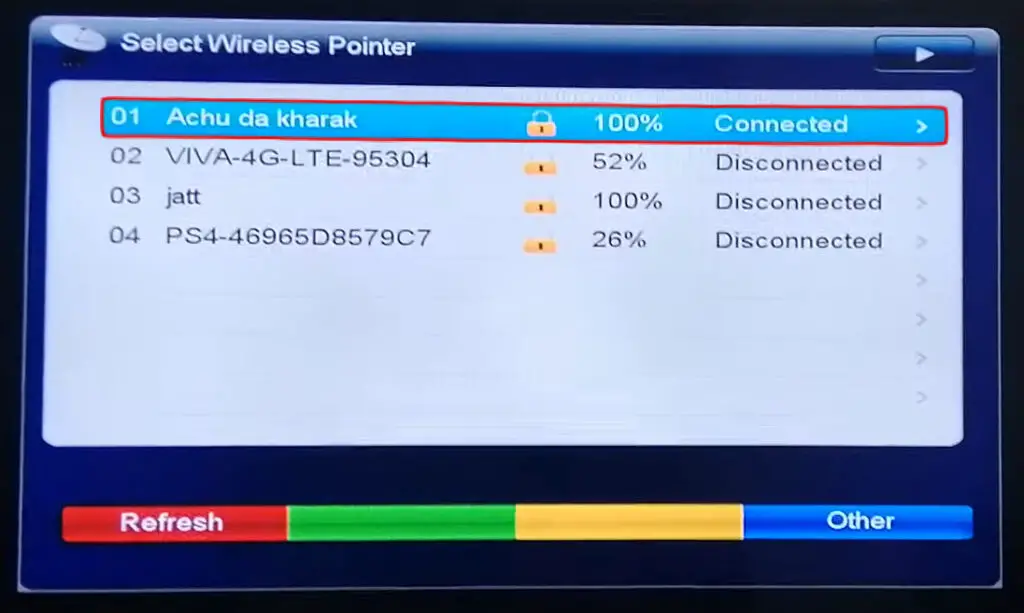
- Now proceed with the Wi-Fi configuration. Click on the Wi-Fi option. A list of the available Wi-Fi networks will be displayed.
- Select the name of your network and click okay. Enter your Wi-Fi password and click okay.
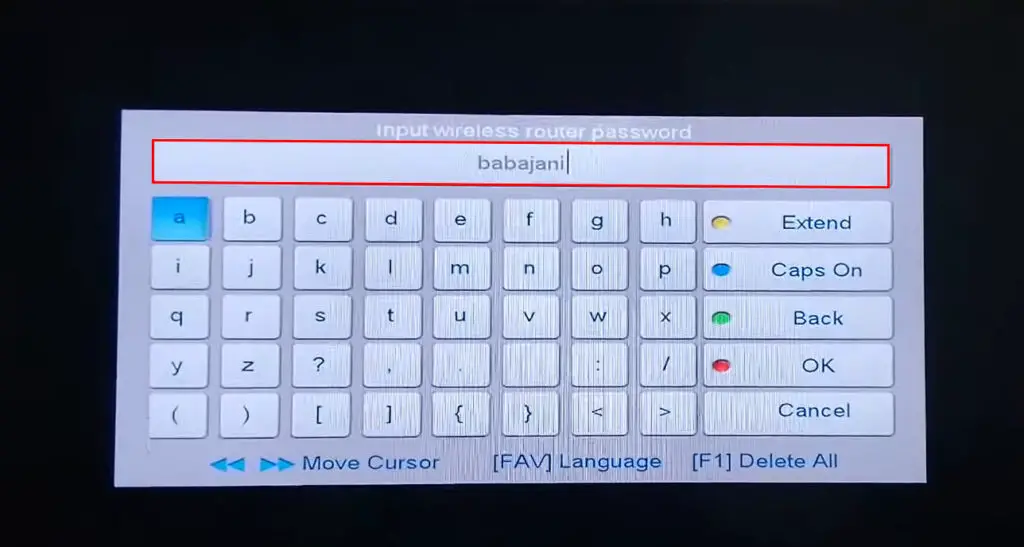
- When a tick sign appears next to your network name, it means that your Starsat Receiver is now connected to the Internet.
How to Connect a StarSat Receiver to Wi-Fi
https://www.youtube.com/watch?v=8ahTks7MOnA
Why is My Starsat Receiver Not Connecting to Wi-Fi?
There are a few reasons why your Starsat Receiver might refuse to connect to Wi-Fi. Some common reasons include:
Wrong Wi-Fi Password: Make sure that you are entering the right password for your Wi-Fi network.
Weak Wi-Fi Signal: If you are trying to connect your Starsat Receiver to a weak and unstable Wi-Fi network, the receiver may not be able to connect.
Mac Filter: Many routers come with a feature known as “Mac Filter” that allows you to handpick which devices can access your Wi-Fi. If the Starsat Receiver is not on that list, it will not connect to your network.
Firmware Issues: In some rare cases, firmware issues can also cause your Starsat Receiver to not connect to Wi-Fi. If you are experiencing this problem, you should contact your Starsat Receiver’s customer support.
Interference: If there are other devices in your home using the same frequency as your Wi-Fi router, you may experience interference. The interference will prevent your Starsat Receiver from connecting to Wi-Fi. Try using an Ethernet cable. An Ethernet cable will provide a stronger and more stable connection than Wi-Fi.
How to Connect Your Starsat Receiver to the Internet Using an Ethernet Cable?
The process of connecting your Starsat Receiver to the Internet using an Ethernet cable is a straightforward procedure. All you will need is a standard Ethernet cable.
To begin, take one end of the Ethernet cable and insert it properly into the “Ethernet” port on your Starsat Receiver.
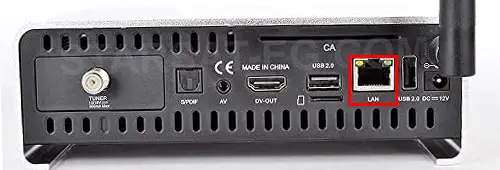
Then, take the other end of the Ethernet cable and properly insert it into your router or modem.
Recommended reading:
- Can Company See the Phone When Connected to Wi-Fi? (Ways to Protect Your Privacy when Connected to Company Wi-Fi)
- How to Connect Asus Desktop to Wi-Fi? (Establishing Wi-Fi Connection in Simple Steps)
- How to Connect My Dish Joey to Wi-Fi (Dish Joey Wi-Fi Setup Instructions)
Once the cable is connected, a blinking green light will appear on the “Ethernet” port of your Starsat Receiver. This indicates that your Starsat Receiver is now connected to the Internet.
Frequently Asked Questions
Question: Can I use my Starsat Receiver without an Internet connection?
Answer: Yes, you can use your Starsat Receiver without an Internet connection. However, you will not access all the features that your Starsat Receiver has to offer.
Question: Can I use my Starsat Receiver with a mobile hotspot?
Answer: Yes, you can use your Starsat Receiver with a mobile hotspot. However, we recommend that you connect your Starsat Receiver to a Wi-Fi network for the best experience.
Question: Can I use my Starsat Receiver with a satellite dish?
Answer: Yes, you can use your Starsat receiver with a satellite dish. You will need to connect the receiver to the dish using a cable. The quality of the decoded signal will depend on the quality of the dish and the location of the satellite.
Question: I forgot my Wi-Fi password. How can I find it?
Answer: If you forgot your Wi-Fi password, you would need to contact your ISP (Internet Service Provider) to help you retrieve it.
Question: I am having trouble connecting my Starsat receiver to Wi-Fi. What should I do?
Answer: If you are having trouble connecting your Starsat Receiver to Wi-Fi, we recommend that you try one of the following:
- Ensure that you are entering the correct password for your Wi-Fi network.
- Weak Wi-Fi Signal: If you are in an area with a weak Wi-Fi signal, try moving your receiver closer to your router or Wi-Fi source.
Conclusion
A StarSat Receiver is a great way to enjoy all the features that a satellite receiver has to offer. To enjoy these features and more, you need to connect your StarSat Receiver to the Internet. The process of connecting your StarSat Receiver to the Internet is simple.
We hope this guide was helpful and that you were able to successfully connect your Starsat receiver to the Internet. If you have any questions or comments, please feel free to leave them in the comment section below.

Hey, I’m Jeremy Clifford. I hold a bachelor’s degree in information systems, and I’m a certified network specialist. I worked for several internet providers in LA, San Francisco, Sacramento, and Seattle over the past 21 years.
I worked as a customer service operator, field technician, network engineer, and network specialist. During my career in networking, I’ve come across numerous modems, gateways, routers, and other networking hardware. I’ve installed network equipment, fixed it, designed and administrated networks, etc.
Networking is my passion, and I’m eager to share everything I know with you. On this website, you can read my modem and router reviews, as well as various how-to guides designed to help you solve your network problems. I want to liberate you from the fear that most users feel when they have to deal with modem and router settings.
My favorite free-time activities are gaming, movie-watching, and cooking. I also enjoy fishing, although I’m not good at it. What I’m good at is annoying David when we are fishing together. Apparently, you’re not supposed to talk or laugh while fishing – it scares the fishes.
