
A static IP address basically means that your device’s IP address does not change. It makes certain processes such as remote access, managing DNS servers, web server hosting, and utilizing VoIP much easier.
Do you want to learn how to configure a static IP address? Do you have some questions about connecting to Wi-Fi with a static IP? You’ve clicked on the right article! Today, we’re teaching you the basics of static IP address setup as well as how to connect to your Wi-Fi network with a static IP address!

CONTENTS
Setting Up a Static IP Address
Before we get into accessing the internet with a static IP address, we should first cover the basics of setting up a static IP in the first place. That way, you’ll make sure that everything is properly configured before you move to the next step.
Windows Devices
If you own a Windows computer, you’ll set it up by going to Control Panel. Then, you should visit the Network and Sharing Center and choose Change adapter settings. Once you see your network, you should right-click on it and choose Properties. You’ll then have to go to the properties of the Internet Protocol Version 4 (TCP/IPv4) as well. You can then choose the Use the following IP address and type the IP, subnet, default gateway, and DNS server you want to use.

You should choose an IP from the available DHCP pool of your router. For home routers, that pool will include 254 addresses. It’s best to avoid assigning addresses that end with .255 or .0 since they are usually for network protocols. Furthermore, you should make sure that an IP is not already assigned to a different device.
Setting Up Static IP in Windows 10
Mac Devices
If you own a Mac, you’ll configure the static IP by going to System Preferences. You’ll reach this menu by clicking on About Mac. Then, you should go to Network. When you see yours, you should tap on it and choose Advanced.
You’ll then have to click the TCP / IP option and go to Configure IPv4. There, you’ll be able to switch to Manual setup. Then, you can enter the static IP address, subnet mask, and gateway. Once you click Apply, you’ll have a static IP on your Mac.
Setting Up Static IP on a Mac
Can’t Connect to Wi-Fi with a Static IP Address – Troubleshooting Tips
If you go through the process of setting the static IP address properly, you shouldn’t have any issues with connecting to the Wi-Fi network you configured it for. The next time you connect to a network, it should work normally, just like any other time you connected it to.
In case you are unable to connect to your Wi-Fi, you should go back to the part of our article where we explained how to set the static IP address. You should double-check whether you went through all the necessary steps.
Another reason why you are unable to connect to your Wi-Fi is due to connection problems. There may be an outage in your area or a bug in your router that is preventing it from working properly. You can go to the official website of your internet service provider to check for any outages or maintenance that may be causing issues with the connection.
You could also perform a power cycle on your router to remove any bugs. You’ll do that by unplugging the device from the electrical socket. After a few minutes, you can plug it back in. it’s best to give the router a minute or two to properly turn on before trying to connect to the wireless network. Resetting your computer is another smart move. Once your computer is up and running, you can attempt to connect it to the internet again.
In addition, you can repeat the process of setting the static IP address once again. If none of your fixes work, you may have to contact your internet provider and report the issue.
How to Connect to Another Wi-Fi Network with a Static IP Address?
You won’t be able to connect to just any network if you set up a static IP address on your computer for your Wi-Fi. The simple explanation lies in the fact that you assigned the IP address on a wireless card and it’s now able to connect to a particular network you set it up for. You won’t be allowed to connect to a different network. Thus, you’ll need to set the IP address to dynamic once again if you want to connect to another wireless network.
If you’re trying to connect to a different physical network, you may need two network interface controllers or two Wi-Fi cards. In case it’s only about different IP ranges, you may be able to go with one NIC. However, that may cause additional issues within the system and the SkipAsSource flagging. The extent of the problem depends on what you are trying to achieve and the features you need enabled.
Therefore, it’s not recommended that you go this route. Instead, you can simply opt for switching to dynamic IP when you’re connecting to another network.

What Can You Do to Make the Situation Less Complicated?
The easiest option for users who want to be able to connect to multiple networks is to set the DHCP back to automatic. If you want some of the benefits of a static IP, you can reserve the address on your router with the help of your computer’s MAC address.
That way, your router will always assign the same address to your computer but your computer will view the allocation as automatic. The name of this process is DHCP reservation and it’s a great alternative to setting a static IP address via your computer.
How to Set Up the DHCP Reservation
The process of setting the DHCP reservation is not as complicated as it may seem. However, you’ll have to make sure that you follow all the steps carefully to avoid creating additional problems within the network.
Step 1: Go to the Router’s Configuration Page
You can set a DHCP reservation on the router by going to its configuration page. The configuration page can be accessed via your browser and the address typically matches your router’s IP address.
If you’re using a Windows computer, you’ll need to visit Command Prompt to get the router’s IP address. Once you’re there, you should type ipconfig /all and press Enter. The IP address is written under Default Gateway. In case you have a Mac, you should hold the Alt (Option) button for a few seconds and choose the Wi-Fi icon when the menu appears. The IP address of your router will be under the Router Address.
When you find the IP address, you should paste it into your browser’s search bar. Once the configuration page appears, you’ll have to type your credentials to log in.
Step 2: Find the MAC Address
Getting your MAC address is essential to successfully completing the process of adding a DHCP reservation. Luckily, the MAC address is extremely easy to find.
If you own a Mac computer, you should go to System Preferences. Then, you’ll need to find the Network option and select the name of the network you’re using. You should then choose Advanced. Among the list of specs, you’ll see the MAC address next to the Wi-Fi address.

Windows users have different ways of reaching the MAC address. The easiest one is going to Command Prompt and typing ipconfig /all. They should then press Enter. The MAC address is a value located under the Physical address.

Step 3: Add a DHCP Reservation
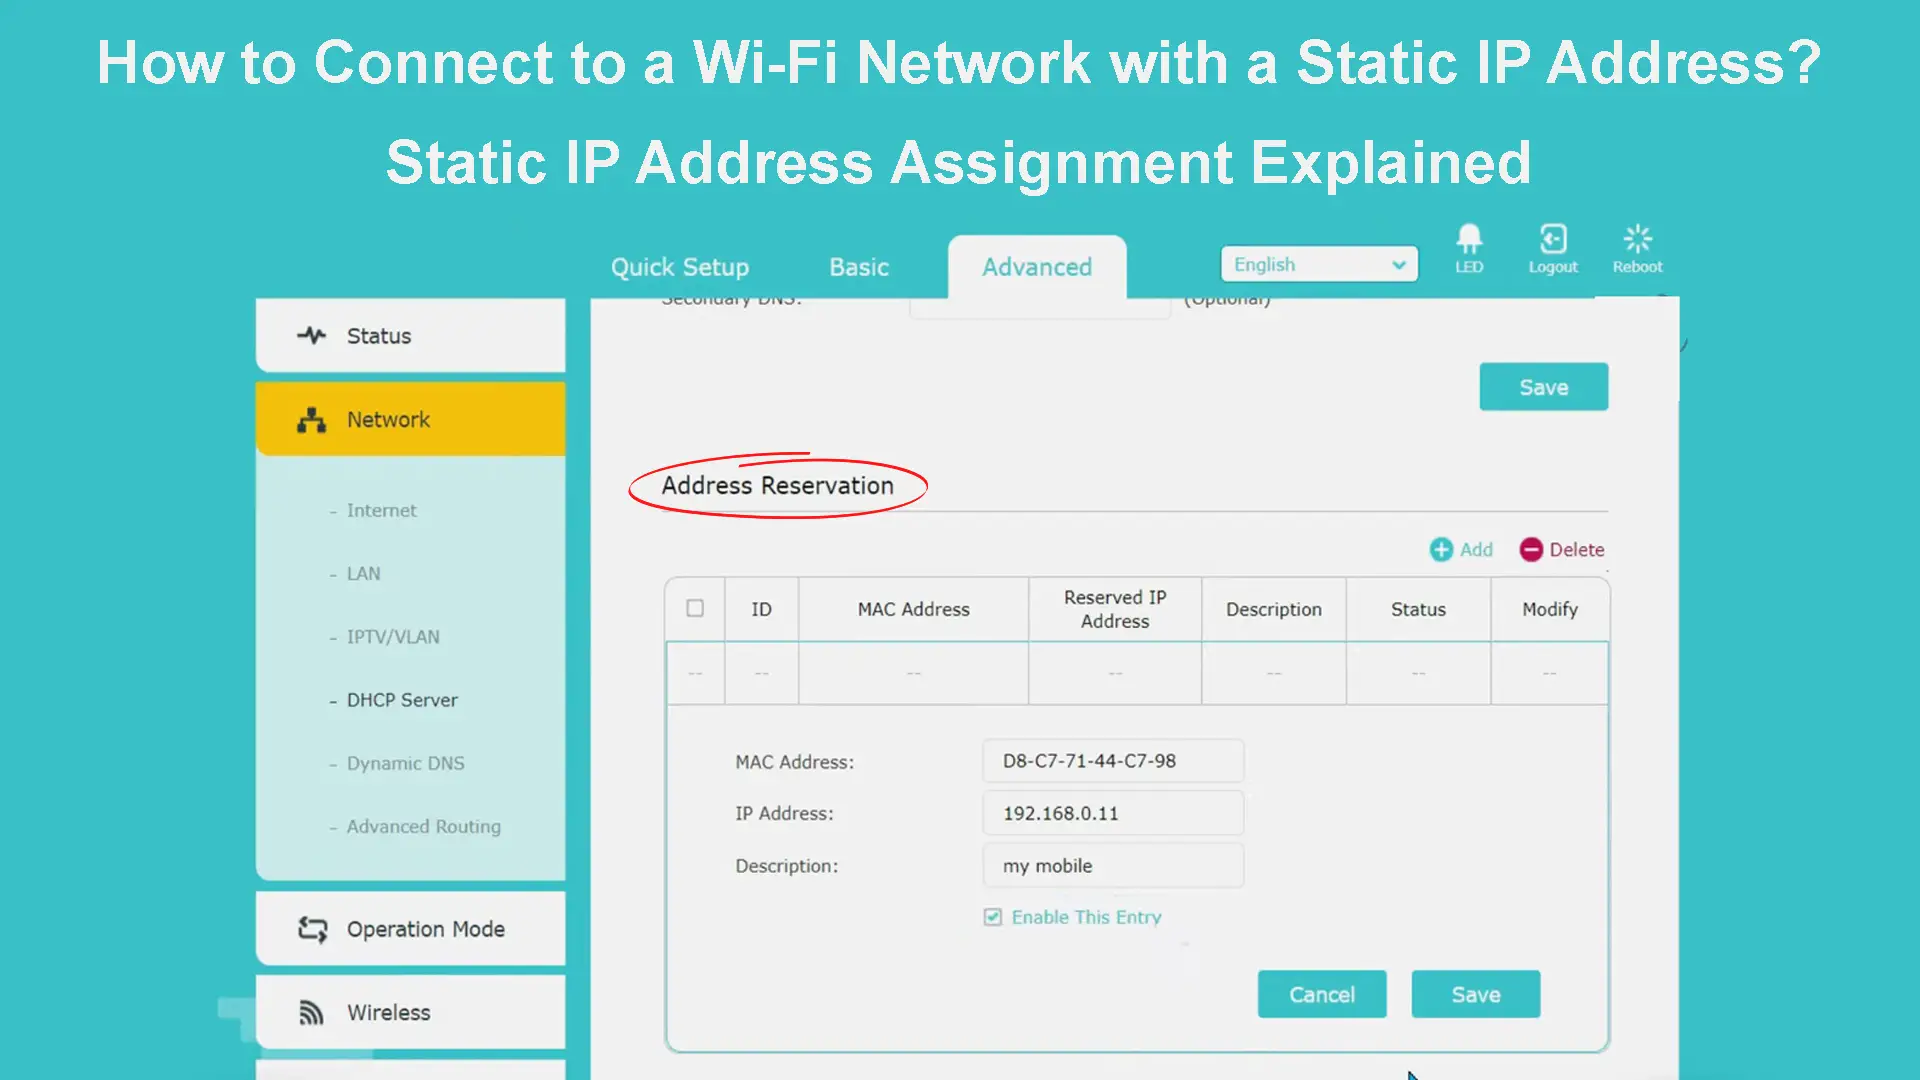
The exact steps you’ll have to go through depend on the router’s brand and model. In general, you should find network settings, and find the DHCP section. You’ll then be able to add a DHCP reservation.
Some routers will provide you with a list of all clients connected to the network. You should find your device there and choose it. If you don’t have the list or you can’t find your device there, you can choose to manually add a client. You’ll then have to enter your device’s MAC address and your desired IP address for that device. Once you’re done, save the settings and log out.
How to Make a DHCP Reservation (TP-Link Router)
The Bottom Line
Connecting to a Wi-Fi network with a static IP address is pretty simple once you properly configure all the settings. However, if you want to connect to multiple networks, you’re likely going to face some problems. We tried to make the process a bit less complicated. That is why we provided you with alternatives that will help you make the most of the static IP without losing some of the features the dynamic one offers!

Hey, I’m Jeremy Clifford. I hold a bachelor’s degree in information systems, and I’m a certified network specialist. I worked for several internet providers in LA, San Francisco, Sacramento, and Seattle over the past 21 years.
I worked as a customer service operator, field technician, network engineer, and network specialist. During my career in networking, I’ve come across numerous modems, gateways, routers, and other networking hardware. I’ve installed network equipment, fixed it, designed and administrated networks, etc.
Networking is my passion, and I’m eager to share everything I know with you. On this website, you can read my modem and router reviews, as well as various how-to guides designed to help you solve your network problems. I want to liberate you from the fear that most users feel when they have to deal with modem and router settings.
My favorite free-time activities are gaming, movie-watching, and cooking. I also enjoy fishing, although I’m not good at it. What I’m good at is annoying David when we are fishing together. Apparently, you’re not supposed to talk or laugh while fishing – it scares the fishes.