
Creating a Guest Wi-Fi network for your Frontier router is an excellent way to let your friends and family use your internet connection without giving them direct access to your personal network. This will let you keep your personal files and data secured, and at the same time, they will be more than happy to use your internet connection.
Keep reading to learn how to create a guest Wi-Fi network for Frontier! There are also some tips to make your Guest Wi-Fi even more secure.

CONTENTS
Why Should You Create A Guest Network?
Having a separate Guest Wi-Fi network is an excellent layer of security because it doesn’t allow your guests and visitors access to the primary network.
When you let someone access your primary network, that person can access all the connected devices, and most importantly, he/she has the chance to access the router admin dashboard. This is a huge security risk and it is definitely something you don’t want to happen because this can make your network vulnerable, and your bandwidth can be used and abused without your permission, not to mention that your personal information and files can be easily accessed and used.
The Importance and Advantages of Guest Wi-Fi Networks
On top of everything, when that person gains access to the admin dashboard, he or she can change the Wi-Fi password leaving all your devices with no internet access, or change any of the settings he or she wants that can make your wireless network unsecured or unusable, or you can even get kicked out of your own network.
When that happens, you will have to reset your router to factory settings and set up the network again, but it is much easier to create a separate network for your guests and visitors.

How to Set Up A Guest Wi-Fi on Frontier?
Setting up a separate Wi-Fi network for your guests is something you should do as soon as possible after you are done with the primary network setup. If you are not sure how to do it properly, we did our best to explain how to create a guest Wi-Fi on the Frontier router.
Recommended reading:
- How to Connect to Wi-Fi When You Are Out of Range? (Try These Quick Fixes)
- How to Turn Off Wi-Fi Restrictions? (Tips for Disabling and Bypassing Wi-Fi Restrictions)
- Can Information Be Collected When Connecting to Wi-Fi? (Who Can Collect My Data When Connected to Wi-Fi?)
NOTE: Since Frontier issues different routers from different manufacturers, don’t be confused if your admin dashboard is a bit different and you can’t follow the steps below exactly as described. The good thing here is that even if the admin dashboard is different, the settings will be there but most likely under a different name. Still, you shouldn’t have problems finding what you need.
So, let’s take one step at a time!
STEP 1 – Log in to Your Frontier Router
We have already written a detailed guide on how to access your Frontier router admin dashboard, but here is a quick explanation on how to do it.
- Launch your web browser
- Enter one of these IP addresses into the Address bar: 192.168.1.1, 192.168.0.1, 192.168.1.254, or 192.168.254.254, and hit the Enter key on the keyboard after you type the IP. The right IP will make the router login page show up. If none of these IPs work, here is how to find the correct router IP address.
- On the router login page, enter the admin username and password. If you have never changed them, you can find default credentials on the label on your Frontier router or try the following combinations. Username: admin or Admin. Password: admin, password1, or password.
- When you click on the Login button, the correct username and password combination will give you access to the Frontier router admin dashboard
Frontier Router Login and Wi-Fi Configuration
STEP 2 – Find The Guest Wi-Fi Section
Frontier issues a wide range of different wireless routers to its customers. After you log in to your router as described above or in the Frontier router login guide we have recommended, you need to find the Guest WiFi section.
Normally, when you log in to your Frontier router, click on Wireless in the horizontal menu. Then you will see a menu on the left with two sections that interest us in this case:
- Guest Access 2.4 GHz
- Guest Access 5 GHz
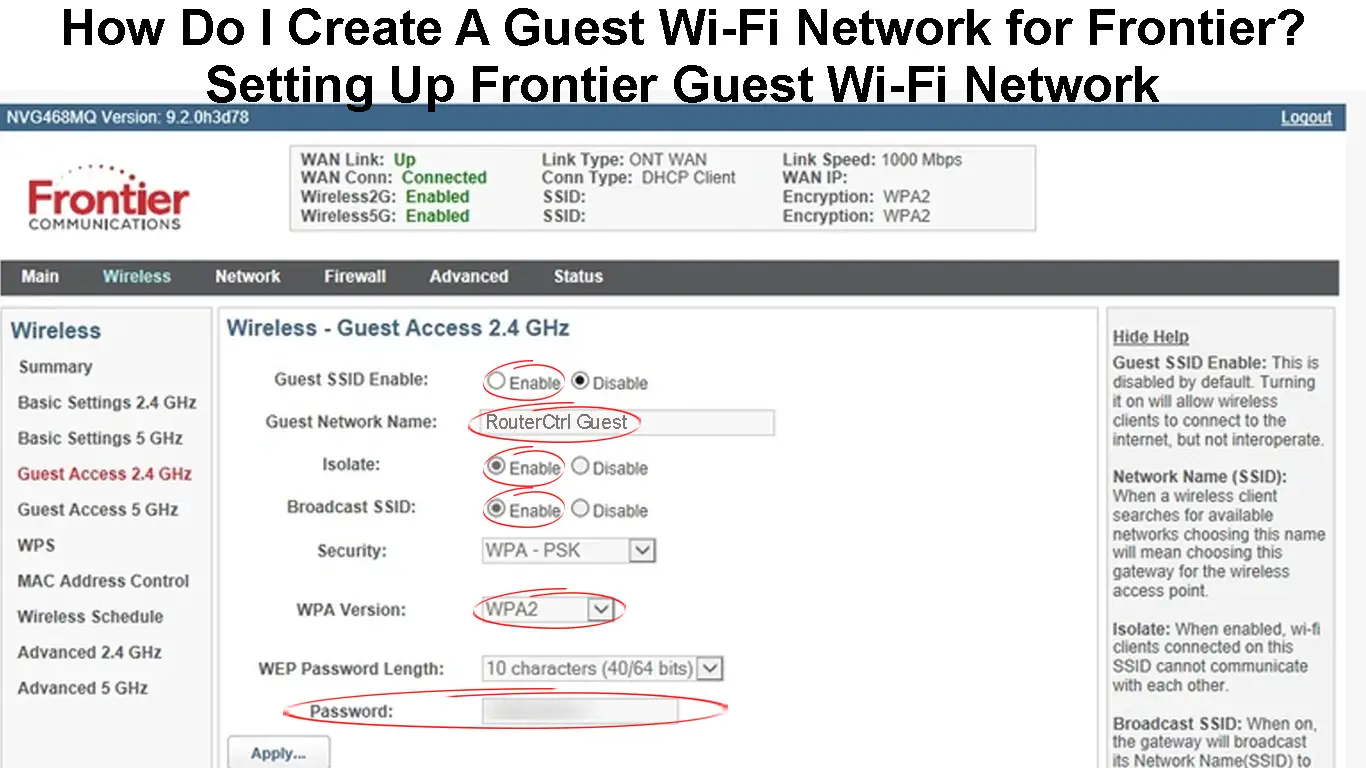
When you click one of these you will have the following options:
Guest SSID Enable – Select YES.
Guest Network Name – Enter the name of your guest network here. Try to make it clear to your guests that they are connecting to a Guest Wi-Fi network.
Isolate – You can enable this option. It prevents wireless clients from communicating with each other.
Broadcast SSID – Make sure to enable this option as well. Otherwise, your guests won’t see the Guest Wi-Fi network name.
Security – It is recommended to select WPA-PSK here
WPA Version – make sure WPA2 is selected.
Password – Enter the Guest Wi-Fi password here.
Now click on the Apply button to save the changes and your Guest Wi-Fi network should be visible in no time. Once you see it, you can connect your device to it to see how it works.

5 Tips for Better Guest Network Security
- The Guest Wi-Fi password has to be simple and memorable. There is no need to make things complicated.
- Always password-protect your Guest Wi-Fi network. Yes, you will still have to share the password with your friends and guests but you will keep your primary network safe. So, you can print the Wi-Fi password or use an online tool to generate a QR code that will automatically connect the smartphone to your Guest Wi-Fi network without the need to type the password.
Creating a QR Code for Your Guest Wi-Fi Network
- Feel free to limit the bandwidth or internet speed on the Guest network. You should make it easy for them to use their email addresses, access their social network accounts, and even watch videos on YouTube (not recommended), but downloading large files from the internet is out of the question.
- Don’t forget to change your Guest wireless password as well as the primary Wi-Fi password every now and then.
- You can enable and disable the guest Wi-Fi easily once you set it up.
Final Words
Creating a Guest Wi-Fi on your Frontier router has many benefits, and the increased security of the primary network is the greatest of all. Now you don’t have to worry whether a “wannabe hacker” will decide to play a little and mess up your network.
We did our best to keep things as simple as possible and we truly believe that you have created a guest network on your Frontier router successfully. In case you had problems finding some of the settings, it is important not to give up. Everything is there, you just need to find it. Have a great time!

Hey, I’m Jeremy Clifford. I hold a bachelor’s degree in information systems, and I’m a certified network specialist. I worked for several internet providers in LA, San Francisco, Sacramento, and Seattle over the past 21 years.
I worked as a customer service operator, field technician, network engineer, and network specialist. During my career in networking, I’ve come across numerous modems, gateways, routers, and other networking hardware. I’ve installed network equipment, fixed it, designed and administrated networks, etc.
Networking is my passion, and I’m eager to share everything I know with you. On this website, you can read my modem and router reviews, as well as various how-to guides designed to help you solve your network problems. I want to liberate you from the fear that most users feel when they have to deal with modem and router settings.
My favorite free-time activities are gaming, movie-watching, and cooking. I also enjoy fishing, although I’m not good at it. What I’m good at is annoying David when we are fishing together. Apparently, you’re not supposed to talk or laugh while fishing – it scares the fishes.