A Wi-Fi hotspot is a handy feature your Windows PC can offer allowing you to share your Wi-Fi connection with other devices. However, it’s not meant to be a permanent feature since you will experience a dramatic reduction in wireless speed compared to what a physical wireless access point can provide.
That said, the PC can serve as a quick temporary internet provider for some light usage such as internet browsing or watching YouTube. This post teaches you how to create a Wi-Fi hotspot with Command Prompt using the administrator account.
CONTENTS
Run Command Prompt as Administrator
Begin the process with the following steps:
- Go to the start button at the bottom-left of your computer screen.
- Type ‘cmd’ on the search box.
- Find the cmd app and right-click on it.
- Select Run as administrator and click Yes.
- You get to the Command Prompt page.
Creating Wi-Fi Hotspot
You’re in the Command Prompt now, and you need to follow all these steps to create a Wi-Fi hotspot:
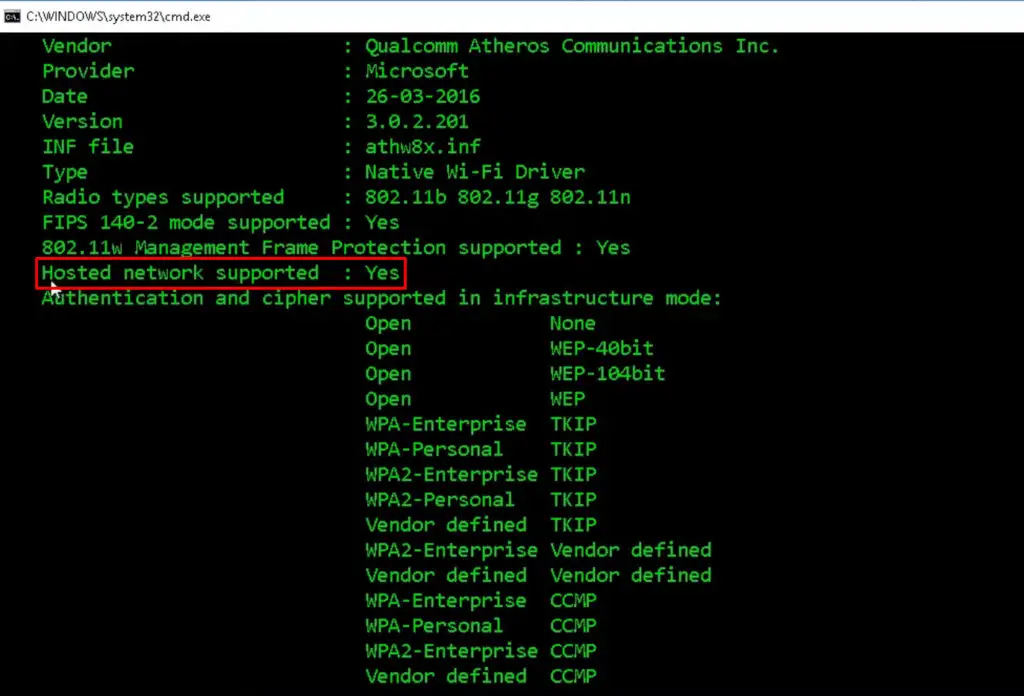
- Type “NETSH WLAN show drivers” and press >Enter.
- The screen will show some details about the drivers. Look at the line that says “Hosted network supported”. If you see a ‘Yes’ next to it, then you can use the Command Prompt to set up a Wi-Fi hotspot on your PC. Otherwise, a ‘No’ means you cannot create a Wi-Fi hotspot.
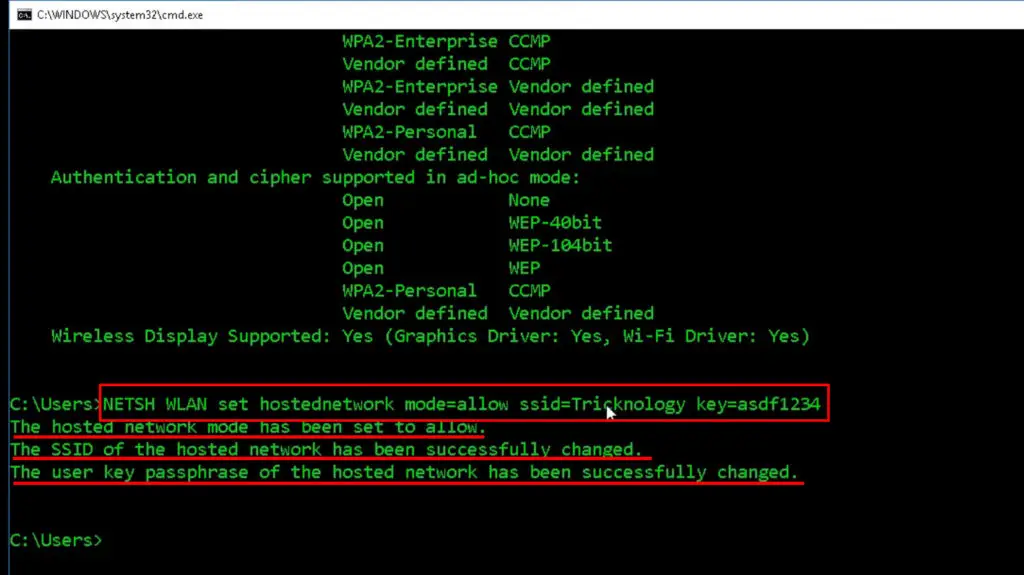
- If you see a ‘Yes’, continue by typing “netsh WLAN set hostednetwork mode=allow ssid=NETWORKNAME key=password” at the prompt. Replace “NETWORK NAME” and “PASSWORD” with your desired Wi-Fi name (SSID) and password. Then, press Enter.
- The page will display confirmation of your action – “The hosted network mode has been set to allow.”, “The SSID of the hosted network has been successfully changed.”, and lastly, “The user key passphrase of the hosted network has been successfully changed.”
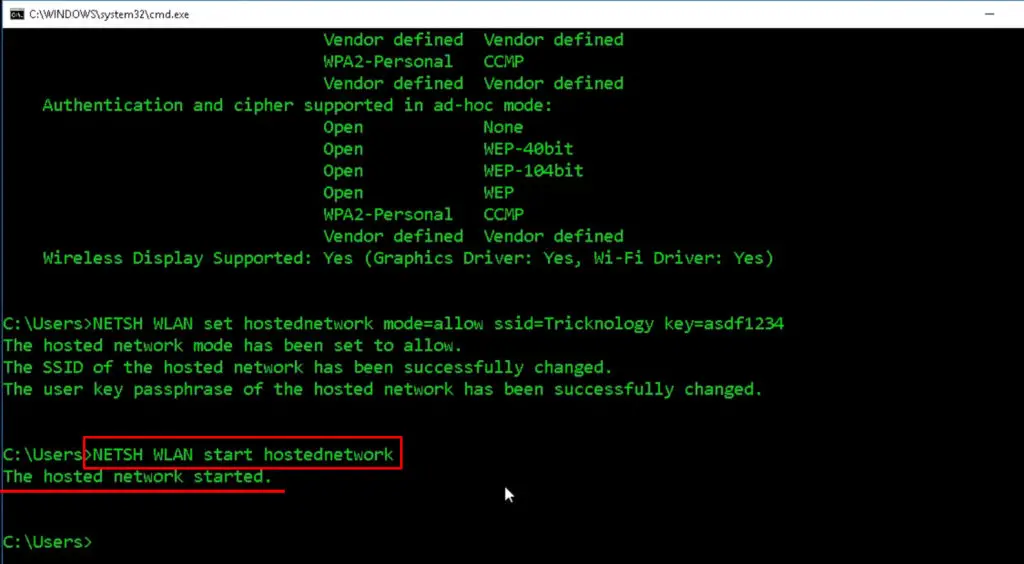
- Next, type “NETSH WLAN start hostednetwork” and press >Enter.
- It will turn on your Wi-Fi network, and you will see a confirmation that says, “The hosted network started”.
- Lastly, type “exit” and press Enter.
VIDEO TUTORIAL – How to Create a Wi-Fi Hotspot Using Command Prompt
Broadcasting and Sharing your Wi-Fi Network
Now that you have created a Wi-Fi hotspot using Command Prompt, you need to make it visible to other devices so that you can share it. This setting should be enabled when you create the hotspot, but in case it isn’t, here are the steps:
- Go to the start button on the bottom-left of your computer screen.
- Type “control panel” on the search box.
- Open up the Control Panel app and select Network and Internet.
- Select Network & Sharing Center.
- Choose Change adapter settings from the menu on the left.
- Find your Wi-Fi network and right-click on it.
- Select Properties from the dropdown menu.
- Then, click on the Sharing page.
- You will get to the Internet Connection Sharing page and check the box that says, “Allow other network users to connect through …..”.
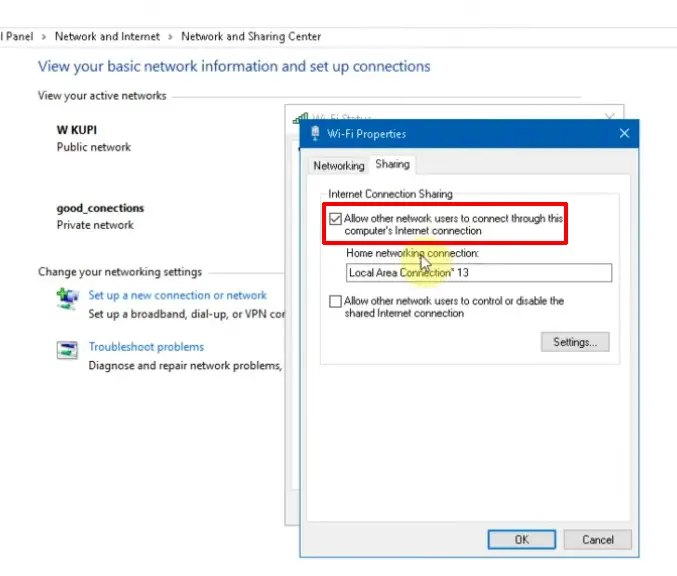
- Click on the dropdown menu and select a private network connection.
- Select Local Area Connection and click OK.
- Your Wi-Fi hotspot is now broadcasted, and other devices can connect to it with a known password.
Stop Sharing your Wi-Fi Network
If you want to stop sharing your Wi-Fi network, use these steps:
- Open the Command prompt administration page using the same steps we mentioned above.
- Type “netsh wlan stop hostednetwork” and press > Enter.
- You will see a message “The hosted network stopped” which confirms your action. Now you have stopped sharing your Wi-Fi hotspot with other devices.
Recommended reading:
- How to Create a Free Virtual Wi-Fi Hotspot on Your Laptop? (Use Your Laptop as a Hotspot)
- How to Connect Two Wi-Fi Routers Without a Cable? (Is it Possible and How to Do It?)
- Why Does My Wi-Fi Keep Disconnecting and Reconnecting? (Proven Solutions)
You might want to ask some questions about creating your Wi-Fi hotspot, and here are our answers to some frequently asked questions that might be useful:
Q: How to set the password when setting up a Wi-Fi hotspot network?
A: You can replace the password text with your own preferred password using this command – “netsh WLAN set hostednetwork mode=allow ssid=NETWORKNAME key=password”.
Q: How to connect to the Wi-Fi hotspot from another computer?
A: Click on the Wi-Fi network icon at the bottom-right of the computer screen. It will display all nearby networks with stronger signals. Look for the name (the one you just created earlier on the other computer) and click on it. It will prompt for the password. Key in the password, and your computer will connect to the Wi-Fi network.
Q: How to find the password on the newly created Wi-Fi hotspot?
A: Use the administrator account to run the Command Prompt. Type “netsh WLAN show hostednetwork security” and press Enter to see the password.
Q: Can I download something with the Wi-Fi hotspot?
A: Yes, you can, but if you want to download files from the hosted computer, you must turn on the file-sharing option in the settings.
Q: What should I do if the Command Prompt shows an error message – “Parameter isn’t correct”?
A: You should open the Command Prompt and type in “netsh winsock reset”. After that, repeat the setup process as shown in the first instruction above.
Q: What should I do if the Command Prompt shows an error message – “hosted network could not be started”?
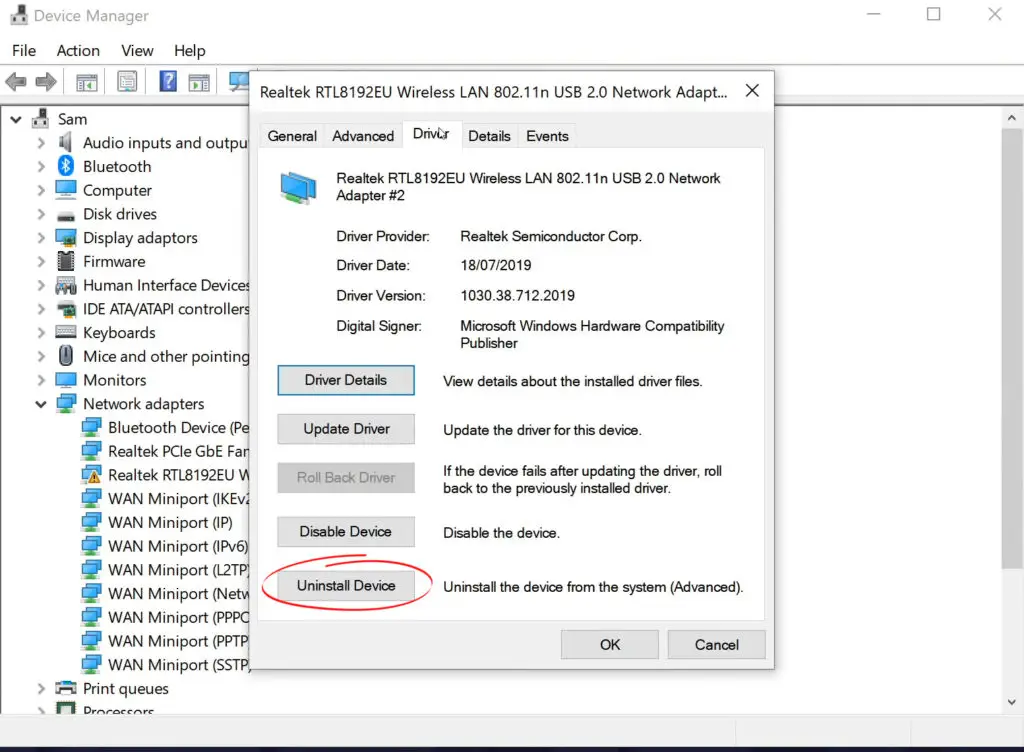
A: See if your PC has the feature to support Wi-Fi hotspot creation using Command Prompt, as shown in the guide above. If yes, then try to reinstall the driver. To reinstall, right-click on the start button and select Device Manager. Double-click on Network adapters and right-click again on the wireless network. Select Uninstall and press OK. Then restart your PC; windows will automatically reinstall the necessary drivers. After that, you can repeat creating the Wi-Fi hotspot.
Q: Can my Wi-Fi hotspot serve more than one device?
A: Yes, it can support multiple devices as long as it has the capacity. But, the more devices connected to your network, the slower the signal speed will become.
Q: Can I create a Wi-Fi hotspot without a password?
A: Yes, you can. In the command “netsh WLAN set hostednetwork mode=allow ssid=NETWORKNAME key=password”, skip the last part “key=password”. However, we don’t recommend doing it since your Wi-Fi can quickly become a target for malicious intruders. Furthermore, when many users connect to your network, they will tremendously slow down the signal speed.
Conclusion
Now, you know how to create a Wi-Fi hotspot with Command Prompt. Over time, Windows has improved its features and functions, including the creation of shortcuts to do tasks. You can also create a mobile hotspot almost instantly by clicking on the network icon at the bottom-right of your computer screen.
Then, you can see three boxes – Wi-Fi, Airplane mode, and Mobile hotspot. Click on the Mobile hotspot, and your Wi-Fi hotspot is up and running. However, it’s not as good as a physical wireless access point, but you’ll find it useful for your computer to host a network and get several devices online.

Hey, I’m Jeremy Clifford. I hold a bachelor’s degree in information systems, and I’m a certified network specialist. I worked for several internet providers in LA, San Francisco, Sacramento, and Seattle over the past 21 years.
I worked as a customer service operator, field technician, network engineer, and network specialist. During my career in networking, I’ve come across numerous modems, gateways, routers, and other networking hardware. I’ve installed network equipment, fixed it, designed and administrated networks, etc.
Networking is my passion, and I’m eager to share everything I know with you. On this website, you can read my modem and router reviews, as well as various how-to guides designed to help you solve your network problems. I want to liberate you from the fear that most users feel when they have to deal with modem and router settings.
My favorite free-time activities are gaming, movie-watching, and cooking. I also enjoy fishing, although I’m not good at it. What I’m good at is annoying David when we are fishing together. Apparently, you’re not supposed to talk or laugh while fishing – it scares the fishes.
