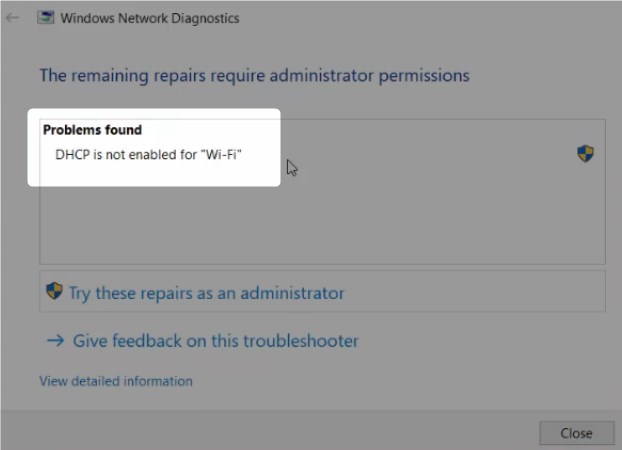
If you’re here looking for the solution for the error message from this title, you’re in the right place. You can read this to fix similar error messages like:
- DHCP is not enabled for Ethernet
- DHCP is not enabled for Local Area Connection
So, you experienced problems connecting to the internet, you clicked on network troubleshooter, and it gave you “DHCP is not enabled for “WiFI” message? Don’t worry. It’s often fixable, and you can do it yourself with minimal effort and in a short time.

CONTENTS
What is DHCP, and Why Do You Need It?
DHCP stands for Dynamic Host Configuration Protocol. To put it simply, it is a protocol used by the DHCP server (in this case, your router) to assign a dynamic IP address for each device you connect to the router. Since every device needs the IP address (and other configurations) to communicate with the rest of the network and the internet, if DHCP is disabled, your computer won’t get an IP address, and you won’t be able to go online.
(To be completely honest, there is a way to go online by manually assigning IP addresses to each device, along with the other settings, but this is a topic for another article).
If you are interested in learning more about DHCP, what it does, and how it works, check this Youtube video. It explains the basics in a visual way and simple language:
How to Enable DHCP?
The most apparent cause for disabled DHCP is incorrect Wi-Fi adapter settings. To change those settings, follow these steps:
- Locate the Internet/network status icon on the lower-right corner of the desktop and right-click on it.
- Click on Open Network and Sharing Center.
- In the central section of the screen, locate the “Change adapter settings” option, then click on it.
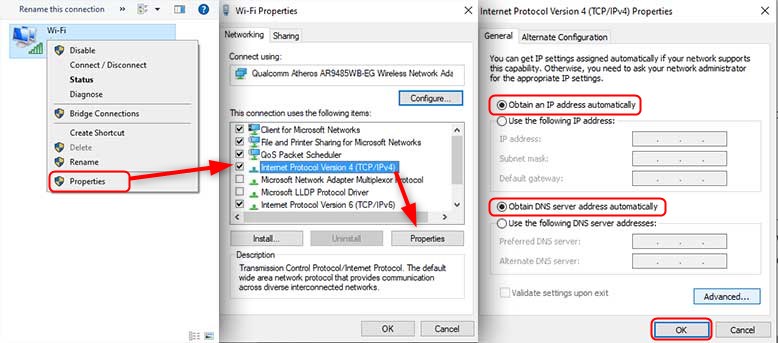
- Locate your wireless network connection. Right-click on it and choose Properties.
- Navigate to Internet Protocol Version 4 (TCP/IPv4) and double-click on it.
- Check the box next to “Obtain an IP address automatically.”
- Check the box next to “Obtain DNS server address automatically.”
- Click OK to confirm the changes. You’re now back to the Wi-Fi Properties window.
- Click OK to save the changes.
Now restart your PC and see if the change of Wi-Fi network adapter settings fixed the problem. If not, move on to the next fix.

DHCP Client Might Be Disabled
If you’re still experiencing the same problem after tweaking the Wi-Fi network adapter settings, your DHCP client might be disabled. DHCP client is a program in charge of requesting the IP address and other parameters from the DHCP server. To enable it, do the following:
- Start the Run app by pressing the Windows logo + R.
- Type “services.msc” into the Run app, and press Enter.
- Scroll through the list of services to find DHCP Client and double-click on it.
- Set startup type to Automatic.
- Click Apply, then OK to save the changes.
When you finish these steps, restart the computer and see if the issue is gone. If you still can’t get online with the same error message, let’s try something else.
Windows Firewall Might be Blocking DHCP
Microsoft Firewall is an application that filters the data coming in and out of your computer. It is in charge of security, and the Firewall may block the DHCP client, effectively preventing it from communicating with the server. If this is the case, you’ll need to open the Windows Firewall and manually add the DHCP client to the list of the applications allowed to send and receive data.
First, turn off the Firewall to see will it solve the problem:
- Type in”cpl” into the search bar on the bottom of the desktop
- Left-click on Control Panel
- Left-click on System and Security
- Left-click on Windows Defender Firewall
- Left-click on Windows Defender Firewall.
- Locate Turn Windows Firewall on or off on the left side of the window and Left-click on it.
- Select Turn off Windows Firewall.
Check if this solved the problem. If it did, you’d need to do what we mentioned earlier and add DHCP Client to the list of the applications that can communicate through the Windows Firewall by following the next steps. If the Firewall is not the one causing the problems, skip to the next fix.
- Open the Start menu and left-click on the Settings icon.
- Left-click on Search and type Firewall. Select Firewall from the search results.
- Left-click on Allow an App or Feature through Windows Firewall on the left.
- Allowed Apps window will open. Left-click on Change Settings.
- Scroll until you find the DHCP service and check the box next to it.
The DHCP client should now be able to communicate through the firewall and request/receive the settings from the server.
Recommended reading:
- How to Change NAT Type on PC? Explained
- How to Enable UPnP on Router?
- How To Fix PS4 NAT Type Failed?
What Else Can Block DHCP?
There are a couple more things that can block the DHCP. If you are using third-party antivirus software, try disabling it to see will it make any difference. Antivirus software can sometimes try to do its job a little too well by putting up a firewall of its own, thus effectively blocking some apps Windows Firewall lets through.
Another possible cause could be bad Wi-Fi network adapter drivers. Drivers are little programs that allow communication between a specific device and the rest of the system. Try reinstalling them with up-to-date drivers you download using a different computer from a manufacturer’s website or other trusted source.
One of these fixes should get you back on track.
If none of the above worked, consider taking the computer to the service. There could be a hardware problem you can’t fix on your own.

Hey, I’m David. I’ve been working as a wireless network engineer and a network administrator for 15 years. During my studies, I also worked as an ISP field technician – that’s when I met Jeremy.
I hold a bachelor’s degree in network engineering and a master’s degree in computer science and engineering. I’m also a Cisco-certified service provider.
In my professional career, I worked for router/modem manufacturers and internet providers. I like to think that I’m good at explaining network-related issues in simple terms. That’s exactly what I’m doing on this website – I’m making simple and easy-to-follow guides on how to install, set up, and troubleshoot your networking hardware. I also review new network equipment – modems, gateways, switches, routers, extenders, mesh systems, cables, etc.
My goal is to help regular users with their everyday network issues, educate them, and make them less scared of their equipment. In my articles, you can find tips on what to look for when buying new networking hardware, and how to adjust your network settings to get the most out of your wi-fi.
Since my work is closely related to computers, servers, and other network equipment, I like to spend most of my spare time outdoors. When I want to blow off some steam, I like to ride my bike. I also love hiking and swimming. When I need to calm down and clear my mind, my go-to activity is fishing.
