Google Nest provides various smart home solutions with their range of devices. The Google Nest Wi-Fi is a game-changer for faster and better internet connections. It uses a mesh network system to provide several network points for a stable and robust connection. The Nest Wi-Fi is compatible with various ISPs, although it has a few complications.
We will see how you can set it up with your internet provider, particularly Xfinity, and we’ll discuss challenges that might occur during the setup. So, this article is primarily for those who want to upgrade to Google’s Nest Wi-Fi and have questions about its compatibility with Xfinity.

CONTENTS
So, Does Nest Wi-Fi work with Xfinity?
The short answer is YES; Google Nest Wi-Fi does work with Xfinity. To connect the two, you need an ethernet cable and a modem. The Nest point works with your modem to provide coverage by replacing your router (or router portion of your Xfinity gateway) with the Nest points throughout the home. It uses technology that optimizes connection, so your device connects with the nearest point with the strongest connection.
The speakers ensure you can voice-control other smart devices on the network with ease and even listen to music. Next, we look at the advantages of connecting Google Nest Wi-Fi to Xfinity.
Why Google Nest Wi-Fi?
With all the hype surrounding these devices, be sure they deserve it. Among many advantages of connecting Xfi internet with Google Nest are:
- The Google Nest will provide you with a faster and stronger connection at a lower price in the long run (compared to other mesh systems and third-party routers and extenders). Its dual-band ensures you have the best connection.
- You have complete control of the network on your phone through the Google Home app.
- It allows you to create a separate guest network and share whatever network you want to share via a simple QR code scan or password.
- You can also prioritize any device you wish for a better connection. To check the speeds, you can always run a speed test.
- The Nest Wi-Fi also provides excellent parental control options as you can restrict sites, limit screen time, and even lock out particular devices.
- You will also be able to use a broader range of intelligent products in your home as Nest Wi-Fi is compatible with most of them.
Drawbacks
Nothing is ever perfect, so the Nest Wi-Fi is bound to have a few disadvantages.
For instance, it can handle internet speeds of between 250Mbps to 300Mbps, meaning if you have a slightly faster network, you will not enjoy its full potential. However, most households rarely need speeds above 150Mbps.
Nest Wi-Fi does not support Wi-Fi 6 yet, although not many devices do either way. It also requires secondary apps for advanced settings, which interferes with user experience.
How to Set Up
The process is easy, and you can do it in a matter of minutes. You will need the google home app from the Play Store or Appstore to manage it.
After downloading the app, follow these steps:
Engage Bridge Mode
Bridge mode engages the Google Nest Wi-Fi as the functional router by disengaging the Xfinity one (the router built inside the Xfinity gateway). Bridge mode inhibits the Xfi router while leaving the modem active.
Recommended reading :
- How to Fix the Xfinity Cable Box Blinking Green Light?
- How to Fix the Xfinity Router Blinking Green Light Issue?
- What Modems Are Compatible With Comcast Xfinity?
To engage the bridge mode, log into your Xfinity network with the admin username and password by visiting 10.0.0.1. Then, on the left side of the interface, select “Gateway” then “At a Glance” and enable bridge mode.
Click OK on the pop-up warning informing you that bridge mode would disable your Xfi router, and just like that, you are through.
However, it is essential to reboot your modem and router and wait for a few minutes until the lights are solid and not blinking.
How to Enable/Disable Bridge Mode Using Xfinity Gateway’s GUI
Connect Modem and Router
To do this, connect the Xfinity modem to the Nest router using an ethernet cable. While doing this, ensure to disconnect any other routers from the modem and leave only the Google Nest Wi-Fi router.
If you face any connectivity issues at this point, a quick solution is to test if any of the other ports are working fine.
Sign in to the Google Home App
You need your phone to log in to the Google Home app in this step. In options under settings, select “Add a device” and then “New Device” options. Here, you can enter your details manually or scan the QR code under the Nest router.
Tweak the Settings
You can change your Nest router settings to serve your comfort in the app. To add new Wi-Fi hubs, you can always click on add device under the settings tab.
Select Strategic Points
The last step is to ensure you install the Nest Wi-Fi points in places people need a connection but cannot find a stable one. These could be in a bedroom further away from the modem, a balcony on another floor, and many more.
You can run a mesh test to ensure the Wi-Fi points are working when done. A mesh test only works when you have more than one Wi-Fi point in your home.

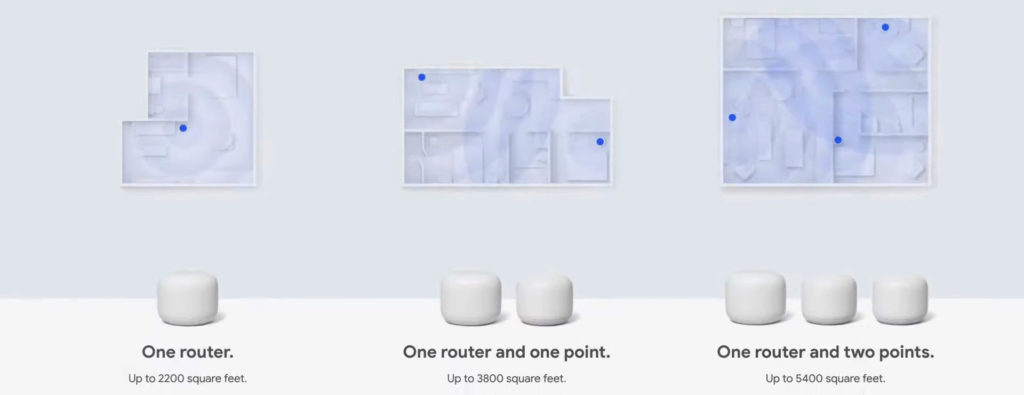
Google recommendations for different home sizes and layouts
Possible Connection Problems and Solutions
This section looks at the common problems you will face when setting up Xfinity with Google Nest. These solutions should get your connection up and running in no time.
Slow Internet Speeds
Should any of your Wi-Fi points work at a slow speed, you can move them closer to the router or move the hubs closer to each other. Place them at a distance that they can establish connections with each other.
You can also place the points at eye level while ensuring no obstructions like thick walls or other electronic devices.
Other solutions include disabling the cloud feature for twenty seconds and disabling the device priority feature. It allocates a significant percentage of bandwidth to a single device and neglects the others.
Recommended reading :
- Xfinity Router Blinking Blue: How to Fix It?
- Xfinity Router Blinking Orange: Meaning and How to Fix It
- Xfinity Router Red Light: Try These Solutions
Select the Privacy option under Settings on the network “Settings” tab to disable the cloud feature. Under settings, select the “End Priority” option to stop your router from giving priority to a particular device.
Double NAT
The cause of a double NAT is that the Nest router and Xfinity router (the one inside the Xfinity gateway) try to function simultaneously. They create two separate Wi-Fi networks and are both in charge of assigning IP addresses to your devices, which could make it much harder for your connected devices (phones, computers, printers, consoles, etc.) to communicate with each other. The problem persists because Xfi’s firewall prevents any connection from occurring as it deems these connections unsafe.
The easiest solution is to check if your Xfinity gateway is in bridge mode. If it’s not, you need to activate it. That way your Nest router will become the only router on your network and your double NAT issue will be resolved. Instead of disabling the router portion of your Xfinity gateway, you can also try putting your Nest router in bridge mode (disabling the DHCP server on it), but this is not recommended unless you only want to use it as an access point. If you want to create a mesh system and connect Nest points to your Nest router, then putting the Nest router in bridge mode is not an option.
How to Avoid Double NAT when Connecting Nest to a Gateway
Compatibility
To ensure your devices are compatible, purchase them in the country you intend to use them. It is necessary as countries have various regulations concerning wireless connections.
Final Thoughts
Conclusively, it is evident that the Nest Wi-Fi and Xfinity combo pros greatly outweigh the cons. For any tech-savvy individual, using the two jointly is a no-brainer. If problems arise and persist, you can always roll back to your original setup until you find a permanent solution. Ensure to be keen on the ports you use, and you should have a seamless connection between Nest Wi-Fi and Xfinity.

Hey, I’m Jeremy Clifford. I hold a bachelor’s degree in information systems, and I’m a certified network specialist. I worked for several internet providers in LA, San Francisco, Sacramento, and Seattle over the past 21 years.
I worked as a customer service operator, field technician, network engineer, and network specialist. During my career in networking, I’ve come across numerous modems, gateways, routers, and other networking hardware. I’ve installed network equipment, fixed it, designed and administrated networks, etc.
Networking is my passion, and I’m eager to share everything I know with you. On this website, you can read my modem and router reviews, as well as various how-to guides designed to help you solve your network problems. I want to liberate you from the fear that most users feel when they have to deal with modem and router settings.
My favorite free-time activities are gaming, movie-watching, and cooking. I also enjoy fishing, although I’m not good at it. What I’m good at is annoying David when we are fishing together. Apparently, you’re not supposed to talk or laugh while fishing – it scares the fishes.


I tried. Disengaged the bridge and lost all internet connection. Set up Nest Pro and accessed the setup WiFi, but it couldn’t connect to the internet via the modem. The Xfinity router was working, but I like the mesh. Unfortunately, now I have nothing but hours of trying to find support. I rebooted everything, even factory reset the Nest.
Sorry, I engaged the Gateway bridge.