
Are you looking for a tutorial that will show you how to enable 5 GHz Wi-Fi on Windows 10?
If your answer is positive, then you are in the right place.
In this post, we will try to give you a detailed explanation and help you with potential issues. Keep reading and find your answers.

CONTENTS
Why Is It Useful to Know How to Enable 5 GHz on Windows 10?
Let’s start with why you would want to enable 5 GHz Wi-Fi on Windows 10. There are several reasons, but we will mention the most important ones. The 5GHz band provides a reliable and much faster Wi-Fi connection than 2.4 GHz Wi-Fi. True, Wi-Fi coverage of 5 GHz Wi-Fi is poorer than 2.4GHz, but if speed is your priority, then 5 GHz is a great choice of band for you.

Is My laptop Compatible with 5GHz Wi-Fi?
The first thing you should do if you want to enable 5 GHz in Windows 10 is to check if the device you are using support 5 GHz Wi-Fi. Here’s how to do it:
- On the keyboard, press the Windows button and the R key at the same time.
- A Run window will open. In it, type “cmd” and then press “Enter” on the keyboard. This way you have opened the “Command Prompt”.
- Type in the following command “netsh wlan show drivers” and press “Enter”.
- Find the section “Radio types supported”. To the right of the section, there will be numbers with letters that represent specific network types. Your device supports 5 GHz (more precisely, it supports both bands, 2.4 GHz and 5 GHz) if the following radio types appear:
802.11ac, 802.11ax, 802.11 a/g/n

- If your device does not support 5GHz, but only 2.4GHz, the following radio types will appear:
8022.11b, 802.11g
Checking the Router
You also need to find out if your router is dual-band. To be more specific, you need to find out if it supports both bands – 2.4GHz and 5GHz. There are several ways to get this information:
- You can start with the user manual that came with the router as it usually contains information about what bands the router supports.
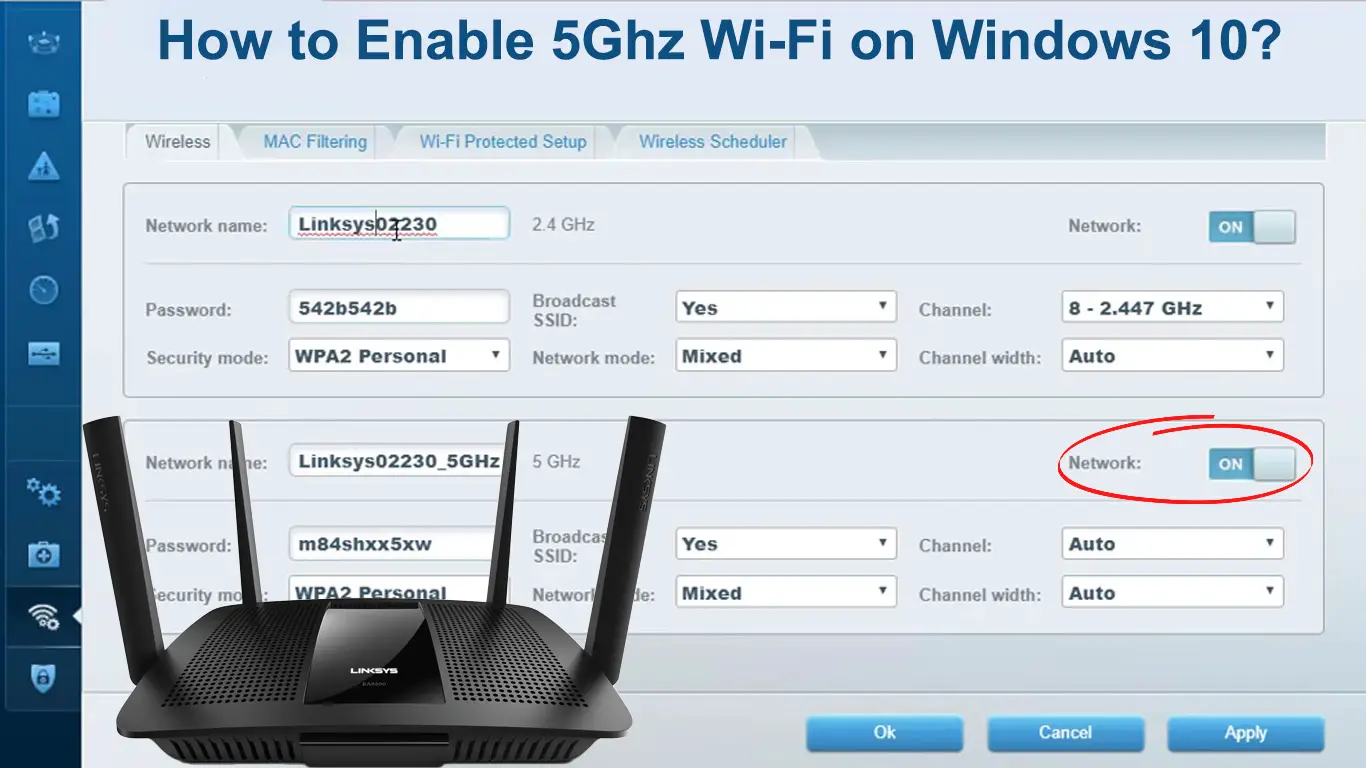
- If you don’t have the guide or can’t find it, you can log into your router’s admin page and check if both bands are supported.

- You can also visit your router manufacturer’s website. On the site, type in the exact router model and you should see the information about that model, including whether it supports 5GHz Wi-Fi.
How to Enable 5 GHz Wi-Fi on Windows 10?
After establishing that both, your Windows PC and your router support 5 GHz Wi-Fi, let’s find out how to enable 5GHz mode using the network adapter driver settings in Windows 10.
Here are the steps:
- In the lower-left corner of the screen, right-click on the Windows icon.
- From the menu that appears, select “Device Manager”. (You can also open the menu by pressing the windows button and the x key on the keyboard).
- In the “Device Manager” section, find “Network adapters” and click on it.
- Now, find the wireless adapter driver inside the listing of network adapters, and then right-click on it. From the menu that appears, click “Properties”.
- Select the “Advanced” option.
- In the “Advanced” section, under “Properties”, find the “802 11n Mode” option and select it. On some PCs, depending on your Wi-Fi adapter, you may see the option “Wireless Mode”, and when you click on it, you can select various Wi-Fi modes (including 5GHz-only mode – 802.11a/n/ac or something similar).
- Then, select the “Value” (located to the right of “Property”). From the drop-down menu, select the “Enabled” option.
- To save the changes, click “OK”.
- Now, you need to Restart your computer. This completes the process and should enable 5 GHz Wi-Fi.
Setting the Preferred Wi-Fi Band – Switch from 2.4 GHz to 5 GHz Wi-Fi
- Use the keyboard shortcut Win+X to open the menu (you can also right-click on the windows symbol icon to open the menu).
- From the menu that opens, select “Device Manager”.
- Find the Network adapters section, then click on it with the right mouse button.
- Tap on the “Properties” option, and then click on the “Advanced” tab.
- Under the Advanced tab, find and click on “Preferred Band”, then from the “Value” option (located on the right) select “Prefer 5GHz band”.

- At the end of the process, click on “OK”, and then restart your device.
Set 5 GHz Wi-Fi as Your Preferred Band (Windows 10)
Driver Update
If there is a problem in the operation of the Wi-Fi network, or if your computer for some reason (for example after a system upgrade) does not recognize the 5GHz Wi-Fi, the first thing you should do is update the Wi-Fi driver. This can be done in two ways – automatically and manually.
Automatically Update Wi-Fi Driver
- Press the Windows symbol on your keyboard and the x key.
- In the menu that opens, select “Device Manager”.
- Now click on “Network adapters” to expand it.
- In the expanded section, find the wireless adapter driver, right-click on it, and from the menu that opens, click “Update Driver Software”.
- A new menu will open where you need to click on “Search automatically for updated driver software”.
- After the update is complete, restart your computer.
Manual Wi-Fi Driver Update
As already mentioned, you can update the Wi-Fi driver manually. Follow the steps below:
- First, you need to open the “Device Manager” window on your device to manually update the drivers.
- In the “Network Adapters” area of the Device Manager window, right-click the wireless driver, and then choose the “Update driver” option from the dialog box.
- You may upgrade the Wi-Fi driver by following the on-screen steps.
- As with the automatic driver update, after performing the manual driver update, be sure to restart your computer.
How to Update Wi-Fi Drivers on Windows 10 (Automatically and Manually)
Reinstalling Wi-Fi Driver
Also, one of the solutions you could try when your computer does not recognize the 5GHz Wi-Fi is reinstalling the Wi-Fi driver. Let’s go through the steps for this procedure:
- On your keyboard, tap the Windows key and the R key at the same time.
- Enter devmgmt.msc inside the Run box and then tap OK. The device manager will open.
- Right-click on your Wi-Fi Network adapters and choose “Uninstall device” and then confirm your command by clicking Uninstall once again.
- Your wireless network adapter will no longer be listed under “Network adapters” after you uninstall it.
- Now, select “Action”.
- From the drop-down menu, click on “Scan for hardware changes”. The wireless network adapter driver will then be automatically found and installed again by Windows.
- If everything is ok, the driver will be displayed in the list.
Conclusion
As you could see from our guide, the process of enabling 5GHz on Win 10 is not too complicated. After checking the compatibility of your PC and your router with 5GHz Wi-Fi, follow our step-by-step guide and you will successfully enable 5GHz Wi-Fi on your Windows 10 computer.

Hey, I’m Jeremy Clifford. I hold a bachelor’s degree in information systems, and I’m a certified network specialist. I worked for several internet providers in LA, San Francisco, Sacramento, and Seattle over the past 21 years.
I worked as a customer service operator, field technician, network engineer, and network specialist. During my career in networking, I’ve come across numerous modems, gateways, routers, and other networking hardware. I’ve installed network equipment, fixed it, designed and administrated networks, etc.
Networking is my passion, and I’m eager to share everything I know with you. On this website, you can read my modem and router reviews, as well as various how-to guides designed to help you solve your network problems. I want to liberate you from the fear that most users feel when they have to deal with modem and router settings.
My favorite free-time activities are gaming, movie-watching, and cooking. I also enjoy fishing, although I’m not good at it. What I’m good at is annoying David when we are fishing together. Apparently, you’re not supposed to talk or laugh while fishing – it scares the fishes.