There are a few different reasons why your Wi-Fi adapter will be disabled on your Windows-powered laptop or computer. Because of it, you won’t be able to connect to your wireless network. So, knowing how to enable the Wi-Fi adapter on Windows 10 is pretty important.
This article will guide you through the steps you need to take to enable the Wi-Fi adapter and also give you some tips on how to fix some Wi-Fi adapter issues. After all, having a fully functional and stable wireless network and fast internet connection is a must today.
So, let’s begin!
CONTENTS
What is a Wi-Fi Adapter?
A wireless adapter or Wi-Fi adapter is a piece of hardware that can be connected to a device like a computer or a laptop making it possible for that device to connect to a wireless network.
Today almost all devices are created with wireless capabilities, but not so long ago you had to use a wireless adapter if you wanted to connect your device to Wi-Fi. In most cases, Wi-Fi adapters come in the form of a USB dongle which can be easily connected to the device’s USB port.
Depending on the type of network we want to connect our device to we can divide the Wi-Fi adapters into two groups:
What are the Benefits of Having a Wi-Fi Adapter?
If we have to mention the benefits of using a wireless adapter we can point out two main ones.
1. If your laptop or computer doesn’t have a built-in Wi-Fi adapter or it’s not functioning properly, you can use a Wi-Fi adapter to connect them to your wireless network.
2. If your laptop or computer has a built-in Wi-Fi adapter, but it’s now functioning properly, you can use a Wi-Fi adapter to fix this issue and connect the laptop or the computer to your wireless network.
3. If you want to have a faster and more stable wireless connection, the Wi-Fi adapter can override your built-in wireless adapter.
4. You don’t need any special tech knowledge to install a Wi-Fi adapter. The process is pretty simple and straightforward and practically anyone can do it.
How to Install a Wi-Fi Adapter in Windows 10?
In case the integrated wireless adapter on your laptop is malfunctioning or you want to connect your desktop PC to your wireless network, installing an external wireless adapter is the solution you are looking for.
When it comes to Windows 10, in most cases this will be a plug-and-play installation. Windows will automatically pick and install the best drivers for your Wi-Fi adapter after you connect it to the USB port.
However, if Windows doesn’t detect the Wi-Fi adapter drivers, you will have to visit the manufacturer’s website and download the correct drivers. After you download and install the drivers you should see a list of available wireless networks in your area. Connect to your Wi-Fi network and enjoy.
Two Ways To Enable A Wi-Fi Adapter In Windows 10
The Wi-Fi adapter will be enabled automatically once you install it, but in some cases, if you are sharing your laptop or computer with someone else, or your device is infected by viruses, you may find that the Wi-Fi adapter is disabled. In that case here is a nice and easy way how you can enable a Wi-Fi adapter in Windows 10.
How To Enable A Wi-Fi Adapter Via Settings
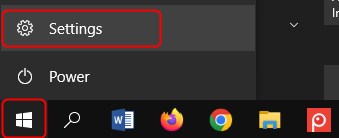
Click the Windows Start button in the bottom-left of your screen and click the Settings icon.
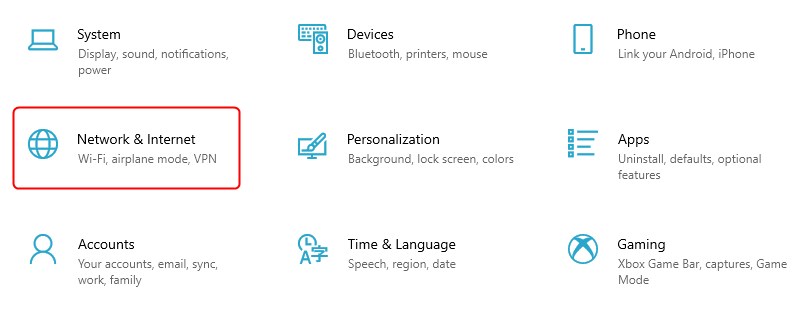
After that click on Network & Internet.
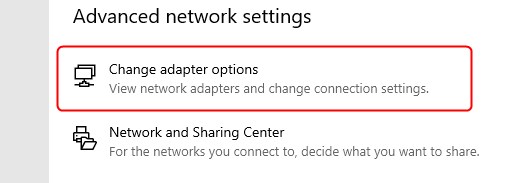
Take a look at the Advanced Network Settings section and click on Change Adapter Options.
Now right-click on the Wi-Fi adapter and select Enable.

Your Wi-Fi adapter will be enabled in a short time.
NOTE: In order to disable the Wi-Fi adapter you have to repeat all these steps but in the last step choose Disable.
How To Enable A Wi-Fi Adapter Using The Command Prompt
The Wi-Fi adapter can also be enabled and disabled using the Command Prompt in Windows 10. It is a command-line interpreter application you can find on your Windows operating machine. Here are the steps you need to take in order to enable the Wi-Fi adapter.
Click on the Search icon in the taskbar and type cmd. In the new window, you can either click on the Command Prompt icon or just hit the Enter button on the keyboard.
Now you can use the following commands:
netsh interface show interface – this command is going to show you the status of the Wi-Fi adapter.
netsh interface set interface enable – this command enables the Wi-Fi adapter.
netsh interface set interface disable – this command can be used to disable the Wi-Fi adapter.
Recommended reading:
- Are Powerline Adapters Good for Gaming? (A Complete Guide to Powerline Adapters)
- Netgear Wireless Adapter Won’t Connect To Internet
- What Does a PC Wi-Fi Adapter Do?
How To Troubleshoot A Wi-Fi Adapter In Windows 10?
If your Wi-Fi adapter isn’t working you will have to use a wired connection in order to get online. In most cases the reason for this is a disabled Wi-Fi adapter, but besides enabling it here are some other things you can do if your Wi-Fi adapter isn’t working properly.
Some of the most common reasons why your Wi-Fi adapter isn’t working are improper settings, bad drivers, and a malfunctioning Wi-Fi adapter.
Here are some of the tried and tested solutions if you have problems with the Wi-Fi adapter.
1. Update the Wi-Fi Adapter Drivers
NOTE: To perform this step you need to connect your laptop or computer to the network using the Ethernet cable.
Right-click the Windows Start button and select Device Manager.
Find the Network Adapters section and click on it to expand it.
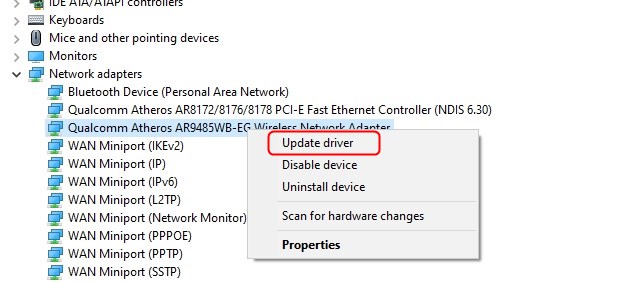
Right-click on the WiFi adapter you are using and click on Update driver.
Click on Search automatically for drivers.
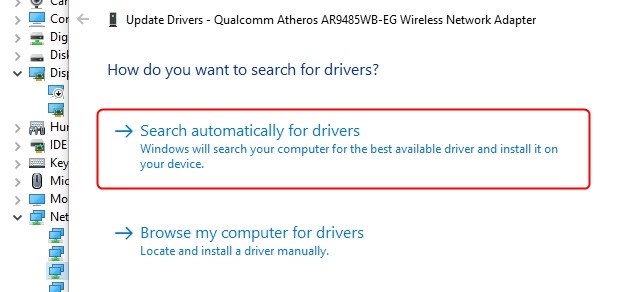
If there is a newer version than the drivers already installed, Windows will install the new drivers and ask you to restart the computer.
2. Reinstall The Wi-Fi Adapter
Right-click the Windows Start button and select Device Manager.
Expand the Network Adapters section by clicking on it.
Right-click on your Wi-Fi adapter and then click on Uninstall Device.
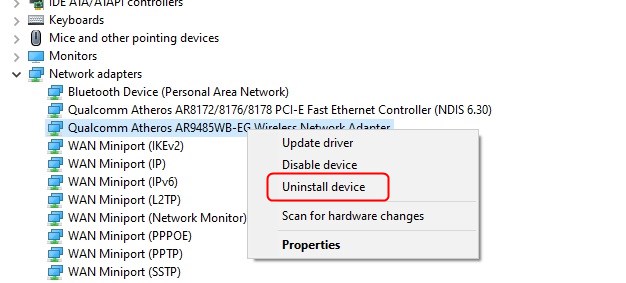
Follow the instructions and finally restart your Windows device. When your computer or laptop boots up again you will need to install the Wi-Fi adapter again. In most cases, Windows will do it automatically once it detects the hardware. However, if your Wi-Fi adapter requires specific drivers you will have to download them using the wired connection and install them.
3. Run The Network Troubleshooter
Windows 10 has a handy little tool installed that can help you with all your networking problems. It is the Network Troubleshooter and here is how you can use it.
Click on the Windows Start button and then select the Settings icon.
Now click on Network & Internet, and click on Status in the left-hand menu.
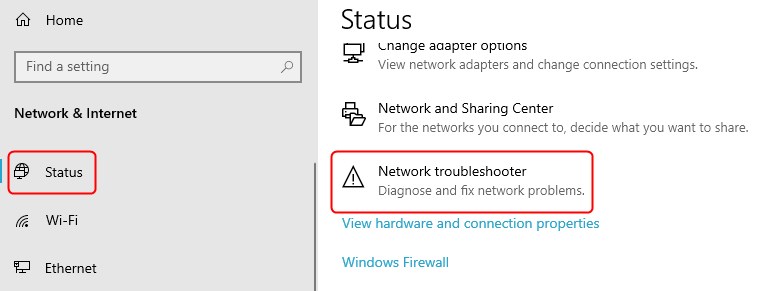
Scroll down a little and under the Advanced Network Settings, you should see the Network Troubleshooter at the bottom of the page. Click on it and Windows will start searching for the problems. Follow the instructions and at the end make sure to restart your Windows-powered device.
4. Restart Your Wireless Network
This step requires you to restart both the modem and the router and this will help you create a new connection to your ISP.
The first thing to do would be to disconnect the modem from the electrical outlet. Simply unplug the power cable. After that, you need to disconnect the router from the electrical outlet. Leave the modem and the router disconnected for a few minutes.
Now, connect the modem and give it some time to boot up completely. When the LED lights on the modem stabilize and stop blinking, you can connect the router to the electrical outlet. You also have to wait a little till the router boots up completely. Just take a look at the LED lights on the router and once they stop blinking you can connect your laptop or computer to the network.
5. Use The Network Reset Option
NOTE: After you reset the Wi-Fi adapter you will have to reinstall and reconfigure your VPN client software if you are using one.
Probably the last step to try if nothing else helps would be the Network Reset option. This option will remove any Wi-Fi adapters that are installed on the device and clear all the custom settings. The Wi-Fi adapter will be reinstalled after you restart your computer or laptop and all the settings will be restored to their default values.
Click on the Windows Start button and then select the Settings icon.
Now click on Network & Internet and click on Status in the menu on the left.
You should see the Network Reset option at the bottom of the page.
Click on it and on the next screen you should click on Reset Now. If prompted click Yes to confirm your choice.
Your laptop or computer should restart after a few minutes. Check whether your problem is still present.
Conclusion
The Wi-Fi adapter is an excellent solution when your desktop PC doesn’t have wireless capabilities or when the built-in wireless adapter is malfunctioning. Knowing how to enable it is pretty useful when you notice that your Wi-Fi connection isn’t working because the adapter has been disabled.
Now you know how to enable or disable your Wi-Fi adapter and also perform some basic troubleshooting if you run into any problems with it. Enjoy!

Hey, I’m David. I’ve been working as a wireless network engineer and a network administrator for 15 years. During my studies, I also worked as an ISP field technician – that’s when I met Jeremy.
I hold a bachelor’s degree in network engineering and a master’s degree in computer science and engineering. I’m also a Cisco-certified service provider.
In my professional career, I worked for router/modem manufacturers and internet providers. I like to think that I’m good at explaining network-related issues in simple terms. That’s exactly what I’m doing on this website – I’m making simple and easy-to-follow guides on how to install, set up, and troubleshoot your networking hardware. I also review new network equipment – modems, gateways, switches, routers, extenders, mesh systems, cables, etc.
My goal is to help regular users with their everyday network issues, educate them, and make them less scared of their equipment. In my articles, you can find tips on what to look for when buying new networking hardware, and how to adjust your network settings to get the most out of your wi-fi.
Since my work is closely related to computers, servers, and other network equipment, I like to spend most of my spare time outdoors. When I want to blow off some steam, I like to ride my bike. I also love hiking and swimming. When I need to calm down and clear my mind, my go-to activity is fishing.
