An average internet user spends around seven hours online every day. A large portion of that time comes from a PC. Even if you aren’t an avid internet user, an internet connection on your computer is a must. That is why we’re here to provide you with a quick guide on how to enable Wi-Fi on a Windows 10 device!
CONTENTS
How to Enable Wi-Fi on a Windows 10 Device
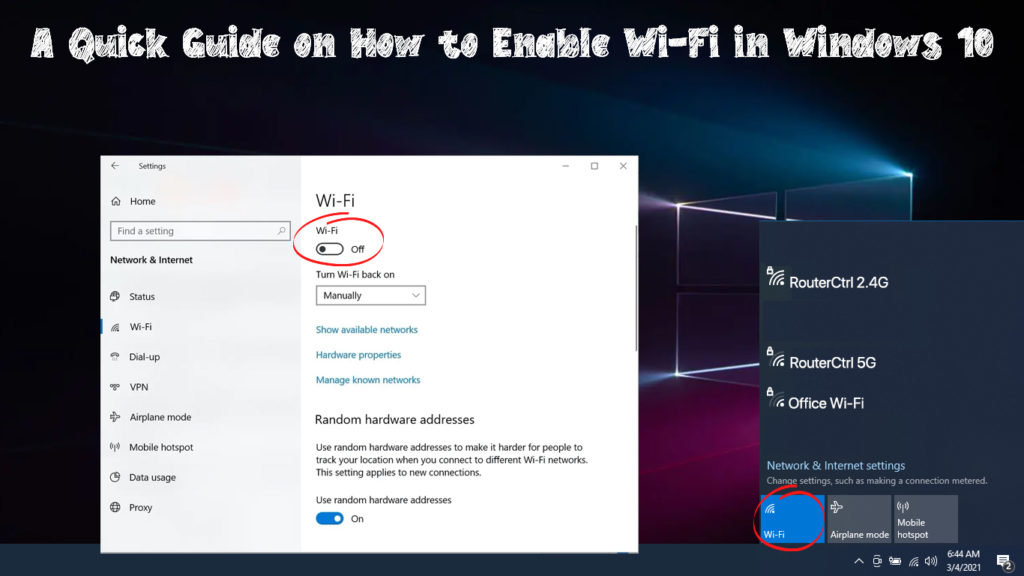
The easiest way to turn on the Wi-Fi on your Windows 10 device is to find the Wi-Fi icon on the toolbar. It’s usually located at the bottom right part of your screen. If it’s not there, you should click on the arrow pointing up to find it. Once you do, you should click on it. In case a list of wireless networks does not appear, your Wi-Fi is likely turned off. To turn it on, you can click on the Wi-Fi at the bottom.
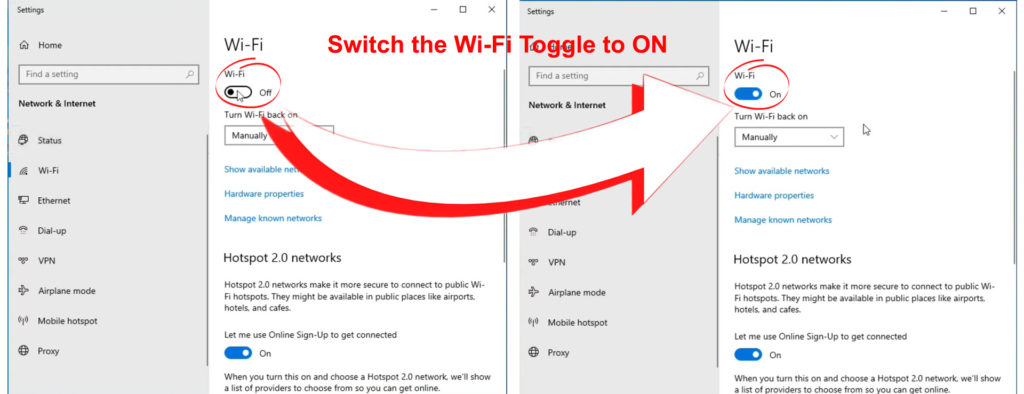
Another way to turn your Wi-Fi on is by going to the settings. You should click on the Start icon, which has the Windows logo on it. Then, you should go to Settings. There, you can choose Network & Internet to find the Wi-Fi option. You should swipe to turn the Wi-Fi on. You will then be able to click on the Wi-Fi icon at the bottom right corner of your screen to find available networks you can connect to.
Troubleshooting Wi-Fi Issues in Windows 10
If for some reason, you can’t connect your Windows 10 computer to a wireless network, there are a few things you can do. First of all, you’ll need to make sure that the Wi-Fi is turned on. You should find the internet connection icon on the taskbar and check whether Wi-Fi is on. Moreover, it’s also good to verify whether the Airplane mode was accidentally switched on. In case it was, you should turn it off and try connecting your computer to Wi-Fi.
Once your computer detects your wireless network, you should click on Connect and enter your Wi-Fi password. If your computer can’t connect to the network, you might want to choose to Forget the Network and then try connecting to it again. Alternatively, you could switch to another frequency band if your router has that option available. In case your router is near you, you should opt for the 5 GHz band. This band should provide you with a stronger signal.
Run the Windows 10 Network Troubleshooter
If none of these methods of fixing your Wi-Fi issues help, you can run the Network troubleshooter. When your computer can’t connect to a wireless network, the system will show the option of running a troubleshooter to help you solve the problem. You will need to give your computer a couple of minutes to diagnose the problem. Then, it will come back with a list of solutions you could try out.
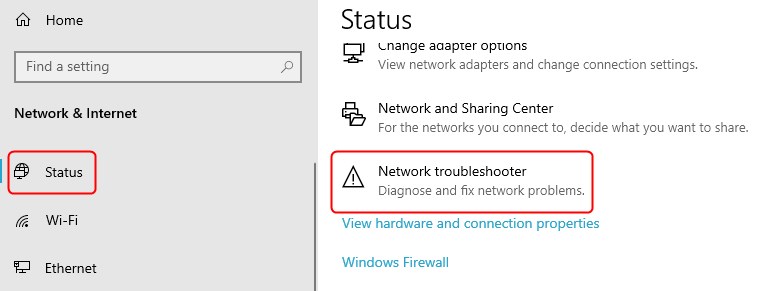
If the system does not automatically offer you the troubleshooting feature, you can find it on your own. You should click on the Start button and then go to Settings. After that, you’ll need to find Network Settings and choose Status. You should then see a Change your network settings option, where you can find the Network troubleshooter feature.
Address Possible Network Issues
In case you suspect that the network drivers or settings on your computer are to blame for your problem, we have two things you can try out. You should make sure to use them as last resort, as they might mess up your settings and lead to more issues.
1. Running the Command Prompt
Firstly, you should type Command Prompt in the search box and run it as administrator. Then, you should type in the commands listed below and press Enter after each one:
- netsh winsock reset
- netsh int ip reset
- ipconfig /release
- ipconfig /renew
- ipconfig /flushdns
These commands will reset the DNS client resolver cache and the TCP/IP stack. Moreover, they’ll release and renew your PC’s IP address. You could restart your device to make sure that everything is working properly and try connecting to a wireless network again.
2. Uninstalling the Network Driver
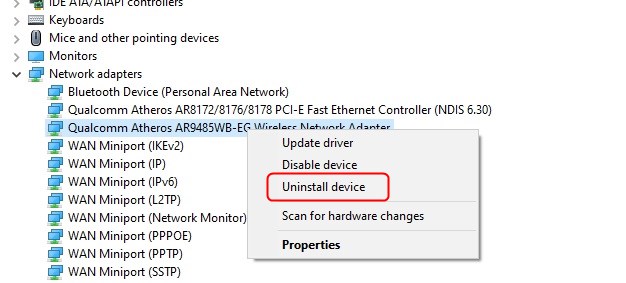
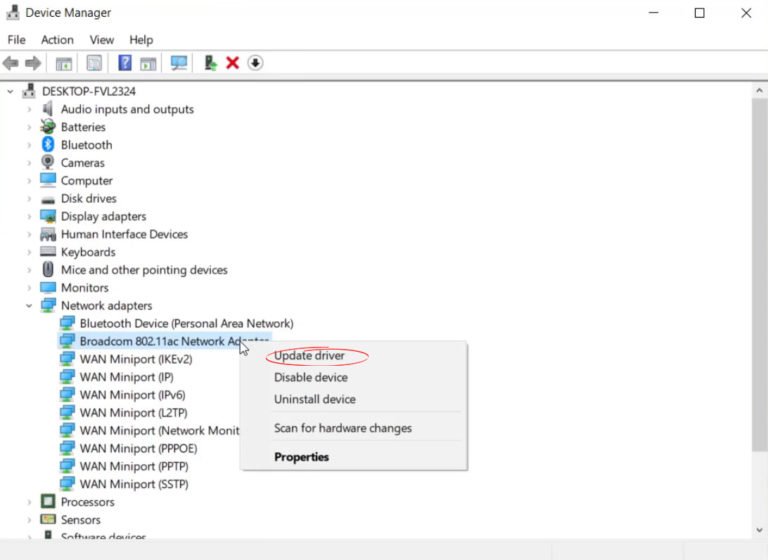
Uninstalling (and reinstalling) the network driver adapter may fix any issues with network settings that are causing the problems with your internet connection. You should go to the Device Manager and find the Network adapters menu. You’ll then have to find your device’s network adapter and right-click on it.
You’ll need to click on the Uninstall device option and proceed to Uninstall. You should then restart your computer and try connecting to a wireless network once again. During the restart, your PC will automatically obtain new drivers.
Instead of uninstalling the driver, you could also try updating it to the latest version.
Try to Fix the Router
Your computer may not be to blame for your Wi-Fi issues. To make sure your router is working properly, you should restart it. You can do that by simply unplugging the device from a power source and waiting for a couple of minutes. Then, you can plug it back in. it’s best to give the router around five minutes to properly turn on before using it.
You could also try connecting another device to the wireless network. If that doesn’t work, the issue is most certainly with the router. You can perform a factory reset on the router, as that usually fixes many connection issues. To do that, you’ll need to take a pin or a pen and press the reset button on the device. The lights on the router will start flashing, informing you that the reset process has begun.
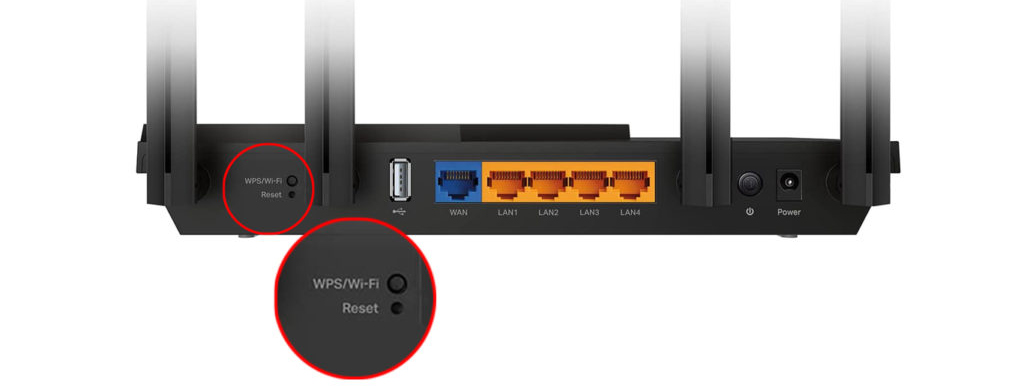
After that, you’ll have to go to the router’s configuration page and set up the router just like you did the first time you used it. Then, you can try connecting your computer to the wireless network by entering the password once again.
Using the Command Prompt for Troubleshooting the Router Connection Issues
Another way to check if there is an issue with the router connection is using the Command Prompt. Firstly, type Command Prompt in the search box. Then, you should run it as an administrator. Once the box opens, you should type ipconfig and click on Enter. You will then find your router’s default IP address that’s written next to the default gateway.

Next, you’ll need to type ping and then paste the default gateway you copied. You can then press Enter and wait for the results. You should receive a reply along with the ping statistics. If the reply comes, the connection to your router is good. Thus, the issue might be with your modem or internet services. You can troubleshoot the modem or contact your internet provider to see how they can help.
In case you don’t receive a reply, there is an issue with the connection to the router. You can then try connecting the computer to the router via an Ethernet cable. If that doesn’t work, the router is likely the cause of your issue.
In Conclusion
Today, you’ve learned two easy ways to enable Wi-Fi in Windows 10. If something goes wrong, you can always follow our troubleshooting guide which will most likely help you solve any kind of network problem. In case it doesn’t, the issue is probably with your router or your internet services. Thus, you might want to contact your provider to check if they have any tips for you.

Hey, I’m Jeremy Clifford. I hold a bachelor’s degree in information systems, and I’m a certified network specialist. I worked for several internet providers in LA, San Francisco, Sacramento, and Seattle over the past 21 years.
I worked as a customer service operator, field technician, network engineer, and network specialist. During my career in networking, I’ve come across numerous modems, gateways, routers, and other networking hardware. I’ve installed network equipment, fixed it, designed and administrated networks, etc.
Networking is my passion, and I’m eager to share everything I know with you. On this website, you can read my modem and router reviews, as well as various how-to guides designed to help you solve your network problems. I want to liberate you from the fear that most users feel when they have to deal with modem and router settings.
My favorite free-time activities are gaming, movie-watching, and cooking. I also enjoy fishing, although I’m not good at it. What I’m good at is annoying David when we are fishing together. Apparently, you’re not supposed to talk or laugh while fishing – it scares the fishes.
