Wi-Fi networks are popular with end users because of their unmatched convenience and flexibility.
Multiple users can wirelessly connect to a Wi-Fi network within seconds without requiring additional configuration.
Besides, you can move around your space without restrictions and stay connected even if you are not close to the main router.
Even though Wi-Fi provides unmatched mobility, it has a limited range, not exceeding 300 feet outdoors and 150 feet indoors.
The further you move away from the wireless router, the weaker the Wi-Fi signals, resulting in connectivity issues.
A practical way to extend your network coverage is to install a Wi-Fi repeater, booster, or range extender.
Alternatively, you can easily extend your Wi-Fi network range using your old router, eliminating the need to buy a repeater or booster.
Extending the Wi-Fi range eliminates dead zone in your space, ensuring whole-home coverage.
This tutorial explains how you can extend your Wi-Fi range with another router without compromising signal strength.
CONTENTS
Step 1 – Reset the Secondary Router
Before configuring your routers to extend your Wi-Fi range, you must reset the secondary router to default settings.
A hard reset erases all custom and personalized configurations, giving your router a clean slate.
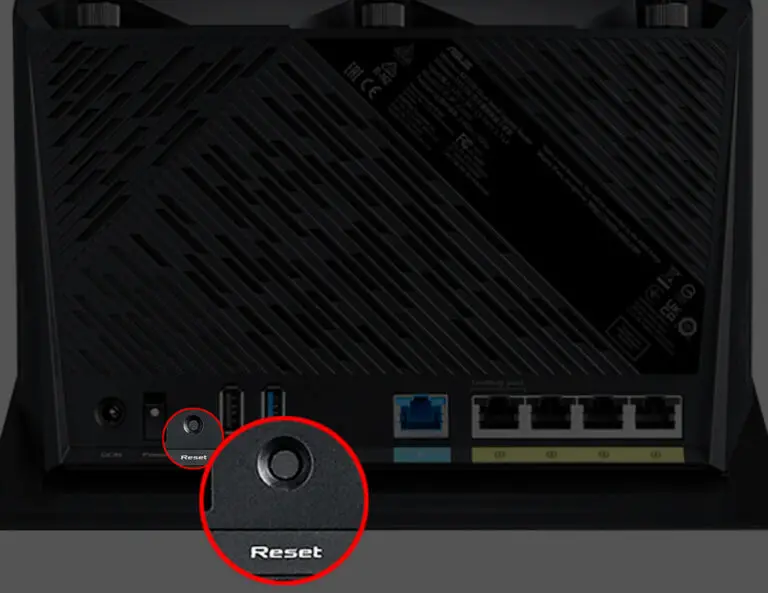
Moreover, performing a reset is easy since all routers have a recessed reset button, usually behind the back panel.
You only need to press this button for a few seconds to reset your router and restore it to default factory settings.
Here are the steps:
- Plug your spare router into the wall outlet
- Locate the reset button
- Using a paper clip or pin, press and hold the reset button for about 10 seconds
- Release the reset button when the router’s LED lights blink
- Allow the router to reboot
How to Reset an ASUS Router to Factory Default Settings
Step 2 – Check Your Main Router’s IP Address
You need to know your primary router’s IP address to help you configure it as your DHCP server and the secondary router as a range extender/access point.
Fortunately, finding your router’s IP address is straightforward. Here are the steps:
- Connect your PC to your primary router
- Press the start key and type CMD
- Right-click Command Prompt and select Open as an Administrator
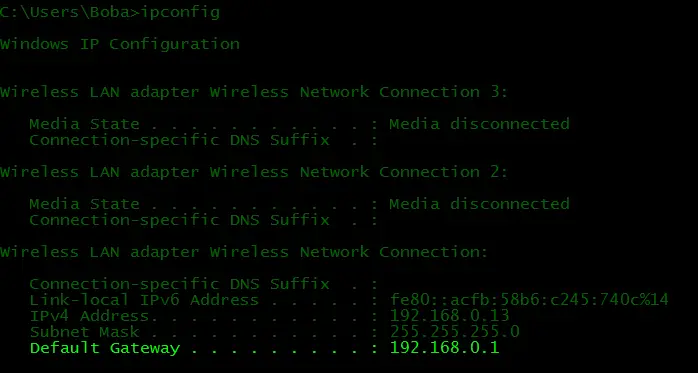
- Type IPCONFIG in the Command Prompt window
- Check your router’s IP address next to Default Gateway
Step 3 – Configure Main Router as DHCP Server
Since we have two routers on the same network, you can only set one router, the primary router, as the DHCP server to prevent IP conflicts.
Here are the steps to configure your primary router as a DHCP server:
- Launch your preferred web browser
- Type in the default IP address of your primary router
- Enter your login credentials to access your router’s admin site
- Go to Administration/System Settings
- Click the DHCP Server checkbox to Enable it
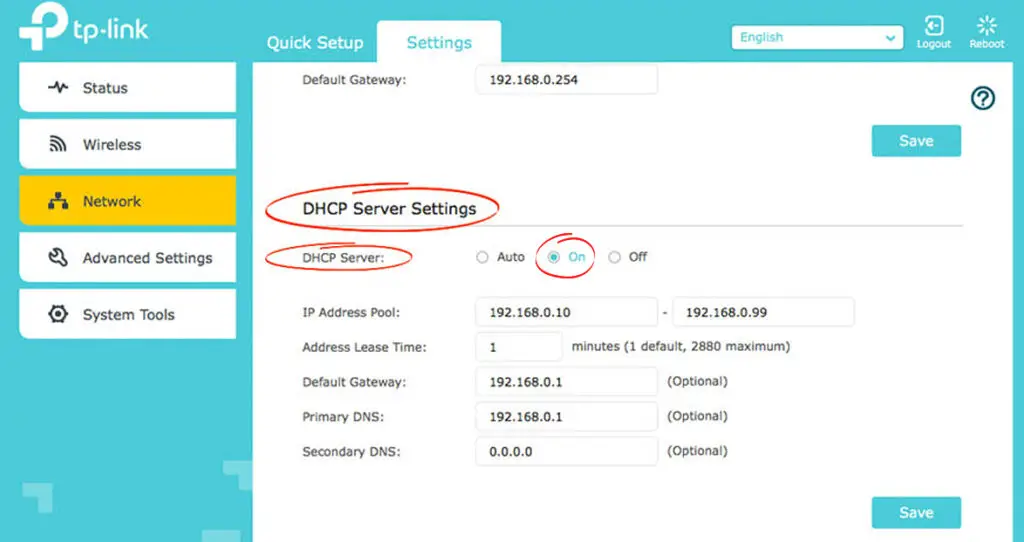
- You can adjust the size of the DHCP pool (the number of available addresses) and the lease time. Or, you can live the default settings.
- Click OK or Apply to save the changes
- Exit the admin site
Step 4 – Configuring the Secondary Router
The steps to configure the secondary router are similar to setting up the primary router. Depending on whether your secondary router supports Access Point Mode or not, you will have to change just one or a few settings. Here’s what you need to do if your secondary router doesn’t support the Access Point Mode.
- Connect your PC to your secondary router
- Press the start key and type CMD
- Right-click Command Prompt and select Open as an Administrator
- Type IPCONFIG in the Command Prompt window
- Check your router’s IP address next to Default Gateway
- Launch your preferred web browser
- Type in the default gateway IP address of your secondary router
- Enter your login credentials to access your router’s admin site
- Go to Administration/System Settings
- If the secondary router’s IP address is the same as your main router’s, you need to change the last digit (under NETWORK or LAN settings). For example, if the main router has 192.168.0.1, you need to change the address of the secondary router to something between 192.168.0.2 and 192.168.0.254. The IP addresses of the primary and the secondary router have to be in the same subnet – the first three numbers in each address have to be the same.
- Save Changes and Exit.
- Now, log in again with a new default IP address.
- Click the DHCP Server checkbox to disable it (you must deselect the checkbox to prevent the secondary router from assigning IP addresses)
- Click OK or Apply to save the changes
- Exit the admin site
If the secondary router supports the AP mode, you can forget about all those adjustments above. You just have to find the Operation Mode section and change it from Wi-Fi Router to Access Point.
Ways to Extend Wi-Fi Range with Another Router
Once you have configured the primary and secondary routers, extending your Wi-Fi range becomes easier than ever.
You can extend your Wi-Fi range with another router using several different methods, including:
Method 1 – Connecting Your Routers with an Ethernet Cable
The quickest and easiest way to extend your Wi-Fi range with another router is to use a LAN Ethernet cable.
You only need to connect the primary and secondary routers using the LAN Ethernet cable for high-speed internet access. Now, depending on whether your secondary router supports AP mode or not, you will have to use LAN-to-WAN or LAN-to-LAN connection.
Ethernet cables can be up to 100 meters long, meaning you can extend your Wi-Fi network to cover a wider area, effectively eliminating dead zones.
The only issue with using an Ethernet cable is that you may have to run wires between the two devices.
Here are the steps to extend your network with an Ethernet cable:
- Power up the primary router
- Connect the primary router to the modem to establish an internet connection
- Install the secondary router in an area with weak Wi-Fi signals
- Plug one end of the Ethernet cable into a free LAN Ethernet port on the primary router
- Power up the secondary router
- If the secondary router supports the AP mode, plug the other end of the cable into a WAN port of the secondary router (blue port). If the secondary router doesn’t support the AP mode, plug the other end of the cable into one of the LAN ports (yellow ports).
- Test your internet connection by connecting your device to the secondary router
How to Covert Your Old Router into an AP
Method 2 – Connecting Your Routers in Wireless Bridge Mode
Connecting two routers with an Ethernet cable can be unsightly since you must run wires between the two points.
The good news is that you can wirelessly extend your Wi-Fi range with another router without requiring cables or wires. The only requirement is that your secondary router supports WDS bridging. If it doesn’t, you will have to use an Ethernet cable.
Here are the steps:
- Plug in your primary and secondary routers
- Place your secondary router where you want to extend your network. Connect your PC to the secondary router (use the WAN port).
- Launch your preferred web browser
- Type in the default gateway IP address of your secondary router
- Enter your login credentials to access your router’s admin site
- Go to Internet Settings or Wireless Settings
- Click the checkbox next to Enable WDS Bridging
- Depending on your router’s control interface, click on Survey/Search to search for available Wi-Fi networks. You will need to connect to your primary router’s Wi-Fi using its Wi-Fi password.
- Give your secondary router a new SSID name
- Click Save to apply changes
- Test your connection
Note: When using WDS bridging, the secondary router will deliver much slower Wi-Fi speeds than the primary router.
How to Extend Wi-Fi Range with Another Router Using WDS Bridging
Conclusion
If you have an old router that you are currently not using, you can make it useful by converting it into a network range extender or an access point.
Extending your Wi-Fi range with another router eliminates the need to purchase a separate Wi-Fi booster or repeater.
Follow our detailed steps to extend your Wi-Fi range with another router.
How to Turn an Old Router into a Repeater

Hey, I’m Jeremy Clifford. I hold a bachelor’s degree in information systems, and I’m a certified network specialist. I worked for several internet providers in LA, San Francisco, Sacramento, and Seattle over the past 21 years.
I worked as a customer service operator, field technician, network engineer, and network specialist. During my career in networking, I’ve come across numerous modems, gateways, routers, and other networking hardware. I’ve installed network equipment, fixed it, designed and administrated networks, etc.
Networking is my passion, and I’m eager to share everything I know with you. On this website, you can read my modem and router reviews, as well as various how-to guides designed to help you solve your network problems. I want to liberate you from the fear that most users feel when they have to deal with modem and router settings.
My favorite free-time activities are gaming, movie-watching, and cooking. I also enjoy fishing, although I’m not good at it. What I’m good at is annoying David when we are fishing together. Apparently, you’re not supposed to talk or laugh while fishing – it scares the fishes.

