Enjoying the benefits of fast and reliable internet connection in every corner of your home is priceless. However, that can be changed in a minute if we don’t know how to manage and secure our home network.
So, if we want to start taking care of our network, the first thing to do is to learn how to login to our FiberGate router. Once we do that successfully, we will have access to the router’s admin settings and we can take all the necessary steps to secure our network.
In this article we are going to guide you through the FiberGate router login steps, and we are going to show you what are the most basic changes you can make that will boost your network security.
CONTENTS
You Will Need:
- A smartphone, tablet, laptop or desktop computer
- Access to the local network over WiFi or using the network cable
- FiberGate Router Default Login Details
FiberGate Router Default Login Details
Default IP address: 192.168.1.1
Default admin username: admin
Default admin password: admin@123 or stdONUi0i
Check the login details printed on a sticker under the router. If they are different from the ones we have provided, use them instead.
How To Access The FiberGate Router Settings?
Pay attention to the following steps, especially when you need to type the router IP address, username and password. Typing mistakes are one of the most common reasons why the router login attempt fails.
So, let’s start!
STEP 1 – Connect To The Network
This step is simple and essential. If the device you are using isn’t connected to the network, you won’t be able to proceed with the FiberGate router login. This is why you have to connect the device to the wireless network or use the network cable.
This depends on the device, but if you have the chance to connect using a wired connection, it is recommended to do that. The wired connection is much more stable than the wireless one, and you won’t be disconnected or logged out when you save some specific changes in the settings.
STEP 2 – Start Your Web Browser
Now launch the web browser on your device. All the devices we have mentioned earlier have a web browser. It will help you access the router’s web-based interface. It makes the router management much easier and user friendly. So any of the popular browsers today can be used – Chrome, Firefox, Edge, Opera and so on, but make sure the browser is up to date.
STEP 3 – Type The FiberGate Default IP In the URL Bar

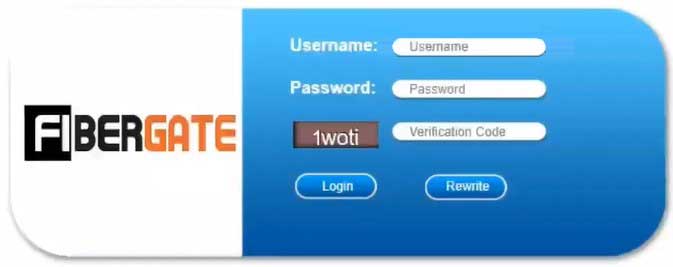
The default FiberGate router Ip address is 192.168.1.1. You need to type this IP into the browser’s URL bar carefully. When you press the Enter or Return button you will have to enter a username and a password if the IP is correct.
If you aren’t requested to do that, it means that you have either mistyped the IP address, in that case retype the IP or check whether 192.168.1.1 is the correct IP address. Follow our guide on how to find the router’s IP on various devices and operating systems.
STEP 4 – Enter The FiberGate Admin Username And Password

The admin username is admin. The admin password is either admin@123 or stdONUi0i. Type them in the Username/Password fields and then carefully type the verification code below. Now you just need to click the Login button and you should see the FiberGate router admin dashboard.
In case these login details don’t work, check the label on the bottom side of the router or use the custom ones if you have changed them before.
When you see the router’s admin dashboard it means that now you can modify the router settings according to your needs.
The simple changes we have mentioned earlier include changing the router’s admin password and changing the wireless password, or setting up a new one in case your network is unencrypted. Let’s see where you can find these settings in your FiberGate router admin dashboard.
Let’s Change The FiberGate WiFi Settings
Since we share our wireless password too frequently these days, it is highly recommended to change it from time to time. This is a simple user-friendly process so apply attention to the following steps.

1. Follow the steps given above to access the FiberGate admin dashboard.
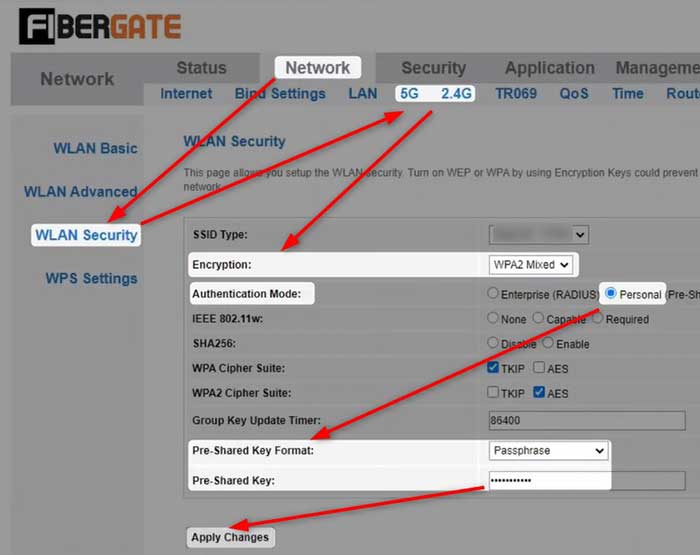
2. Click on Network in the main menu.
3. Now, depending on whether you want to modify the 5GHz or 2.4GHz network, click on 5G or 2.4G. WLAN Basic will be automatically selected.
4. Find the SSID field, erase the old WiFi network name and enter the new one.
5. Now click on WLAN Security.
6. From the Encryption drop-down list select WPA2 Mixed.
7. Set the Authentication Mode to Personal (Pre-Shared key).
8. As a Pre-Shared Key Format select Passphrase.
9. In the Pre-Shared Key field enter the new WiFi password.
10. Click on Apply Changes and save the new WiFi network name and password.
NOTE: After you change the settings for the 5GHz network, you can do the same for the 2.4GHz network as well.
After that you can reconnect your wireless devices to the new wireless network.
Can’t Login To Your FiberGate Router? Read This!
In case you get stuck at one point and the router login fails, here is what you need to check.
- Is your WiFi turned on?
- Is Airplane mode off?
- Is your device connected to the network?
- Is it connected to the correct wireless network?
- Are you typing the correct router IP?
- Are you typing the IP correctly?
- Are you using the correct admin username and password?
- Are you typing the admin login details correctly?
- Is your device too far from the router?
- Check whether your device obtains its IP address automatically.
After you go through this checklist and check or fix everything, the router login process should be successful. In case you don’t succeed, it will require some additional troubleshooting.
Recommended reading:
- How to Protect Your Router from Hackers? (Wi-Fi Security Tips)
- Should The WPS Light Be On On My Router?
- How to Change Your Wi-Fi Password? (A Step-by-Step Guide)
Final Words
And these are the FiberGate router login steps. We hope that this article has helped you access the FiberGate router settings and modify the wireless network settings. The troubleshooting checklist should help you in case you get stuck at some point. And after you login successfully, feel free to go through the admin dashboard and see all the available features and options.
Some settings are pretty basic and easy to understand, while others require some advanced knowledge. If you have no experience, don’t make any changes in the advanced settings. However, keep track of the changes you are making in order to change them back if needed. Or even better, create a backup of the current configuration just in case something goes wrong.

Hey, I’m David. I’ve been working as a wireless network engineer and a network administrator for 15 years. During my studies, I also worked as an ISP field technician – that’s when I met Jeremy.
I hold a bachelor’s degree in network engineering and a master’s degree in computer science and engineering. I’m also a Cisco-certified service provider.
In my professional career, I worked for router/modem manufacturers and internet providers. I like to think that I’m good at explaining network-related issues in simple terms. That’s exactly what I’m doing on this website – I’m making simple and easy-to-follow guides on how to install, set up, and troubleshoot your networking hardware. I also review new network equipment – modems, gateways, switches, routers, extenders, mesh systems, cables, etc.
My goal is to help regular users with their everyday network issues, educate them, and make them less scared of their equipment. In my articles, you can find tips on what to look for when buying new networking hardware, and how to adjust your network settings to get the most out of your wi-fi.
Since my work is closely related to computers, servers, and other network equipment, I like to spend most of my spare time outdoors. When I want to blow off some steam, I like to ride my bike. I also love hiking and swimming. When I need to calm down and clear my mind, my go-to activity is fishing.
