Do you want to secure your Fido router and your home network? Do you want to change your wireless password or create a separate WiFi network for your guests? Maybe you want to set up port forwarding if you are into gaming? Well, in order to achieve this and much more, you need to learn the exact Fido router login steps.
In this article, we are going to show you how to access your Fido router settings and modify the WiFi network settings that will make your router and network more secure.
CONTENTS
You’ll Need:
- Access to the local network over WiFi or a wired connection
- A device to connect to the network
- The Fido router admin login details

What Are The Default Fido Router Details?
Just like all other routers, Fido routers come with some predefined settings from the factory. These include a default WiFi name and password, a default router IP address, so on.
These default settings make the initial setup and router configuration much easier. However, because of their simplicity and the fact that hundreds or thousands of other routers of the same model have exactly the same settings, it is recommended to change them as soon as possible.
These are the default Fido router admin login details:
Default IP address: 192.168.0.1
Default username: cusadmin
Default password: It’s the wireless password that has been created during the initial setup. In case you don’t know it you can try to find the WiFi password from an already connected device, or factory reset the router and set it up again.
NOTE: Check the bottom side of the router and see if there is a label on it. This label usually contains the default login details. In case they are different from the ones we have provided, use the ones printed on the label. Also, if you or your ISP has changed the default login details, make sure to use them.
How To Login To Fido Router?
If you are ready, we can start now.
STEP 1 – Are You Connected To The Network?
This is the key element when you want to access your Fido router settings. The device you are using (laptop or computer, tablet, Android phone or iPhone) must be connected to the network. You can connect over WiFi or you can connect directly to the router using an Ethernet cable. A device that is not connected can’t access the router settings. So, check whether your device is connected. If it is, go to Step 2.
STEP 2 – Open Your Browser
The devices we have just mentioned already have a pre-installed web browser. It really doesn’t matter whether you want to use Chrome, Firefox or Edge.
What matters is that the browser has to be updated. Sometimes there can be a conflict between an older web browser and the router’s admin dashboard. In order to prevent this, make sure to update the browser.
STEP 3 – Enter The Fido IP In The Address Bar
The default Fido router IP address is 192.168.0.1. Type this IP in the URL bar of the browser and press Enter on the keyboard. You should see the router login page. If the router login page doesn’t appear, but you see an error message in your browser, check whether you have typed the IP correctly or check whether 192.168.0.1 is the correct IP.

NOTE: If your browser displays a warning message regarding the SSL certificate you can bypass it by clicking on Advanced and then selecting Proceed to…
STEP 4 – Enter The Fido Admin Username And Password
Now you should enter the admin username and password. If these are correct you should see the Fido router admin dashboard now. You won’t have any problems finding the settings you want to change, but if you aren’t sure what you are doing, make sure to backup the router settings before you do anything.
And that should be it. Now you can modify your Fido router settings.
How To Change The Fido WiFi Name And Password?
We have already said that the router admin password is the WiFi password that has been set up during the initial router configuration. It is also recommended to change the wireless password every other month, especially if you share it a lot with your guests and visitors. So, here is where you can find the settings you need to change.
After you login to your Fido router, select Wireless from the menu on the top. After that select Basic Settings. Click on 2.4G and in the Network name (SSID) field enter the new WiFi network name.
The wireless password can be also changed in the Basic Settings section. In the 2.4G tab, in the Password field enter the new wireless password.
Save the changes by clicking the Save Changes button and you are good to go.
Repeat the steps if you want to change the name of your 5GHz wireless network. However, if you have enabled band steering the network name and wireless password will be updated for the 5GHz network as well. If it’s disabled you will have to do it manually as described above.
Recommended reading:
- How to Protect Your Router from Hackers? (Wi-Fi Security Tips)
- How to Encrypt Your Wireless Network? (An In-Depth Guide)
- How to Configure Router to Use WPA2?
How To Reset Fido Router To Factory Defaults?
Resetting the router to factory settings requires you to set up the router from scratch. This procedure deletes all the changes you have made before and reverts the router to the settings that have been predefined in the factory.

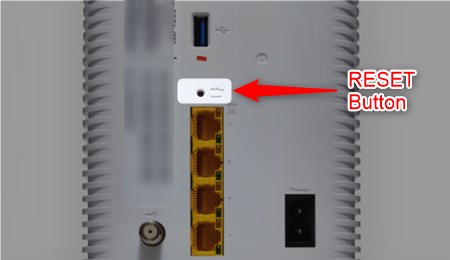
In order to reset your Fido router to factory defaults you will need a pointed object like a pen or a paperclip. Now, locate the reset button at the back of the Fido router.
This button is usually hidden inside of a pinhole and you need a pen or a paperclip to press it. Press the reset button and hold it for 10 seconds. After the router reboots, you will be able to login to it using the default login details that are printed on the label on the router. Now follow the instructions given here to set up your Fido router again.
Final Words
Now you should know how to login to your Fido router and modify the wireless network settings. Of course, there are many other settings that can be changed, just keep track of the changes you are making if you are not too confident in doing that.
Also, make sure to remember the password and the other login details. In case you forget these, you will have to reset the router to factory settings and reconfigure the router again.

Hey, I’m David. I’ve been working as a wireless network engineer and a network administrator for 15 years. During my studies, I also worked as an ISP field technician – that’s when I met Jeremy.
I hold a bachelor’s degree in network engineering and a master’s degree in computer science and engineering. I’m also a Cisco-certified service provider.
In my professional career, I worked for router/modem manufacturers and internet providers. I like to think that I’m good at explaining network-related issues in simple terms. That’s exactly what I’m doing on this website – I’m making simple and easy-to-follow guides on how to install, set up, and troubleshoot your networking hardware. I also review new network equipment – modems, gateways, switches, routers, extenders, mesh systems, cables, etc.
My goal is to help regular users with their everyday network issues, educate them, and make them less scared of their equipment. In my articles, you can find tips on what to look for when buying new networking hardware, and how to adjust your network settings to get the most out of your wi-fi.
Since my work is closely related to computers, servers, and other network equipment, I like to spend most of my spare time outdoors. When I want to blow off some steam, I like to ride my bike. I also love hiking and swimming. When I need to calm down and clear my mind, my go-to activity is fishing.
