If you are using a Gigabyte router and you want to access the router settings you are in the right place. The following article will guide you through the Gigabyte router login steps and also provide some information about how to change the default admin password, the default network name and the WiFi password as well. Making these changes will boost your network security so make sure to read to the end and apply the changes if you haven’t already.
CONTENTS
What You Need:
- Gigabyte wireless router
- Access to the network
- Default admin login details
- Smartphone, tablet or computer

What Are The Default Gigabyte Router Details?
The default admin login details for Gigabyte routers are:
- Default IP address: 192.168.1.254
- Default username: admin
- Default password: admin
Please note that you can’t use these default login details if you have changed them earlier. However, you will be able to use the default ones after you reset the router to factory defaults. This is why you should keep the default and the custom login details written somewhere.
How To Login To Gigabyte Router?
The Gigabyte router login steps are pretty simple and you shouldn’t have any problems during the process. Just make sure to follow the steps carefully.
STEP 1 – Connect To The Network
The first thing to do is to connect the device you want to use to login to the router. You need to connect it to the network and you can do it either using a wired connection (the network cable) or the WiFi. The wireless connection is more stable but you can’t connect your smartphone or tablet using that. In that case connect over WiFi.
STEP 2 – Open A Web Browser
After you connect your device, launch the web browser you use every day. It will help you access the router’s admin dashboard. Any of the modern browsers today will do the job, but if for some reason your current browser doesn’t display the router login page, try another one.
STEP 3 – Enter The Gigabyte IP In The URL Bar

At this point you need to type the Gigabyte router IP in the browser’s URL bar. We have mentioned it’s 192.168.1.254. After you type this IP and press the Enter button on the keyboard or Go on the tablet or smartphone you should see the router login page asking you for a username and a password. If it doesn’t appear you have either mistyped the IP address or another IP is the router’s default gateway. You can easily find the default router IP by following this guide.
STEP 4 – Enter The Gigabyte Admin Username And Password
When the router login page appears, you need to enter the router admin username and password. In this case type admin in both fields and then click on OK. You should be redirected to the router’s admin dashboard where you can explore all the router settings and modify the ones you want.
Now when you have access to the router settings, we recommend making some changes to secure the router and your wireless network in general. To do this, you need to change the default router admin password, the network name and the wireless password.
How To Change The Gigabyte Admin Password?
The Gigabyte router allows the admin to change the default admin password. The default settings in general are a security risk and it is recommended to change them immediately after the setup or during the network setup.
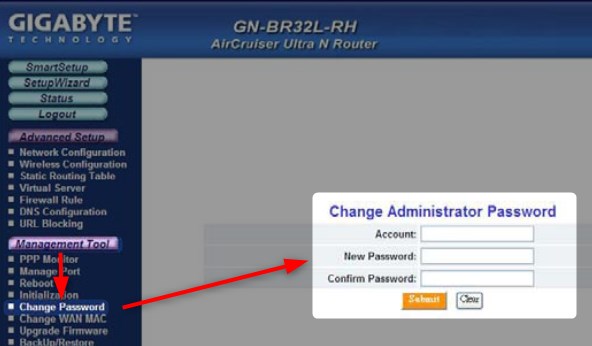
After you login to your Gigabyte router find the Management Tool section on the left. Then select Change Password. You will see the Change Administrator Password screen.

Now simply enter your account and the new password. You will also have to enter the new password again just to make sure you have typed it correctly the first time. After you do that click the Submit button.
Now you can log out and then login with the new router admin login details.
How To Change The Gigabyte SSID (Network Name) And Password?
The default network name or SSID is “GIGABYTE”. So, basically anyone connected to the network can find the default login details in a few minutes and access the router settings. Since we don’t want this to happen we have to change the network name into something more personal and memorable. Setting up a strong wireless password is a must and we have to remind you that it is advised to change it every now and then.
You can change the network name and the wireless password in the Wireless Configuration screen.
Change the network name in the SSID field.
As Authentication Type select WPA Pre-shared key. Now type the new wireless password in the WPA PSK Passphrase field.
Note: If your router offers WPA2 authentication make sure to select that one.
Don’t forget to click the Submit button to save the changes. Then you will have to connect your devices to the new network name using the brand-new wireless password.
Final Words
We hope that you haven’t had any problems logging into your Gigabyte router. This also applies to making the necessary changes to make the network more secure. One thing we now recommend is to keep the admin login details somewhere safe. You will use them the next time you want to change the wireless password or make some other changes.
However, if you have any problems, check these things and try again:
- Is the device connected to the network? It has to be, otherwise you won’t be able to connect.
- Are you typing the IP correctly? It is easy to make a typo. Sometimes people type letters instead of the numbers 0 and 1.
- Are you typing the correct IP? Typing the wrong IP will get you nowhere. Find the correct router IP address.
- Are you typing the IP in the browser’s URL bar or the search bar? Typing the IP in the browser’s search bar will give you lots of results about that IP. It won’t trigger the router login page to appear.
- Have you entered the admin username and password correctly? The username and password are case-sensitive.
Sometimes even a small detail can make the Gigabyte router login unsuccessful, so pay attention.

Hey, I’m David. I’ve been working as a wireless network engineer and a network administrator for 15 years. During my studies, I also worked as an ISP field technician – that’s when I met Jeremy.
I hold a bachelor’s degree in network engineering and a master’s degree in computer science and engineering. I’m also a Cisco-certified service provider.
In my professional career, I worked for router/modem manufacturers and internet providers. I like to think that I’m good at explaining network-related issues in simple terms. That’s exactly what I’m doing on this website – I’m making simple and easy-to-follow guides on how to install, set up, and troubleshoot your networking hardware. I also review new network equipment – modems, gateways, switches, routers, extenders, mesh systems, cables, etc.
My goal is to help regular users with their everyday network issues, educate them, and make them less scared of their equipment. In my articles, you can find tips on what to look for when buying new networking hardware, and how to adjust your network settings to get the most out of your wi-fi.
Since my work is closely related to computers, servers, and other network equipment, I like to spend most of my spare time outdoors. When I want to blow off some steam, I like to ride my bike. I also love hiking and swimming. When I need to calm down and clear my mind, my go-to activity is fishing.
