Globe Telecom is one of the leading telecommunications providers in the Philippines. For all those who are users of the services of this company, in this article, we will answer the question “What to do in a situation when Globe Prepaid Wi-Fi is connected but there is no internet access?”.
The inability to connect to the internet is one of the biggest nightmares of modern times. Just imagine a situation without internet access – you can’t use social networks, you can’t check emails, you can’t watch videos on YouTube, etc. This really seems frustrating.
Of course, when you know the exact cause of your internet connection issue, it is much easier because you can start fixing it.
However, what to do when everything seems fine, but you still can’t access the internet? Don’t worry, in this article, we will cover all the potential reasons that could lead to this situation, and of course, we’ll explain what you need to do to successfully connect your PC/laptop/phone to the Internet.

CONTENTS
- Check Your Ethernet Cable
- Restart the Modem and Router
- Check the Time and Date on Your Device
- Enable DMZ Settings
- Disable the Router Firewalls
- Check Other Devices
- Clean the DNS Cache
- Connect the Modem to the Computer Using an Ethernet Cable
- Check the Remaining Amount of Your Data
- Reset Your Network Settings
- Reset the Router
- Conclusion
Check Your Ethernet Cable
When looking for a culprit, it’s not a bad idea to start with an Ethernet cable. First, make sure the cable is properly inserted into the Ethernet port. Also, make a detailed inspection to see if there is any physical damage to the cable. If so, you will need to get a new one.
Restart the Modem and Router
Restart often solves various problems with the internet connection – slow speed, inconsistent connection, etc. It’s easy to do – just turn off the router and modem, and then turn them on again in a few minutes.
Check the Time and Date on Your Device
This can happen to less experienced users. You may not know this, but wrong time or date settings could cause the loss of internet connection. Be sure to check this and, if it’s incorrect, enter the correct time and date.
Enable DMZ Settings
Enable DMZ settings. Why? Well, because your router’s firewall is maybe interfering with the internet connection preventing your device from going online even though you’re connected to the Wi-Fi. You will do this as follows:
- Click on the Advanced option
- Then go to Security
- In the Security section, find and click on DMZ Settings
- With DMZ status you will see Enable and Disable. You need to check Enable.
- Finally, click on Apply
DMZ Explained
Note: Enabling DMZ puts your devices at risk. You’re basically removing the router’s firewall that protects you from malicious attacks. Use this method only to check if there’s a problem with your router. If you still can’t access the Internet, disable DMZ.
Disable the Router Firewalls
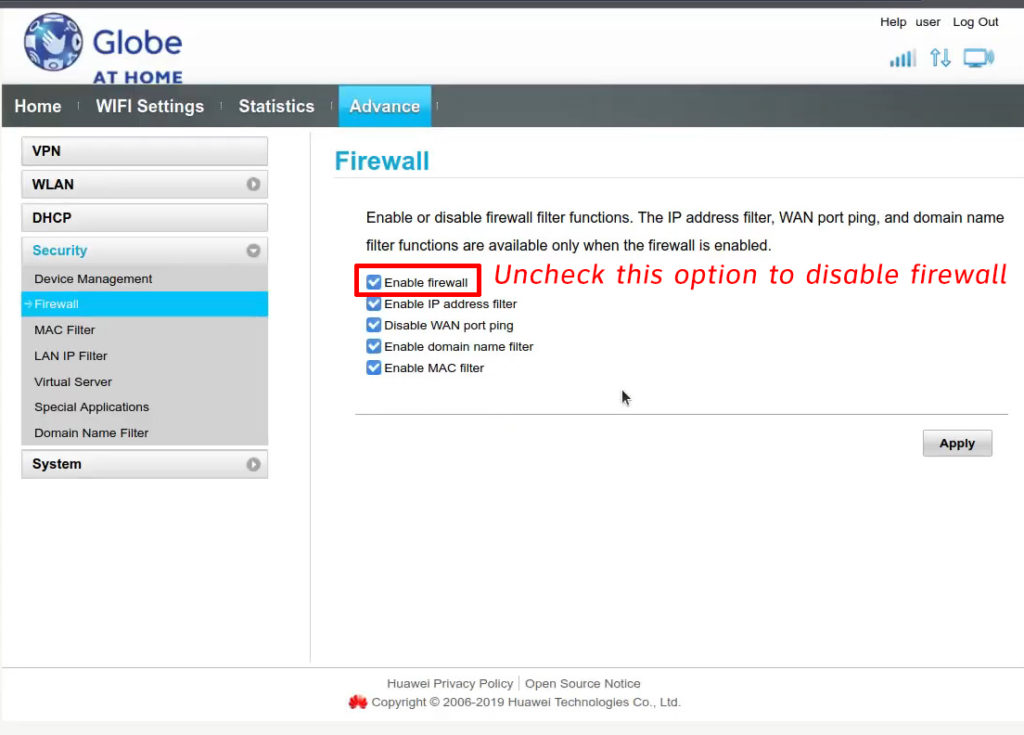
This one is pretty similar to the previous tip. The only difference is that DMZ also forwards all ports to the device used as a DMZ host. Here’s how to disable the firewall:
- Select Advanced, then click Security.
- From the Security section, select Firewall.
- Now, you need to turn off all the options from the Firewall section by unchecking them.
- Click Apply.
- From the menu on the left, select System, then click Restart.
- In the window on the right that will also open, select Restart, and finally click OK.

Note: Just like DMZ, this should only be a temporary solution. Disable firewall just to check whether that restores your internet connection or not. If not, reenable it.
Check Other Devices
Try connecting to Wi-Fi on several different devices. If none of them have internet access, then there is no doubt that the problem comes from a modem or a router. If you can access the internet on some devices, then the problem is probably not in the modem/router.
Clean the DNS Cache
It is useful to know that when the cache memory is too crowded, it can cause connection problems, so rinsing the DNS cache is recommended. Here’s how to do it:
- First, click on the start menu.
- Now select Windows System.
- In Windows System, find Command Prompt, right-click on it, and select Run as administrator.
- Type the following: ipconfig / flushdns.
- Finally, press enter.
If the problem was in the DNS cache, you should have Internet access after these procedures.
How to Flush DNS (macOS, Windows 10, Chrome)
Connect the Modem to the Computer Using an Ethernet Cable
This method will help you determine if you may have a problem with the router. Connect your modem directly to your computer via an Ethernet cable. If you have internet access, then something is wrong with the router.
Check the Remaining Amount of Your Data
Make sure you have used up the amount of data available to you. If so, then this is the reason why you do not have internet access, you will solve this very simply – renew your internet package.
Reset Your Network Settings
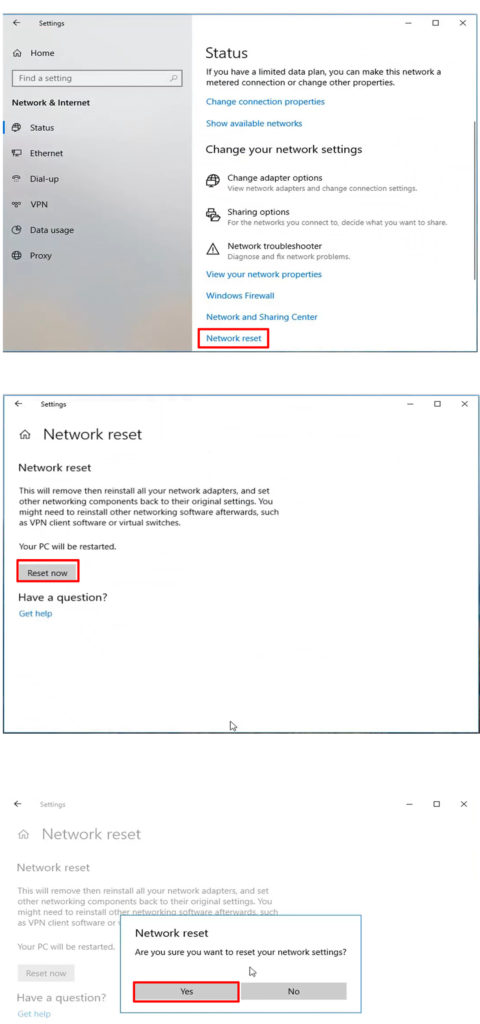
You can always reset your Network settings. This is done extremely simply:
First, find and click Settings on your computer. Then, open Network and Internet. In the Network and Internet section, click Status. At the very bottom, find Network Reset and click on it. Finally, click on Reset Now.

Reset the Router
This is done by pressing the reset button with a paper clip (or some other sharp object) and holding it for 5-10 seconds. After resetting, all settings on the router will be deleted and reset to factory defaults.
Conclusion
We hope that some of the solutions we listed above will eliminate interference, resolve your problem, and give you access to the Internet. If you still don’t have internet access after trying all these potential solutions, we advise you to contact your ISP for help.

Hey, I’m Jeremy Clifford. I hold a bachelor’s degree in information systems, and I’m a certified network specialist. I worked for several internet providers in LA, San Francisco, Sacramento, and Seattle over the past 21 years.
I worked as a customer service operator, field technician, network engineer, and network specialist. During my career in networking, I’ve come across numerous modems, gateways, routers, and other networking hardware. I’ve installed network equipment, fixed it, designed and administrated networks, etc.
Networking is my passion, and I’m eager to share everything I know with you. On this website, you can read my modem and router reviews, as well as various how-to guides designed to help you solve your network problems. I want to liberate you from the fear that most users feel when they have to deal with modem and router settings.
My favorite free-time activities are gaming, movie-watching, and cooking. I also enjoy fishing, although I’m not good at it. What I’m good at is annoying David when we are fishing together. Apparently, you’re not supposed to talk or laugh while fishing – it scares the fishes.

