Today it is hard to imagine a home without a wireless network. Most of the devices we are using depend on it and this is one of the reasons why we have to take care of our WiFi network security. If you have a GTT router and you want to manage and secure your wireless network, you need to know how to access the GTT router’s web-based interface.
In this article we are going to show you the steps you need to take in order to login to your GTT router and where to find the wireless settings that need to be changed.
So, let’s begin.

CONTENTS
What You Need:
Before you begin, it is important to take care of the following and make sure you have:
- A device to connect to the network
- Network access over WiFi or a wired connection
- The GTT admin login details
If you have these, the rest of the GTT router login process is pretty simple and straightforward.
What Are The Default GTT Router Details?
These are the default GTT router login details that should help you access the router admin dashboard.
Default IP address: 192.168.1.1
Default username: gttuser
Default password: gtt-user
Or
Default username: user
Default password: gttuser
NOTE: The default GTT router login details are usually printed on a label under the router. Check whether you have this label and use the login details given there. Otherwise you can use the login details given above or consult the router manual.
How To Login To GTT Router?
Follow these steps to access the GTT router settings. If you get stuck at any point please refer to the troubleshooting section at the end of the article.
STEP 1 – Connect The Device
Connect the device to your network over WiFi or connect it to the router using an Ethernet cable. This step is pretty important because you won’t be able to access the router settings. Just the devices connected to the network can access the router settings. After you make sure the device is connected, proceed with the next step.
STEP 2 – Launch A Web Browser On The Device
Now launch any of the browsers you have on your device. It helps the user access the router’s web-based interface which allows the user to easily manage the router settings. Some router manufacturers advise using Google Chrome or Microsoft Edge. However, make sure that the browser is updated recently in order to avoid some conflicts with the web-based interface.
STEP 3 – Enter The GTT IP In The Address Bar

Now type the GTT router IP 192.168.1.1 in the browser’s address bar. When you hit the Return or Enter key (depending on the device) you should see the GTT router homepage.
However, if the router homepage doesn’t appear, please check whether you have typed the IP correctly. If the same happens after you retype the IP address, you should check whether 192.168.1.1 is the correct IP.
NOTE: If you see something like “Connection to this site is not private” click on Advanced and then on Proceed to…
STEP 4 – Enter The GTT Router Admin Login Details
On the top left corner of the homepage there should be a link saying “Manage gateway (advanced)”. Click on it and in the router login page type the admin username and password we have recommended or the ones printed on the label. In case you are already using custom ones please type them in. Then press on the Sign In button. You should see the GTT router admin dashboard now.
Now you have the possibility to change the router settings, but we definitely don’t recommend changing the setting if you don’t quite understand what you are doing. That can make your home network unstable or even make it stop working completely. Therefore, either make a backup of the router configuration or ask someone with a little more experience to make the changes you want.
On the other hand, there are some basic changes you can make that will make your network more secure. They are changing the admin password which will stop anyone from accessing the router settings, and changing the wireless network name and password.
Let’s Change The GTT Network Name

Although we don’t change the network name often, it is good to know how to do it in case you want to set up a new, memorable network name.
1. Login to your GTT router by following the steps we have described above.
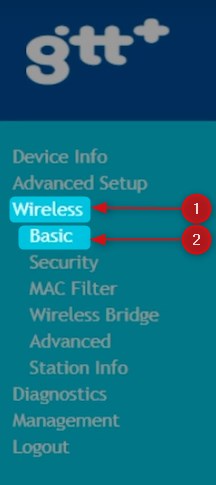
2. In the menu on the left click on Wireless and then on Basic.
3. Check whether Enable Wireless is checked. If it isn’t, check the box next to it.
4. Scroll down to the SSID field. Type the desired network name there.
5. Click on the Apply/Save button to save the changes.
Let’s Change The GTT WiFi Password
Protecting your network with a wireless password or changing the current one is the key element for a well-protected wireless network. It is recommended to change it every few months and always make sure it is hard to guess one.

1. Follow the steps above to login to the GTT router admin dashboard.
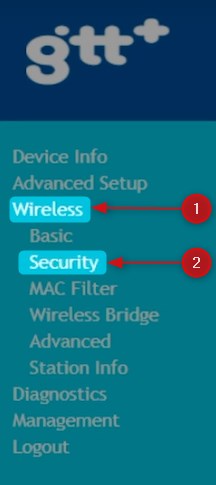
2. Click on Wireless in the menu on the left, and then click on Security.
3. Scroll down to the Manual Setup AP section.
4. From the Select SSID drop-down list select the network name.
5. From the Network Authentication drop-down list select WPA2 or Mixed WPA2/WPA-PSK.
6. Enter the new wireless password into the WPA Passphrase field.
7. Leave the WPA Encryption set to TKIP+AES or just AES.
8. Click the Apply/Save button to save the changes.
Recommended reading:
- How to Configure a Router to Use DHCP? (Understanding DHCP Server Configuration)
- How to Protect Your Router from Hackers? (Wi-Fi Security Tips)
- How to Find Password of Wi-Fi I’m Connected To? (View Saved Wi-Fi Passwords)
Final Words
As you can see the GTT router login steps are easy to follow and the entire process takes around a minute of your time. However, if you run into any problems, check whether your device is connected, check whether you are typing the login details correctly, are the login details correct, disable the firewall and the antivirus software installed on your device, check whether your device has a valid IP address, move the device closer to the router if you are connected over WiFi.
Changing the wireless settings is also easy. However, if you want to make some more advanced changes in the router configuration, we recommend doing it carefully and creating a backup of the current router configuration. Then you can continue exploring the other router features and options. We don’t recommend changing the settings that you don’t understand. It is always safer to ask someone for help. Eventually, if you mess up the router settings you can reset the router to factory defaults and set up the network again.

Hey, I’m David. I’ve been working as a wireless network engineer and a network administrator for 15 years. During my studies, I also worked as an ISP field technician – that’s when I met Jeremy.
I hold a bachelor’s degree in network engineering and a master’s degree in computer science and engineering. I’m also a Cisco-certified service provider.
In my professional career, I worked for router/modem manufacturers and internet providers. I like to think that I’m good at explaining network-related issues in simple terms. That’s exactly what I’m doing on this website – I’m making simple and easy-to-follow guides on how to install, set up, and troubleshoot your networking hardware. I also review new network equipment – modems, gateways, switches, routers, extenders, mesh systems, cables, etc.
My goal is to help regular users with their everyday network issues, educate them, and make them less scared of their equipment. In my articles, you can find tips on what to look for when buying new networking hardware, and how to adjust your network settings to get the most out of your wi-fi.
Since my work is closely related to computers, servers, and other network equipment, I like to spend most of my spare time outdoors. When I want to blow off some steam, I like to ride my bike. I also love hiking and swimming. When I need to calm down and clear my mind, my go-to activity is fishing.
