Internet security is something many people take for granted or overlook. The same applies to their wireless networks. Very few people care about it until something bad happens. At that point, it is usually too late. If we make an analogy with your home security, it would be something like this:
You can leave your home unlocked and unprotected at all times, hoping no one with bad intentions will try to enter. You can lock it with a basic lock or use a sturdy, complex lock and a security system.

The same goes for your wireless network.
If you already know all this and you’re here just for instructions on configuring WPA3 protocol on your router, scroll to the end. However, keep reading if you want to learn the basics about wireless security and what is what in that section of the router’s admin panel.
CONTENTS
Wireless Network Security Basics
Every time you install a wireless router in your home or office, you are creating a wireless network. This network consists of all devices connected to that router. Depending on how you feel about your security, you can either set it up to be open or protect it by choosing a specific security protocol(s).
If you choose to leave it open, it will be accessible to everyone within the signal range. It won’t require entering any password to join the network. This approach can work if you’re pretty sure that all the people who can potentially access the network have no ill intentions.
However, we all know this is not always the case. So, in order to increase the security of wireless networks, people came up with WEP, which stands for Wired Equivalent Privacy protocol, back in 1999. It used a 40-bit encryption key. Hackers soon found a way to crack it and get through, thus making it obsolete.
The new solution was required, and it came in the form of WPA or Wi-Fi Protected Access. The WPA was better and used improved encryption called TKIP (Temporal Key Integrity Protocol). Even though TKIP was better than WEP, it was designed only to be a stopgap until something solid gets developed. The protocol was also vulnerable to various hacker attacks, which inspired the development of WPA2 and the corresponding AES – Advanced Encryption Standard protocol.
The WPA2 provides good enough security for most applications, but it has some issues. The newest iteration, WPA3, was introduced in 2018. and it offers the highest levels of encryption and security for Wi-Fi networks to this date.
Why Would You Choose WPA3?
Like we already explained, it is the best you can get. However, unless you can buy every device in your home that connects to the Wi-FI brand new, there is a good chance some or many of your current devices won’t support WPA3. You’ll have to combine it with WPA2.
How to Configure the Router to Use the WPA3 Protocol?
Whenever you want to change some settings on your router, you need to go to the Admin console or Admin panel.

Every router manufacturer uses a different address to access the Admin panel. You can find this default address on a sticker on the back of your router. It will be written under ‘default IP address.’ If your router doesn’t have a default IP address written in the back, type the manufacturer name +default IP address in the google search.
In some cases, the default IP will be written as a domain and sometimes as a set of numbers (i.e.192.168.1.1). Along with the default IP address, you will find a default username and password on that same sticker. Memorize them all or write them down.
Now open any internet browser on a device connected to the router you want to configure and enter the default IP address into the address bar. You don’t have to have internet access to do this part. Upon typing in the IP, the browser will open a login page where you need to enter the username and password you found on the sticker in order to proceed.
If you followed the previous steps correctly, you should now be in the Admin panel.
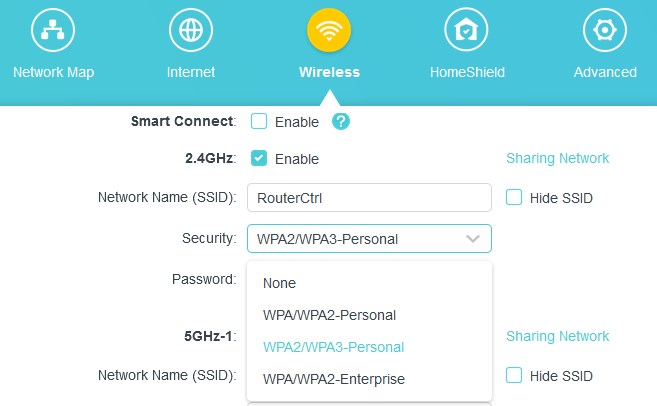
Every manufacturer uses a different user interface, and they can differ a lot even within the same manufacturer. Still, the options you are looking for should be under Wireless security, wireless settings, wireless authentication, or similar.
You’ll know you are in the right place if you see all the acronyms mentioned in the text above (WPA, WPA2, WPA3, etc.) to choose from.
Choose WPA3-PSK for Wireless security and AES for encryption, and then follow the instructions in the Admin panel to reboot the router so the changes can take effect.
PSK stands for Pre-Shared Key. This option is preferred for the home and small office networks because it doesn’t require an authentication server.
If your router is dual-band and supports both 2,4 GHz and 5 GHz frequencies, you may have to choose the settings for each antenna separately. If that is the case, opt for WPA3-PSK on the 5GHz and WPA3/ WPA2-PSK on the 2,4 GHz. That way, your older devices will connect to the more congested 2,4 GHz frequencies, and your newest (made in 2019 and newer) devices will have a 5 GHz band for themselves.
In case you have some device made before 2006 that you need to connect to the Wi-Fi, you won’t be able to do it with only WPA3 enabled. If this is the case, you’ll need to use combined settings by enabling WPA and using both TKIP and AES encryptions. However, keep in mind that these settings will reduce the security level since the WPA/TKIP is not as safe as WPA2/AES.
In other words, when you go to 5GHz band settings, choose WPA3-PSK/AES and on a 2,4 GHz antenna choose WPA2/WPA-PSK/TKIP/AES.
If you don’t have a dual-band router, but only 2,4 GHz, and you have devices older than 2006, consider upgrading your router or devices. You can set up your router to have two combined protocols, but not three. So, you won’t be able to use all generations of devices on your network and still be protected by WPA3.
SUMMARY
We should all take our internet security more seriously. Wireless networks became an inseparable part of our everyday life. However, many people ignore the risk that their Wi-Fi network can open a door for hackers to steal their private data and access their assets. To prevent that, we should all raise our wireless security to the optimal level. WPA3 is the newest security standard in Wi-Fi.
If your router supports it, you need to access the Admin panel to turn it on.
You can do that by connecting to your router and typing in a default IP address into an address bar of any internet browser. This will open a login window where you need to enter the admin username and password in order to proceed. Note that you don’t need internet access for this.
Different manufacturers use different user interfaces, but the settings you are looking for should be under ‘wireless security Wireless authentification or authorization.’
Choose or check WPA3/WPA2-PSK and AES for encryption. You need to keep WPA2 active if any device you are using to connect to the Wi-Fi doesn’t support WPA3.
If you have a device that predates 2006, you won’t be able to make it work with your network if you configure the router only for WPA3/WPA2. If that is the case, you may be able to make it work if you have a dual-band router.
Those will allow you to configure the 2,4GHz band for WPA2/PA2- PSK security and TKIP/AES encryption, while the 5 GHz band can use WPA3-PSK/AES.
All that is left for you to do at this point is to follow the instructions in the Admin panel on how to save settings and reboot the router.

Hey, I’m David. I’ve been working as a wireless network engineer and a network administrator for 15 years. During my studies, I also worked as an ISP field technician – that’s when I met Jeremy.
I hold a bachelor’s degree in network engineering and a master’s degree in computer science and engineering. I’m also a Cisco-certified service provider.
In my professional career, I worked for router/modem manufacturers and internet providers. I like to think that I’m good at explaining network-related issues in simple terms. That’s exactly what I’m doing on this website – I’m making simple and easy-to-follow guides on how to install, set up, and troubleshoot your networking hardware. I also review new network equipment – modems, gateways, switches, routers, extenders, mesh systems, cables, etc.
My goal is to help regular users with their everyday network issues, educate them, and make them less scared of their equipment. In my articles, you can find tips on what to look for when buying new networking hardware, and how to adjust your network settings to get the most out of your wi-fi.
Since my work is closely related to computers, servers, and other network equipment, I like to spend most of my spare time outdoors. When I want to blow off some steam, I like to ride my bike. I also love hiking and swimming. When I need to calm down and clear my mind, my go-to activity is fishing.
