Many people don’t want to bother with Wi-Fi network security and leave all the settings to default and security to ‘open’ until something terrible happens. At this point, it is usually too late.
Being here and reading this means you are aware of the risks and looking for a way to improve your safety. So, let’s dive into it.
CONTENTS
Wi-Fi security evolution

When you set up a wireless router in your home or office, you establish a wireless network. This network is made up of all devices that are linked to the router. Depending on how you feel about your security, you can configure it to be open or secure by implementing a specific security protocol(s).
Let’s check out your options from none to best and newest:
If you leave the settings on ‘open,’ anyone within the signal range will be able to use it. No password will be required. You can do this if you live in a remote location with little chance of getting uninvited users within the range. In any other case, you’ll need some protection from bad people with IT skills.
All the way back in 1999, to improve the security of wireless networks, people devised WEP, which stands for Wired Equivalent Privacy protocol. It made use of a 40-bit encryption key. Hackers quickly cracked it and got through, rendering it obsolete. At the present day, you will need to look hard if you want to find some network device that still uses and supports WEP. Yes, that’s how bad it is.
WPA, or Wi-Fi Protected Access, was the next step in the Wi-Fi security evolution. WPA was superior because it used improved encryption known as TKIP (Temporal Key Integrity Protocol). As the game of cat and mouse between the hackers and security developers went on, the bad guys soon figured out how to break through TKIP.
The protocol was vulnerable to various hacker attacks, which prompted the development of WPA2 and the improved encryption AES – Advanced Encryption Standard protocol. Even doe it has some weaknesses, WPA2 provides adequate security for most applications.
Still, improving safety is an ongoing process. WPA3, the most recent iteration, was introduced in 2018. It presents the further development of internet security and encryption for wireless networks.
What are the advantages of choosing the WPA2 protocol?
The answer to this question can be summarized into two words -adequacy and compatibility.
In other words, WPA2 will be good enough for most applications while having little or no compatibility issues.
Since 2006, all devices bearing the Wi-Fi trademark have been required to support it. The chances of finding something that requires Wi-Fi but cannot use WPA2 are slim to none. The only thing that comes to my mind would be an audio/video receiver. Those are not the type of devices you change very often.
Suppose you have an AV receiver or some other device that predates 2006 but has Wi-Fi connectivity. In that case, you must configure your router to use a WPA2/WPA combination to allow access and use for both older and newer devices.
However, you should do this only if you absolutely must have that outdated device on the network and can’t update it or replace it with the newer one. ‘Any chain is only as strong as its weakest link.’ and enabling WPA to allow access for some ancient device will decrease the overall level of your network’s protection.
How do you configure your router to use the WPA2 protocol?
Whenever you need to make some changes to the network settings or choose some options on your router, you’ll need to access the Admin panel, a.k.a. the Admin console.
Router settings can, in some cases, be accessed through a dedicated mobile app. But, since we are trying to inform the users of all makes and models, we will use the internet browser. You can do it on any device connected to the specific router to change the network security settings.
To get to the admin panel, you’ll need to know two things:
- Default IP address for your router
- Default administrator username and password
1. Each router manufacturer has a different IP address for accessing the Admin panel. In most cases, it’s written on a sticker on the back of your router under the heading’ default IP address.’ If your router does not have a default IP address written on the back, use Google to find it by typing in the manufacturer’s name and ‘default IP address’ in the search bar.
In some cases, the default IP will be written as a domain, while in others, it will be written as a series of numbers (e.g..192.168.1.1).
2. The same sticker on the back of the router should have a default admin username and password. If you don’t find it, use Google the same way as for the default IP address.
NOTE: If you have a second-hand router, there is a chance someone changed the default admin username and password. If this is the case, you’ll need to reset the router by pushing the reset button for a few seconds. By doing this, you will restore the router to the factory settings. However, you will also need to configure your network from scratch (SSID, admin username and password, and all other settings)
If you found the default IP address and administrator username and password, open any internet browser on a device connected to the router you want to configure, and type the default IP address into the address bar. This will open a login page where you must enter the username and password you found on the sticker to continue.
Voila! You are in the Admin panel!
Every manufacturer has a unique user interface, and even within the same manufacturer, they can vary greatly. Still, the options you seek should be found under either Wireless security, Wireless settings, Wireless authentication, or something similar.
Let’s use single band TP-Link as an example:
Look on the left side of the screen and click on the ‘Network,’ then on ‘wireless security.
You’ll know you’re in the right place if you see a WPA, WPA2, WPA3, and so on as options to choose from.

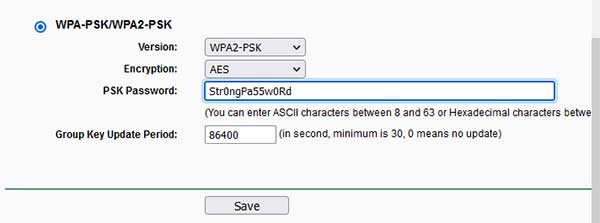
Choose WPA2-PSK for wireless security and AES for encryption, then restart the router according to the instructions.
PSK is an abbreviation for Pre-Shared Key. Because it does not require an authentication server, this option is preferred for home and small office networks.
Like we mentioned earlier, there is a way to allow your devices made before 2006 to use the network. If you have such a device, you won’t be able to use only the WPA2 protocol. Instead, you’ll need to enable both WPA2 and WPA and both TKIP and AES encryption. Again, keep in mind these settings will reduce security because WPA/TKIP is not as secure as WPA2/AES.
SUMMARY
Many people are unaware that their Wi-Fi network can allow hackers to steal their personal information and access their assets. To avoid this, we should all increase our wireless security to the highest functional level.
WPA2 protocol and AES encryption present a good compromise between security and compatibility. All Wi-Fi devices manufactured after 2006 to the present must support them.
To enable WPA2 and AES, access the Admin panel using any internet browser on any device connected to the router you want to configure.
Open a browser and enter a default IP address into the address bar. This will open a login window where you must enter the admin username and password to continue.
The default IP address and admin username and password can be found on the back of the router. If not, use Google to find them by typing in the manufacturer’s name and ‘default IP address into the search. The same goes for the administrator username and password.
The user interfaces used by different manufacturers vary, but the options you seek should be located under ‘wireless security.’, Wireless authentification, or something similar to that.
Choose WPA2-PSK and AES from available options.
If you need to connect a device predating 2006 to a wireless network, use the WPA2/WPA -PSK combo and AES/TKIP encryption. Otherwise, stick with WPA2-PSK/AES.
After choosing the proper settings, follow instructions in the Admin panel to save changes and reboot the router.

Hey, I’m David. I’ve been working as a wireless network engineer and a network administrator for 15 years. During my studies, I also worked as an ISP field technician – that’s when I met Jeremy.
I hold a bachelor’s degree in network engineering and a master’s degree in computer science and engineering. I’m also a Cisco-certified service provider.
In my professional career, I worked for router/modem manufacturers and internet providers. I like to think that I’m good at explaining network-related issues in simple terms. That’s exactly what I’m doing on this website – I’m making simple and easy-to-follow guides on how to install, set up, and troubleshoot your networking hardware. I also review new network equipment – modems, gateways, switches, routers, extenders, mesh systems, cables, etc.
My goal is to help regular users with their everyday network issues, educate them, and make them less scared of their equipment. In my articles, you can find tips on what to look for when buying new networking hardware, and how to adjust your network settings to get the most out of your wi-fi.
Since my work is closely related to computers, servers, and other network equipment, I like to spend most of my spare time outdoors. When I want to blow off some steam, I like to ride my bike. I also love hiking and swimming. When I need to calm down and clear my mind, my go-to activity is fishing.
