If you’re having some troubles with your Wi-Fi speeds or security, or you are concerned that someone might be using your network without permission, and you want to remove that person and its device, you’ve come to the right place.
This article will explain two ways how to remove devices from your CenturyLink router and take complete control.
It’s pretty easy. You don’t have to be a network technician or tech-savvy. All you need is a bit of time and some information to turn your network into the fort.
Depending on the model of the router you are using, there are two ways to remove a device from your CenturyLink router. The first is by using a Secure Wi-Fi toolkit, and the other is by manually accessing the router’s administration panel.

CONTENTS
How to Remove Devices From CenturyLink Router With Secure Wi-Fi
Secure Wi-Fi is a toolkit you can access by logging into your CenturyLink account or by using the My CenturyLink app on a mobile device.
However, the toolkit is only available for the C1100, C3000A, C3000Z, and C4000 routers. If you use a different model, move on to the next section.
To get to the Secure Wi-Fi tools, access your CenturyLink account by signing up on the website or My CenturyLink app. You can download the app for Android and Apple devices from their app stores.
Once you log in, go to the Internet service option from My products.
Look for Connected devices and click on the option to see the list of all devices connected to your network.
If you don’t recognize or want to manage any of the devices on the list, click on it to see management options.
For each device, you can:
Choose Name to rename device and give it a more recognizable name on your device list, or
Device type to Identify that specific device (mobile, PC, game console, TV, etc.), or
Internet access to Pause or Unpause and deny or allow the network access while keeping it on the network, and
Manage device group to organize devices into groups.
As you can see, CenturyLink’s Secure Wi-Fi tools will allow you to remove any identity, pause or remove any device from your network in just a few clicks.
If you’re using one of the unsupported routers, you’ll have to do things manually.
Let us show you how.
How to Remove Devices From Other CenturyLink Routers
This method will work with pretty much any router you may have, whether provided by CenturyLink or some model from a third party.
You’ll need a device connected to the router for this to work. It can be a mobile phone over Wi-Fi, but it would be much faster and more convenient if you use a laptop or a PC connected to the router via ethernet cable.
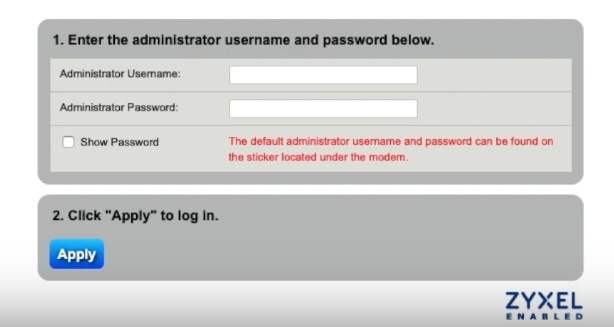
Open Google Chrome or any other internet browser and enter the router’s IP address.
Most CenturyLink routers have the default IP address 192.168.2.1. Some models use 192.168.1.1 or 192.168.0.1.

Default administrator username for CenturyLink routers is (blank), and the password is 1234
Third-party routers may have different default IPs, usernames, and passwords, but the defaults are usually printed on the back of the router or provided in the manuals that come with the unit.
Recommended reading:
- CenturyLink DSL Light Red: Meaning and How to Fix It?
- CenturyLink Modem Blinking Blue: 6 Ways To Fix It
- CenturyLink Router Blinking Red & Green
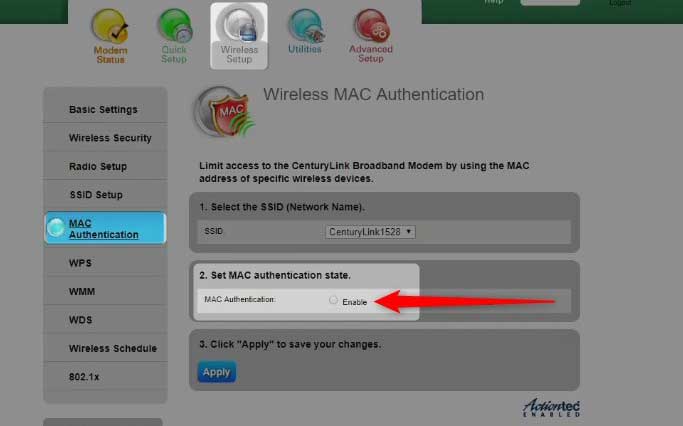
Once you log in to the control panel, look for MAC authorization or the MAC filtering option. In the CenturyLink routers, you should find it in the Wireless setup section, while third-party brands may put that option under Security or somewhere similar.
Inside the menu, you will be able to set the list of the devices that will be allowed to connect to your network by listing their MAC addresses.

MAC address is a unique set of markings used to identify any device that connects to the network.
Every network card has a MAC address, and it’s something like social security number for that network device.
If you choose to use MAC address authentication as a method of controlling who can connect to your Wi-Fi, you’ll need to learn where to find the MAC addresses on different operating systems and devices. Consumer electronics usually have the MAC address printed on the sticker, while computers and mobile phones don’t.
It is made out of 6 sets of two alphanumerical symbols, divided by “:”.
For example 6b:ag:5h:15:3d:7a
Here are instructions on finding MAC addresses in the most popular operating systems.
You can find the MAC address on the list of connected devices. Now, you can list allowed devices by typing in their MAC addresses. All devices not detailed won’t be allowed to connect to the network.
Once you create the list, click apply. You can add or remove devices from this list later by following the same steps.
To find the MAC address of a Windows PC, Press Start + R on the keyboard.
In the Run window, type in cmd and click OK.
At the command prompt, type ipconfig /all and hit Enter.
The MAC address for each interface is shown as a Physical Address.
To find the MAC address of an Android device, go to Setting, then About Phone. Tap Status or Hardware Information (depending on phone’s make and model).
Scroll down to find the Wi-Fi MAC address.
To find the MAC address of an Apple iPhone, go to Settings then General from a home screen on your Apple iPhone, or swipe left to access the App Library if a Settings app isn’t available on your Home screen,
Tap About.
View the MAC address (it is in the Wi-Fi Address field).
To find the MAC address of an Apple Mac (MacOS X), go to the Apple Menu, then System Preferences. Open Network, then go to Advanced. Select the Wi-Fi tab. The Wi-Fi Address or Airport Address is your device’s MAC address.
Summary
Many people don’t think too much about their Wi-Fi security and control over who has access to their network until something goes wrong.
At that point, it is often too late.
You should not be afraid to access and utilize some basic security features of your CenturyLink router.
As a CenturyLink user, you may have three possible situations when it comes to your router and two ways to change settings.
Option No 1.
You can have one of the following models: C1100, C3000A, C3000Z, or C4000.
If that is the case, go to the Google Play or App Store and download the My CenturyLink app. Alternatively, visit the CenturyLink website and sign up using your CenturyLink credentials. Once inside, navigate the menus to get to the list of the connected devices. You’ll be able to pause or remove any device from there.
Option No 2.
It is available for other CenturyLink routers and any third-party model you may have.
Find the default IP, administrator username, and password on the sticker or instructions manual.
Type the IP address into the web browser’s address bar on a device connected to that router.
Use the username and password to log in.
If it’s a CenturyLink router, go to Wireless setup, then to MAC authentication, and type in MAC addresses of all devices you want to allow on your wireless network.
In case you have a third-party router, check the manual to see what options are available to you. Many third-party routers will have more options on how to handle this issue than the ones provided by CenturyLink.
We hope you find this article helpful and encourage you to check our other content.

Hey, I’m Jeremy Clifford. I hold a bachelor’s degree in information systems, and I’m a certified network specialist. I worked for several internet providers in LA, San Francisco, Sacramento, and Seattle over the past 21 years.
I worked as a customer service operator, field technician, network engineer, and network specialist. During my career in networking, I’ve come across numerous modems, gateways, routers, and other networking hardware. I’ve installed network equipment, fixed it, designed and administrated networks, etc.
Networking is my passion, and I’m eager to share everything I know with you. On this website, you can read my modem and router reviews, as well as various how-to guides designed to help you solve your network problems. I want to liberate you from the fear that most users feel when they have to deal with modem and router settings.
My favorite free-time activities are gaming, movie-watching, and cooking. I also enjoy fishing, although I’m not good at it. What I’m good at is annoying David when we are fishing together. Apparently, you’re not supposed to talk or laugh while fishing – it scares the fishes.
