We have so many answers to the “why does Mac keep disconnecting from Wi-Fi” question. But, instead of boring you with too many details, we’ll present you with a few easy solutions to your problem! Today, you’ll learn how to diagnose possible wireless problems on your device, as well as what you can do in case you’re not able to find the culprit there. Let’s begin!

CONTENTS
Find the Core of the Issue by Performing a Mac Wireless Diagnostics
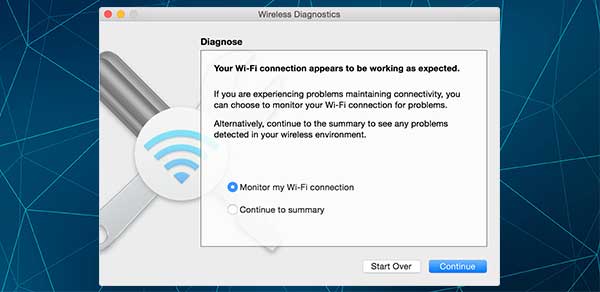
The easiest way to see what went wrong with the Wi-Fi connection on your Mac is to use the Mac Wireless Diagnostics tool. This tool is pretty easy to navigate. Before you begin the diagnostics, it might be best to close the open apps on your device.
You’ll find the Diagnostics tool by holding the “Option key” and clicking the Wi-Fi status icon in the menu. Then, you’ll have the option to go to Wireless Diagnostics. You can also use Mac’s search bar and simply type “Diagnostics” to find the feature.

Once your device opens the file for you, you should go to the diagnosis section and click on “Continue” to let the Mac perform the diagnosis. You’ll receive thorough instructions before every step. Once Mac completes the analysis, you can find the specifics of the possible issue by clicking the info buttons in the Summary section.
Aside from the on-screen data you’re getting immediately, the Diagnostics tool also prepares a compressed file for you. There, you’ll find all of the details that you can show your network administrator or customer service of your Wi-Fi network if you don’t manage to fix the internet problem yourself.
You’ll see it in the /var/tmp folder under the name WirelessDiagnostics. In case you can’t find it on your own, you can simply click the Finder icon and search for the folder that way.
Managing the Mac Diagnostics Tool
If you have an OS x Yosemite or a newer version, all of the diagnostics items will be displayed separately. That will make it easier for you to check specifics and find the possible cause of the issue. Some of the sections are Scan, which scans the Wi-Fi environment in your house, and Performance that allows you to check the signal quality, strength, and noise.
You’ll also see sections such as Sniffer, which analyses Wi-Fi packets, and Monitor, which shows the performance and allows you to display that part of the diagnostics in the corner of your monitor.
Most of these sections won’t be useful to regular users as their main purpose is to help professionals troubleshoot the network. But, one particular portion could help you with your issue. That’s the Performance one. So, you should examine that one thoroughly.
Recommended reading:
- ASUS Router Keeps Disconnecting From Internet
- Frontier Internet Keeps Disconnecting
- How To Fix Xfinity WiFi Keeps Disconnecting?
If you notice that the signal strength is poor, you will have to do something to improve it. You could place your Mac closer to the router or remove any large objects between the router and your device. On the other hand, high noise levels mean you’ll need to find a better Wi-Fi channel. As that process is pretty complicated, it might be easier to simply switch from the 2.4GHz to the 5GHz band. You can do that by opening the browser and going to the router settings.
Try Out a Few Simple Solutions
If you’re not a professional, you certainly don’t want to spend hours fixing your Wi-Fi issue. Thus, we’re offering you a couple of possible fixes for your problem that won’t take up too much of your time.
1. Restarting the Router
This one will be especially helpful if you notice that the Wi-Fi is not working on multiple devices. If only your Mac is the issue, restarting the router most likely won’t help you solve the problem. But it’s worth trying.
To restart the device, you should simply unplug it from the power source. Then, you’ll need to wait for a few minutes until you plug it back in. Wait for an extra few minutes for the connection to establish again, and then check the Wi-Fi signal on your Mac device.
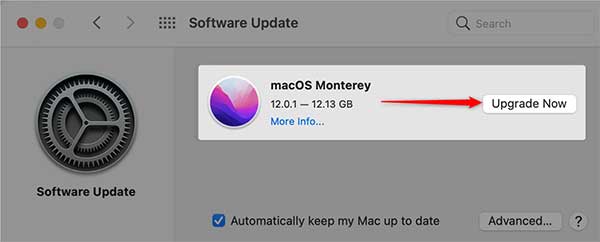
2. Updating the Mac Operating System

Sometimes, an outdated operating system can cause issues with your device’s performance. Moreover, a newer OS could fix possible Wi-Fi issues that were present during the older versions. That is why you should always keep your operating system up to date. To do that, go to the System Preferences menu and download the latest version available. Then, follow the instructions to install it.
3. Switching to Ethernet
If you’re not the only person living in your house, switching to Ethernet might not be the best idea. But, it would be a great temporary solution for emergencies. You should find the Ethernet adapter that came with the router and connect your router and the Mac device on each end. Then, try out the internet connection to see whether it has improved.
4. Reconfiguring the DNS
The DNS has the ability to switch addresses to the ones your server can understand. That could help your Mac connect to the Wi-Fi without interruptions.
To reconfigure the DNS, you should open the Network Preferences section of your Mac device. Then, you can choose the “Advanced” option and go to the DNS menu. Your next step will be clicking on the plus icon and typing 8.8.4.4 or 8.8.8.8 in the text box. Then, you’ll simply need to press Enter, and the DNS will be successfully configured!
In Conclusion
There are so many possible answers as to why your Mac keeps disconnecting from Wi-Fi. Luckily, our few simple solutions will help most users solve their internet connection issues.
If they don’t, there are a few other things you can do. Firstly, you can use some of our articles as a guide on creating a perfect environment for a strong internet connection. What’s more, you could disconnect all other devices and try again, set up the network priority in the settings, or renew the DHS lease.
Alternatively, you could ask a professional to help you find the core of your issue or opt for a newer router, as that might be at the root of your problem.

Hey, I’m Jeremy Clifford. I hold a bachelor’s degree in information systems, and I’m a certified network specialist. I worked for several internet providers in LA, San Francisco, Sacramento, and Seattle over the past 21 years.
I worked as a customer service operator, field technician, network engineer, and network specialist. During my career in networking, I’ve come across numerous modems, gateways, routers, and other networking hardware. I’ve installed network equipment, fixed it, designed and administrated networks, etc.
Networking is my passion, and I’m eager to share everything I know with you. On this website, you can read my modem and router reviews, as well as various how-to guides designed to help you solve your network problems. I want to liberate you from the fear that most users feel when they have to deal with modem and router settings.
My favorite free-time activities are gaming, movie-watching, and cooking. I also enjoy fishing, although I’m not good at it. What I’m good at is annoying David when we are fishing together. Apparently, you’re not supposed to talk or laugh while fishing – it scares the fishes.
