We are sure you are well aware of the negative effects of having an unsecured wireless network or protecting it with weak passwords that can be easily cracked. Because of that, it is important to secure your network with a strong password and you can do that after you login to your Plusnet router i.e. after you access the Plusnet Hub manager.

The Plusnet Hub Manager allows you to manage all your wireless network and advanced settings in one place.
CONTENTS
Brief Outline
This guide will teach you how to access the Plusnet Hub manager using its default IP address and default admin password. Additionally, you will see how to change the default WiFi name and password.
So, without any further ado, let’s see what are the essential things you need to get ready for a successful Plusnet router login.
What You Need:
- Plusnet router
- PC, smartphone, or a tablet connected to the network over WiFi or Ethernet cable
- Plusnet router IP and the default or custom login details
Why Should You Access The Plusnet Router Admin Dashboard?
As we have mentioned at the beginning of this article all your network settings can be easily managed from the router admin dashboard.
We can start with some simple security tweaks like changing the WiFi name and password or changing the default admin password. We can also set up a guest network, open some ports for gaming, tweak the QoS (Quality of Service) control settings, and so on. We normally don’t recommend playing with the advanced settings unless you know what you are doing, but just in case we encourage you to take a backup of the current router configuration. After that, you can continue exploring the router configurations.
How To Access The Plusnet Router Admin Dashboard?
If you have prepared everything we have mentioned above, we can begin:
STEP 1 – Connect Your Device To The Network
Although we have already mentioned that you need a device connected to the network it is important to mention it again. The reason for this is that if the device isn’t connected, the login process will be unsuccessful. The device needs to be connected to the network in order to be granted access to the router admin dashboard.
STEP 2 – Launch Your Favorite Web Browser
You will need a web browser to access the router admin dashboard. The router web-based interface will be shown in the browser once you access the router settings page. So, launch the one you use most frequently.
STEP 3 – Enter The Plusnet Default IP In The URL Bar
All Plusnet routers (Plusnet Hub Two, Plusnet Hub One, Plusnet Hub Zero and Technicolor 582n) use the same IP address as a default gateway. It’s 192.168.1.254.

So, type this IP in the browser’s URL bar and press Enter or Go on the keyboard.
If the IP is correct you will see the Hub Manager where different settings can be seen.
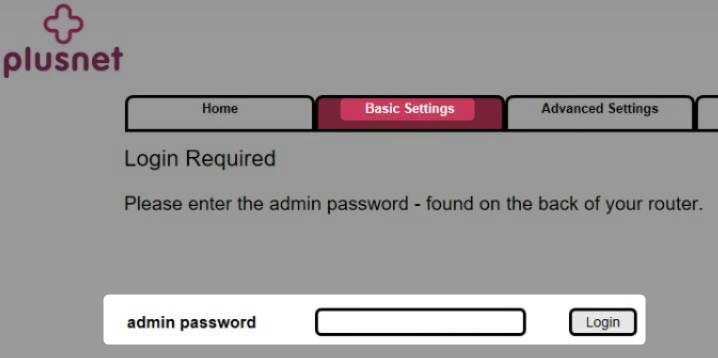
STEP 4 – Enter the Admin password

However, if you want to change any of these settings you will need to enter the admin password. For example, if you want to change your WiFi password and you select Wireless you will see the Change Settings button. When you click on it you will be requested to enter the admin password.
This password can be found printed on a card that is placed at the back of the router or printed on a sticker.
When you need to enter this password, type it in the appropriate field and click OK. Then you will see the settings you can modify.
STEP 5 – Manage And Secure Your Router Now
Once you access the Plusnet router settings it is easy to make all the necessary changes. Just in case, we recommend making a backup of the Plusnet Hub settings in order to restore them later if necessary.
How to Change The Plusnet WiFi Name And Password?
Changing the wireless network name and password is highly recommended. As for the WiFi name, changing it to anything else that doesn’t discover which router we are using is OK.

The WiFi password, on the other hand, should be changed from time to time as well. Making these changes is simple and straightforward and you should make them as soon as possible.
We have already mentioned that when you click on the settings you want to modify you will be asked to enter the admin password.
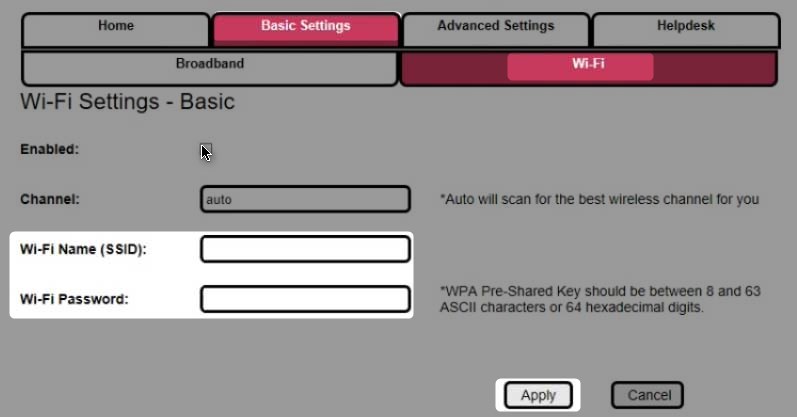
When you see the Hub manager there are two options depending on the graphical user interface. So, click the following:
- Basic Settings > Wi-Fi
- Wireless > Change Settings button at the top-right of the screen
When asked, enter the admin password and click Login or OK.
If you have enabled 2.4GHz and 5GHz, make sure to change the network name and password for both of them.
The steps are similar but remember this – when you save the changes, the device you are using to access the router settings and all other devices connected to the network will be disconnected from the wireless network and you will need to reconnect them again.
To change the SSID (Network Name) find the Network name (Wi-Fi Name) field and delete the current network name. Then type in the new one.
Scroll down a little and in the Security password (Wi-Fi Password) field delete the current password and enter a new one. The new one should be at least eight characters long and should be a combination of small and capital letters, numbers and punctuation marks. There is a nice bar below the password field which indicates how strong your new password is. Make sure it’s a strong one.
Make sure to save the changes using the Save button once you finish modifying the settings.
If you have connected to the router wirelessly to make the changes, you will be logged out of the Hub manager and the network when you save the changes. Just find the new network name and connect again with the new wireless password.
Final Words
As you have seen from the guide presented above, accessing the Plusnet Hub settings is rather simple when you have everything ready. Just make sure to write down the changes you make in order to use them again when you need to login to your Plusnet Hub again.
The admin password can be changed as well as an additional layer of security and you can make that change too. But remember that in case you lose the admin password, you will have to reset the Plusnet Hub to factory settings and then set up your network from the beginning. A factory reset deletes all the changes you have made before. You will be able to login with the default IP and password again, so make sure to save these as well.

Hey, I’m David. I’ve been working as a wireless network engineer and a network administrator for 15 years. During my studies, I also worked as an ISP field technician – that’s when I met Jeremy.
I hold a bachelor’s degree in network engineering and a master’s degree in computer science and engineering. I’m also a Cisco-certified service provider.
In my professional career, I worked for router/modem manufacturers and internet providers. I like to think that I’m good at explaining network-related issues in simple terms. That’s exactly what I’m doing on this website – I’m making simple and easy-to-follow guides on how to install, set up, and troubleshoot your networking hardware. I also review new network equipment – modems, gateways, switches, routers, extenders, mesh systems, cables, etc.
My goal is to help regular users with their everyday network issues, educate them, and make them less scared of their equipment. In my articles, you can find tips on what to look for when buying new networking hardware, and how to adjust your network settings to get the most out of your wi-fi.
Since my work is closely related to computers, servers, and other network equipment, I like to spend most of my spare time outdoors. When I want to blow off some steam, I like to ride my bike. I also love hiking and swimming. When I need to calm down and clear my mind, my go-to activity is fishing.
