
One of the basic troubleshooting steps you can take when you start experiencing problems with your wireless connection is to reset the Wi-Fi adapter. In this article, we are going to explain how to do it properly on Windows 10.
So, let’s start!
CONTENTS
WI-Fi Adapter: What Does It Do?
A Wi-Fi adapter is a networking device designed to allow laptops and desktops computers that don’t have wireless capabilities to connect to a wireless network. Practically all the laptops produced today have a built-in wireless adapter. But when it stops working an external WiFi adapter will easily help you fix the problem. Desktop computers don’t have ones so a Wi-Fi adapter will make it possible to connect your desktop computer to your wireless network. By doing this you won’t have to deal with cables and wires.
How To Use A USB Wi-Fi Adapter?
Using a Wi-Fi adapter is pretty simple. The good thing about them today is that in most cases you don’t need a CD to install them. Instead, they act like plug-and-play devices. You plug the USB Wi-Fi adapter into your desktop or laptop computer and Windows will install the device automatically and it will be ready for use in a few seconds.
The next step would be to click on the network name you want to connect to and enter the wireless password. After that, you will be able to use the internet on your device without any problems.
Why Should You Reset Your Wi-Fi Adapter?
NOTE: Before you reset your WiFi adapter you need to know the wireless password of your network so you can connect your device again when the Wi-Fi adapter reset completes.
Resetting the Wi-Fi adapter is something you really don’t have to do often. In fact, most people never have a reason to do that. However, in some cases, a Wi-Fi adapter reset is necessary if you want to fix some issues in your network.
Here are some situations where it is necessary to reset the Wi-Fi adapter.
1. If you have changed some network settings (encryption, password, IP configuration, and more).
2. If you have obsolete or damaged Wi-Fi network adapter drivers on your Windows 10 device.
3. If your Wi-Fi adapter is causing you problems that make it impossible to connect to a wireless network, for example the Wi-Fi adapter doesn’t detect the network.
When you reset your Wi-Fi adapter all the saved network profiles will be deleted and the Wi-Fi adapter driver will be reloaded. Any of the settings you may have customized will be brought back to their default values.
3 Ways To Reset Wi-Fi Adapter In Windows 10
When it comes to resetting the Wi-Fi adapter we can say that we have two options here. The first one isn’t so aggressive and will require you just to disable and enable the Wi-Fi adapter again.
The other method requires you to reset all the adapters on your Windows 10 laptop or computer. This method reloads the Wi-Fi adapter driver and you will have to connect to your network again. So, if you don’t know the wireless password, don’t do this step.
And finally, the third way includes the Command Prompt. We can say that this is an advanced way to reset your Wi-Fi adapter so if you want to feel like a tech guru, go ahead.
1. Disable The Wi-Fi Adapter And Enable It Again
1. Click on the Windows Start button and then click on the little gear icon (Settings).

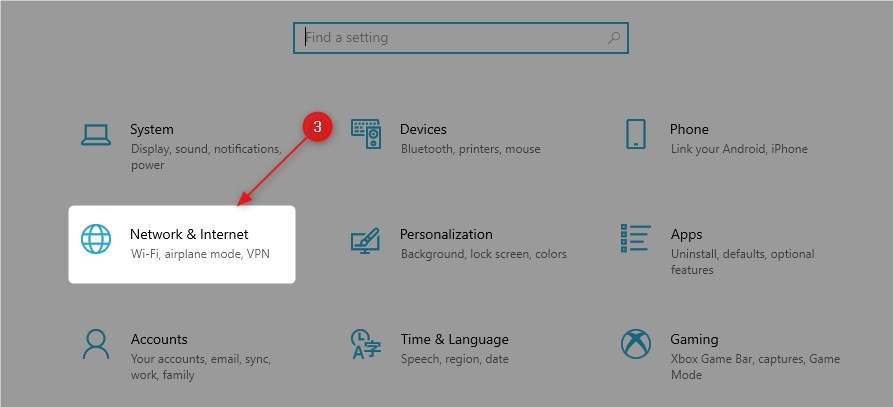
2. Now find and click on Network & Internet.
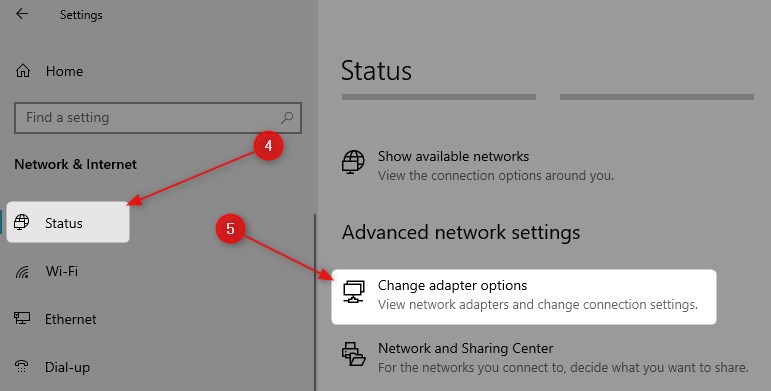
3. Make sure Status is selected and then click on Change adapter options.
4. Right-click on the Wi-Fi adapter and select Disable from the list.

5. The WiFi adapter is disabled.
6. Now, right-click the Wi-Fi adapter again and click on Enable.

7. The Wi-Fi adapter will be restarted and, in a few seconds, it will identify the wireless network and connect to it automatically. In case it doesn’t connect automatically for some reason, you will have to do it manually. Click the network icon at the bottom-right of the screen and click on your network name and connect.
2. Reset All The Wi-Fi Adapters
1. Click on the Windows Start button and then click on the little gear icon (Settings).
2. Now find and click on Network & Internet.
3. Make sure Status is selected and then scroll down until you see the Network reset link.

4. In the new window click on the Reset Now button.

5. Now you have to confirm your selection by clicking the Yes button.

6. You will see a message that you will be signed out in 5 minutes and your computer or laptop will restart.

7. Give it some time to reboot and once it boots up again it should connect to the network again. If it doesn’t connect manually and you are good to go. We hope that this step has fixed the issue you were experiencing.
3. Reset The Wi-Fi Adapter Using CMD
If you want to try using the Command Prompt to reset the Wi-Fi adapter you are free to try. It isn’t as complicated as it sounds. All you have to do is to launch the Command prompt and type in the correct command.
Let’s see how to do this properly.
1. Click on the Search icon in the taskbar and type cmd.
2. When the Command Prompt icon appears click on Run as administrator. If the User account control asks you whether you want to allow the app to make changes select Yes.

3. Now use this command netsh interface show interface to find the network adapter name.
4. Now use the following command to disable the Wi-Fi adapter.

netsh interface set interface name= “networkadaptername” admin=disabled
Please note to enter the Interface name instead of the networkadaptername. Leave the quotation marks. In our example this is the way the command should look like:
netsh interface set interface name= “Wi-Fi” admin=enabled
This will disable the WiFi adapter.
5. Now enable the WiFi adapter by typing the same command but add enable instead of disable at the end.
netsh interface set interface name= “networkadaptername” admin=disabled
This command will enable the Wi-Fi adapter and when it restarts it will connect to your wireless network automatically.
Recommended reading:
- Are Powerline Adapters Good for Gaming? (A Complete Guide to Powerline Adapters)
- Are MoCA Adapters Worth It? (Beginners Guide to MoCA Adapters)
- Netgear Wireless Adapter Won’t Connect To Internet
- What Does a PC Wi-Fi Adapter Do?
Conclusion
As you can see it isn’t that complicated to reset your Wi-Fi adapter in Windows 10. You can either disable/enable the Wi-Fi adapter or reset all the adapters, or if you really want, you can do it using the Command Prompt. No matter which method you choose, if the problem you are experiencing doesn’t get fixed after you reset the Wi-Fi adapter, you will need to get in touch with your ISP customer support and ask for their help.

Hey, I’m David. I’ve been working as a wireless network engineer and a network administrator for 15 years. During my studies, I also worked as an ISP field technician – that’s when I met Jeremy.
I hold a bachelor’s degree in network engineering and a master’s degree in computer science and engineering. I’m also a Cisco-certified service provider.
In my professional career, I worked for router/modem manufacturers and internet providers. I like to think that I’m good at explaining network-related issues in simple terms. That’s exactly what I’m doing on this website – I’m making simple and easy-to-follow guides on how to install, set up, and troubleshoot your networking hardware. I also review new network equipment – modems, gateways, switches, routers, extenders, mesh systems, cables, etc.
My goal is to help regular users with their everyday network issues, educate them, and make them less scared of their equipment. In my articles, you can find tips on what to look for when buying new networking hardware, and how to adjust your network settings to get the most out of your wi-fi.
Since my work is closely related to computers, servers, and other network equipment, I like to spend most of my spare time outdoors. When I want to blow off some steam, I like to ride my bike. I also love hiking and swimming. When I need to calm down and clear my mind, my go-to activity is fishing.