
In an age where smart devices run most of our daily lives in terms of automation and IoT devices, a reliable Wi-Fi connection is very necessary. Whenever you have a strong, reliable wireless signal, your devices can communicate smoothly over the wireless network, and you can also browse the internet without interruptions.
Often when Wi-Fi is installed, it works perfectly. After some time, you will start experiencing various connectivity issues, such as Wi-Fi dropping constantly and a slow internet connection. It can be hard to narrow down the problem hence why this article will help you run diagnostics on your Wi-Fi network either through the PC or an Android device.

CONTENTS
How to Run Wi-Fi Diagnostics on Windows?
A Wi-Fi diagnostic analyses your wireless network connection and the components used to establish that connection, i.e., router or client devices. In some instances, the diagnostic can solve whatever problems it finds; in others, it can only identify the problem, and how you solve it is up to you.
The importance of a Wi-Fi diagnostic is it helps narrow down a connectivity problem allowing you to determine better how to solve such issues.
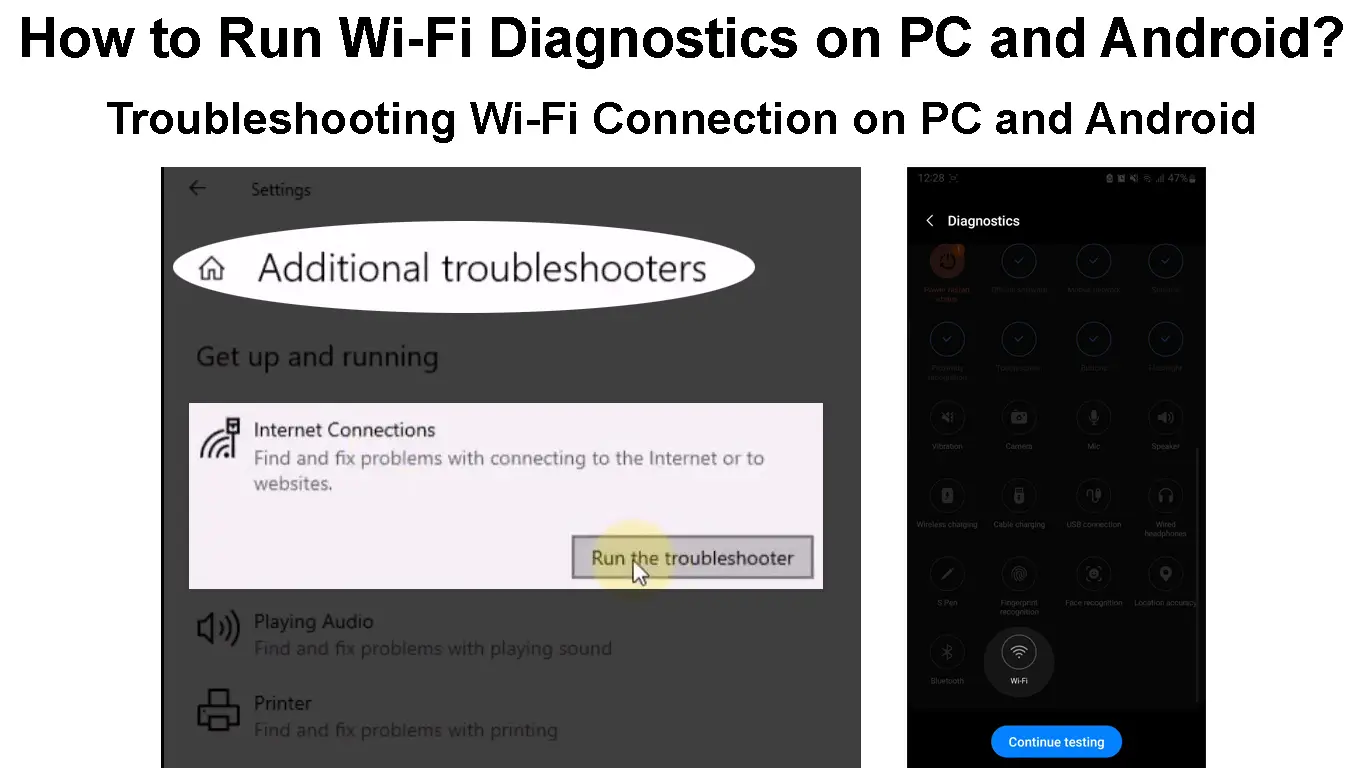
Using the Windows Troubleshooter
Windows has a built-in troubleshooter that can help you run diagnostics on various aspects of the system, one of them being the network adapters. Therefore, you can use it to diagnose the Wi-Fi adapter on its own or all network adapters simultaneously. You can do this by following the steps below:
- Connect your device to the Wi-Fi network you want to run diagnostics on.
- Press the Windows + R keys, then type Control Panel into the dialogue box that will pop up. You can also use the search box and search for the Control Panel.
- Once the control panel window is open, click on the Network and Internet option, then select Network and Sharing Center.
- If you do not see the Network and Internet option, click on the ‘View by’ drop-down menu on the top right corner of the control panel window. Then select Category, and you should see the option. Alternatively, click on the ‘View by’ drop-down menu, select small or large icons, then select Network and sharing center.
- The Network and sharing center will show your active networks; click on the highlighted Wi-Fi SSID under ‘Access type: Internet.’
- A new Wi-Fi status window will pop up; click Diagnose to diagnose the current Wi-Fi connection.

- Wait for the Troubleshooter to run and follow the prompts in case of a problem with your device’s network adapters. If there are any problems, the troubleshooter will provide suggestions on how you can solve them.
- You can also click on Troubleshoot problems once you get to the Network and sharing center. Then select Internet connections, and the troubleshooter will guide you through the troubleshooting process, allowing you to choose whether you want to troubleshoot the Ethernet, Wi-Fi adapter, or both.

Using the Command Prompt
Another alternative is to use the PC’s Command Prompt, and this is a better option because it can generate Wi-Fi connectivity reports spanning a couple of days. The diagnostics report will have information about every time your PC interacted with a wireless network and at what stage of the interaction the connection failed if it was unsuccessful.
You can then use the generated report to analyze your PC’s wireless connections and understand the wireless driver behavior, establishing a Wi-Fi diagnosis.
The steps below describe how to run the said command:
- Click on the taskbar’s magnifying icon/search option and type CMD.
- The results will include the CMD app, right-click on it and select Run as administrator.
- Key in the command netsh WLAN show wlanreport and hit Enter.
- Wait for the command to run, creating the necessary report, and you will know it is done when it shows you the path to find the generated report. The last line of the command should look something like
Report written to: file:///C:/ProgramData/Microsoft/Windows/WlanReport/wlan-report-latest.html

- Copy the file path by selecting it and pressing Ctrl + C since the right-click function will not work in the CMD environment.
- Paste the file path on a browser URL box and press enter, and you will access the generated report.
- The report will include the name of your PC wireless adapter, a summary of reasons why the PC could not establish connections to Wi-Fi on the current and previously connected networks when the connection had Internet access and when it did not, the strength and speed of previous and current Wi-Fi connections and so much more.
Note that the connection information will be from a span of three days which will make it easier to diagnose the Wi-Fi connections effectively.
Creating a Wireless Network Report in Command Prompt
The first aspect of the report will be the Wi-Fi report chart that shows the Wi-Fi connection history. The red circles marked with an X indicate a connectivity error, and you can click any to see more information about a particular error.
Running the above command gives a comprehensive report on your Wi-Fi connections, including the speed and signal strength meaning there is little need to use online speed testing tools.
Running Wi-Fi Diagnostics on Android
Unlike PCs, Android devices have less robust network diagnosis criteria. However, Android has a Connectivity Diagnostics API that allows network managing apps to access diagnostic information of a network they own or manage. That is how you can use the app your Internet Service Provider provided to diagnose the router as long as you are connected to it and have administrative access.
However, you can still use your phone to diagnose a Wi-Fi connection in the following instances:
Using the Phone’s Inbuilt Analyzer App
Some Android phones, like Huawei, have an app that can scan your Wi-Fi connections and provide reports on the speed and signal quality.
Unfortunately, these apps are limited in terms of the type of network information they can provide since they simply scan a network and advice you to switch to a stronger Wi-Fi signal or move closer to the router. They do not provide insightful information that can help you locate the problem.
You can still use them to conduct a soft Wi-Fi diagnosis that lets you know if Wi-Fi is working, and others can tell you what channels and frequency bands your Wi-Fi is using.
Using a Third-Party Analyzer App
You can also use third-party analyzer apps like the Wi-Fi analyzer by Olgor to run Wi-Fi diagnostics. However, most apps require a subscription fee to access their features.
Additionally, they will not provide detailed information as one would want, and if they do, you will have to sign into the router through them first.
Therefore, it is better to use the app provided by your ISP or router manufacturer for comprehensive and accurate Wi-Fi diagnostics.
But if you still want to follow this path, go to the Play store, search for Wi-Fi analyzer apps, and download your preferred one.
Wi-Fi Analyzer App for Android
Using Your Router’s App/GUI
Some Internet Service Providers and router manufacturers provide companion apps that streamline the user experience when enjoying their services. Such apps include the Netgear Nighthawk by Netgear and Asus router by Asus.
Also, mesh network systems like Google Nest Wi-Fi have advanced apps (Google Home) that can run comprehensive network diagnostics and provide possible solutions. You can also use the router’s website setup page to run Wi-Fi diagnostics.
Procedures vary depending on the router you have; therefore, be sure to visit the manufacturer’s website for precise instructions.
Android phones have ‘secret menu codes’ that can be used to run various hardware and software tests, including testing your Wi-Fi connection.
Therefore, you can enter the code *#*#4636#*#* into your phone’s dial pad, and it will automatically open a testing screen with your phone’s information, usage statistics, and Wi-Fi information.
Tap Wi-Fi information, then Wi-Fi status, and you will see information like whether your Wi-Fi is enabled, the SSID if it is connected, and the upload and download speeds.
You can also tap the Run ping test option; the phone will tell you whether it is successful.
The ping test sends data packets to Google to check whether your Wi-Fi connection can access the internet. You can try different troubleshooting measures on the phone and router if it fails.
Note that this code does not work on all Android phones, and you do not have to press the call button after entering it in the dial pad. Just enter the code, and the phone will automatically open a testing screen; if it does not, try again and if it fails, use other measures suggested here.
Conclusion
The best way to analyze a Wi-Fi connection is through your PC. A PC will provide more detailed information about various network infrastructure aspects than an Android device.
You should always run Wi-Fi diagnostics on your PC when experiencing problems to ensure your router is at peak performance. Also, consider changing the Wi-Fi password from time to time to kick off older devices that you no longer want to remain on the network. This decongests the router, thus ensuring you have a reliable Wi-Fi connection throughout.

Hey, I’m Jeremy Clifford. I hold a bachelor’s degree in information systems, and I’m a certified network specialist. I worked for several internet providers in LA, San Francisco, Sacramento, and Seattle over the past 21 years.
I worked as a customer service operator, field technician, network engineer, and network specialist. During my career in networking, I’ve come across numerous modems, gateways, routers, and other networking hardware. I’ve installed network equipment, fixed it, designed and administrated networks, etc.
Networking is my passion, and I’m eager to share everything I know with you. On this website, you can read my modem and router reviews, as well as various how-to guides designed to help you solve your network problems. I want to liberate you from the fear that most users feel when they have to deal with modem and router settings.
My favorite free-time activities are gaming, movie-watching, and cooking. I also enjoy fishing, although I’m not good at it. What I’m good at is annoying David when we are fishing together. Apparently, you’re not supposed to talk or laugh while fishing – it scares the fishes.