
If you live in a city, there are available wireless networks all around. If you want to find an open Wi-Fi or a specific network you want to connect to, you need to know how to see all available Wi-Fi networks around your device.
In this article, we will explain how to see all the available wireless networks on different devices (computers and smartphones), and what to do if your device doesn’t show any network. Keep reading!

CONTENTS
- How to See All Available Wi-Fi Connections?
- What to Do if Your Device Doesn’t Show Available Networks?
- Check Whether Wi-Fi Is Enabled (All Devices)
- Restart Your Device (All Devices)
- Check Whether Wi-Fi Is On in the Network Settings (Windows)
- Update the Wi-Fi Adapter Driver (Windows)
- Reinstall the Wi-Fi Adapter Driver (Windows)
- Run the Network Troubleshooter (Windows)
- Reset the Network Settings (iPhone and Android)
- Final Words
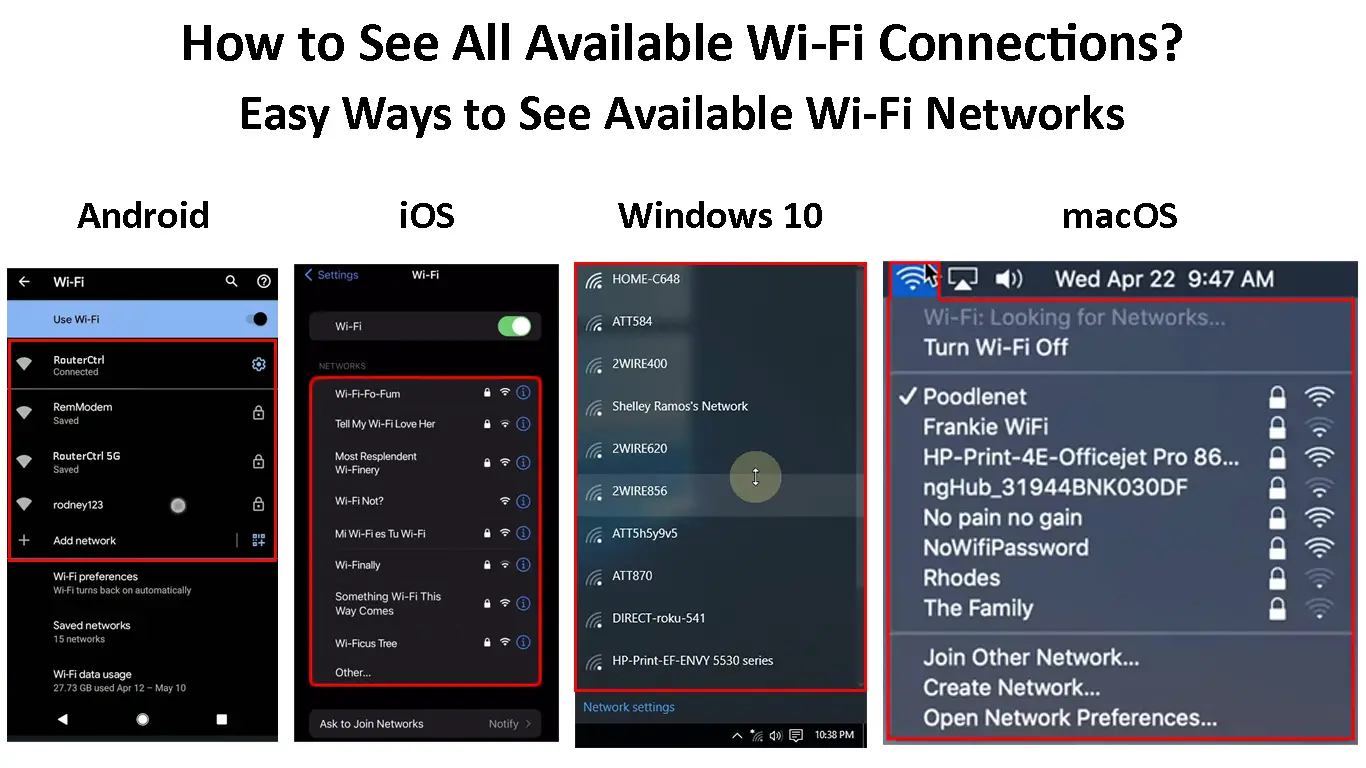
How to See All Available Wi-Fi Connections?
Here is a brief explanation of how to see the available networks on your iPhone or Android phone, as well as how to do it on Windows or macOS devices.
Android
When you want to see all the available Wi-Fi networks on your Android phone, the procedure is pretty straightforward. However, the steps may be a bit different depending on the brand and model of your phone.
Unlock your phone, swipe down from the top of the screen, and tap on the Settings icon (little gear icon).
Now tap on Connections. Then tap on Wi-Fi. Make sure Wi-Fi is enabled and there you should see a list named Available Networks.

iPhone, iPad, or iPod touch
If you want to see all the available Wi-Fi networks on your Apple device, unlock it and tap on the Settings icon.
Then tap on Wi-Fi.
All the available Wi-Fi networks will be listed in the NETWORKS section.

To connect to a specific wireless network, you need to tap on it and enter the wireless password if requested. Once connected, there will be a blue checkmark in front of the network name, and it will move to the top of the screen.
Windows 11
Seeing all the available Wi-Fi networks is pretty simple on your Windows 11 computer. In fact, there are three ways to do it. You can do it from the desktop, from Settings, and from the Command Prompt. Here is a brief explanation of how to do this properly.
See Available Wi-Fi Connections from The Desktop
To see all the available wireless networks from the desktop in Windows 11, you have to click the Wi-Fi icon in the taskbar first. Alternatively, press the Windows key on the keyboard and the letter A.
Now click on the arrow next to the Wi-Fi icon. This will open the list of all available networks around your Windows PC. You should get an idea about the wireless signal strength based on the appearance of the Wi-Fi icon.
![]()
In case there are no available networks, check whether Wi-Fi is enabled. After you enable it, the list will appear.
See Available Wi-Fi Connections from The Settings
To see the list of available wireless networks within the Settings section, follow these steps.
Press the Windows key and the letter I. Alternatively, click on the Windows Start button on the taskbar, and in the search bar at the top type “settings” and press the Enter key.
The Settings page will open.
Now click on Network & internet, and then on Wi-Fi.
Click on Show available networks and just as the name says you will see a list of all the available wireless networks.

See Available Wi-Fi Connections from The Command Prompt
The Command Prompt is a handy little utility. To open it, click on the Windows Start button and type “cmd” in the search bar.
The Command prompt should open. Now type or copy/paste the following command.
netsh wlan show networks
All the available networks will be shown along with the Network Type, Authentication, and Encryption details.

macOS
If you want to see all available networks on your Mac, you can use the AirPort/Wi-Fi icon or the Network Pane.
See Available Wi-Fi Connections Using the Wi-Fi icon
This is a quick and easy way to see all the available Wi-Fi networks on your MacBook.
Check the top-right of the desktop and click on the Wi-Fi icon. If Wi-Fi is enabled, you should see a list of all the available networks.

See Available Wi-Fi Connections from the Network Panel
To do this properly, click on the Apple logo icon in the top-left of the screen, and then click on System Preferences.
Now find the Network icon and click on it.
In the left pane select Wi-Fi, and then click on the Network Name drop-down list It will show a list of available Wi-Fi networks to connect to.

If you want to connect to a specific network, click on it, enter the wireless password and click on the Join button.
What to Do if Your Device Doesn’t Show Available Networks?
You can use the above-listed methods to see all the available Wi-Fi networks around your device. However, in some cases, you follow all the steps one by one, and your device doesn’t display the list of available wireless networks. Let’s see what we can do about it.
Check Whether Wi-Fi Is Enabled (All Devices)
Sometimes your laptop has a physical Wi-Fi switch or a button that can be used to enable or disable Wi-Fi. If you know about it, check whether Wi-Fi is on or off. If it’s off, enable it and try again. You can also read our article on how to enable Wi-Fi from your keyboard.
Also, once you access the Wi-Fi section on your device, you have to check whether Wi-Fi is turned on. If it isn’t, turn it on, and then check whether the list of available wireless networks appears.
Restart Your Device (All Devices)
It doesn’t matter whether you are using a smartphone, MacBook, or Windows computer, restarting the device is a quick and easy way to fix most networking problems.
Simply press and hold the Power button on your smartphone or shut down the computer completely. Then turn the device on and wait for it to boot completely. After that, try to find the available Wi-Fi networks as described above.
Recommended reading:
- Can’t Connect to Wi-Fi With Full Wi-Fi Signal? (Try These Solutions)
- How to Limit Wi-Fi Connection Time? (Step-by-Step Guide)
- How to Turn On Wi-Fi on Technicolor Modem? (Step-by-Step Instructions)
Check Whether Wi-Fi Is On in the Network Settings (Windows)
You or someone else may have disabled the integrated Wi-Fi adapter.
On Windows 11, click on the Windows Start button, and in the search bar type “control panel”. Press the Enter key and the Control panel will appear.
Click on Network and Internet, and then on Network Sharing Center.
Now click on Change adapter settings.
If you see that Wi-Fi is disabled, right-click on it and select Enable. Now restart your computer and try to find the list of available networks again, as described above.

Update the Wi-Fi Adapter Driver (Windows)
Right-click on the Windows Start button and from the list select Device Manager. Click on the little arrow next to Network adapters to expand the list. Right-click on the Wireless network adapter and select Update driver.

Click on Search automatically for drivers, and if there is a new version Windows will install it automatically. If you already have the latest version you will see a message saying “The best drivers for your device are already installed”.
Reinstall the Wi-Fi Adapter Driver (Windows)
Follow the steps described in the first paragraph of the Update the Wi-Fi Adapter section.
Once you get to the point to right-click on the Wireless network adapter, click on Uninstall device.
Connect the network cable to the computer or laptop and restart the device. Once it boots up it will detect, download and install the missing driver.
Check whether this has fixed the problem. If it hasn’t, try the next solution.
Run the Network Troubleshooter (Windows)
The integrated network troubleshooter is pretty useful when there are some problems with the network. Just run the troubleshooter and let it find and fix any issues it finds on the way.
Click on the Start button. In the search bar type “settings”. Press the Enter key.
The system should be selected automatically on the left. Scroll down and click on Troubleshoot. On the new page, click on Other troubleshooters.
Scroll down to find the Network adapter section. Click the Run button next to it.

The network troubleshooter will scan the system and if it finds any errors it will try to fix them. If it determines that everything is OK, you will see a message saying “Troubleshooting couldn’t identify the problem”.
Reset the Network Settings (iPhone and Android)
iPhone Running on iOS 15 And Newer – Unlock the iPhone, tap on the Settings icon and then tap on General. Now scroll all the way down and tap on Transfer or Reset iPhone. Tap on Reset and from the list select Reset Network Settings.

This procedure will reset the wireless networks and passwords, APN and VPN settings as well as cellular data settings.
Android – The steps may be different depending on the brand and model of your smartphone. Unlock the smartphone and tap on the Settings icon. Find General management on the list and tap on it. Now tap on Reset and then on Reset Network Settings. Finally, select Reset Settings and confirm your choice by clicking on Reset again.
How to Reset Network Settings on an Android Phone
Final Words
We hope the instructions presented in this post helped you see all the available Wi-Fi networks on your device. As you can see, there is nothing complicated and you don’t need any special technical knowledge.
If your device didn’t show the available Wi-Fi networks, one of the solutions presented here will, hopefully, help you resolve the problem and see the available Wi-Fi networks.

Hey, I’m Jeremy Clifford. I hold a bachelor’s degree in information systems, and I’m a certified network specialist. I worked for several internet providers in LA, San Francisco, Sacramento, and Seattle over the past 21 years.
I worked as a customer service operator, field technician, network engineer, and network specialist. During my career in networking, I’ve come across numerous modems, gateways, routers, and other networking hardware. I’ve installed network equipment, fixed it, designed and administrated networks, etc.
Networking is my passion, and I’m eager to share everything I know with you. On this website, you can read my modem and router reviews, as well as various how-to guides designed to help you solve your network problems. I want to liberate you from the fear that most users feel when they have to deal with modem and router settings.
My favorite free-time activities are gaming, movie-watching, and cooking. I also enjoy fishing, although I’m not good at it. What I’m good at is annoying David when we are fishing together. Apparently, you’re not supposed to talk or laugh while fishing – it scares the fishes.