
When we connect to a wireless network and enter the Wi-Fi password, our device saves that information for the next time. So, the next time it’s in range, the device will connect automatically to the network thanks to the saved network details.
The question now is whether we can see the Wi-Fi networks we have connected to in the past and eventually see the Wi-Fi password.
In this article, we will explain whether you can do it or not on different devices, and if it’s possible, give you the exact steps on how to do it. Additionally, if there is a way to find wireless passwords or saved networks, we’ve got you covered.

CONTENTS
How to See Saved Wi-Fi Networks?
And now let’s see what steps you need to take in order to find the Wi-Fi networks you have been connected to previously. We will explain how to do it on your iPhone or Android phone, and on Windows 11 and macOS as well.
So, let’s get started!
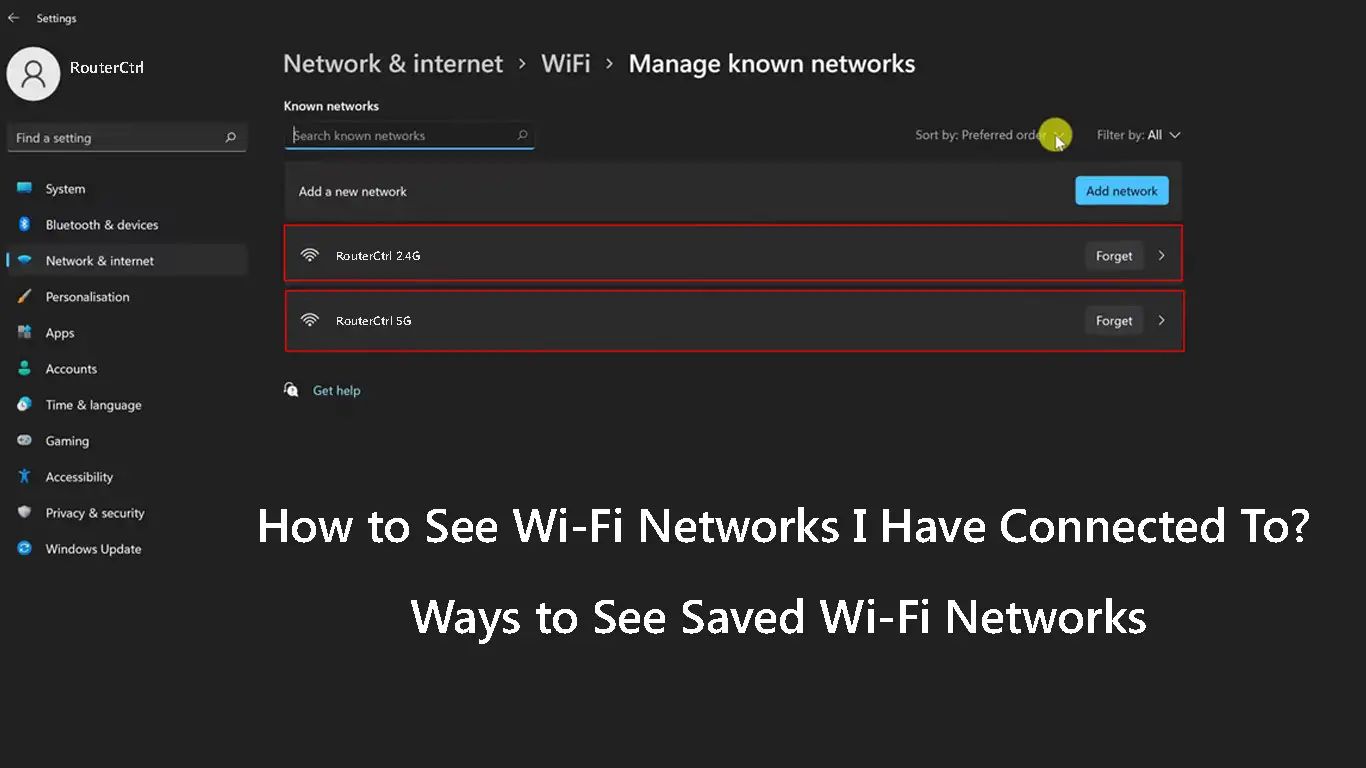
How to See Saved Wi-Fi Networks in Windows?
Your Windows computer saves the Wi-Fi networks for later and you can easily see all the Wi-Fi networks you have connected your laptop to in the past. Here is how to find these.
- Click on the Windows Start button in the taskbar and then click on the Settings icon if you have it pinned. If it isn’t, type ‘settings’ in the search bar and hit the Enter key.
- Now click on Network & internet.
- Click on Wi-Fi.
- Now click on the Manage known networks section.

- A list of all the wireless networks you have been connected to will appear. You can easily sort the network by Preference, Source, or Name, or you can filter them to see all of them and choose to see only:
- Open networks
- Secured
- Suggested
- Network Providers
- Company Policy

You can also choose to forget a network with a click of a button or you can see additional details about the network when you click on it or tell Windows to connect automatically when a specific network is in range.
You can also set specific networks (like a hotspot from your smartphone) to be set as metered connections. In this case, Windows will disable a number of automatic connections we are usually not aware of.
How to See Saved Wi-Fi Networks Using the Command Prompt?
Finding the list of saved Wi-Fi networks is pretty easy if you want to do it using the Command prompt. All you have to do is to type the correct command. On top of everything, the Command Prompt will let you see the Wi-Fi passwords of the saved wireless networks.
- Click on the Windows start button and in the search bar at the top type ‘cmd’.
- Right-click on the icon, and choose Run as administrator.
- Click Yes when prompted and the Command Prompt will open.
- Type the following command or just copy/paste it:
netsh wlan show profile
Press the Enter key and all the saved Wi-Fi networks will be listed.

- Now if you want to see the wireless password of a specific Wi-Fi network, use the following command:
netsh wlan show profile USERPROFILE key=clear
*replace USERPROFILE with the specific network name and hit the Enter key.
- In the results look for Key Content. The wireless password will be written there.
How to See Saved Wi-Fi Networks and Wi-Fi Passwords on a Windows Computer Using the Command Prompt
How to See Saved Wi-Fi Networks on Android Phones?
If you are an Android user, the steps below may be a little different depending on the phone’s brand and model. However, you shouldn’t have any problems finding the saved Wi-Fi networks.
- Unlock your Android phone and tap on the Settings icon.
- Now tap on Wi-Fi.
- Now click on Additional settings and then on Manage saved networks.

- There you will see the list of all the networks you have been connected to before. Click on a specific network name and you will be offered to forget the selected network. Some models can even let you see the saved wireless password for that specific network.
How to See Saved Wi-Fi Networks on MacBook?
Seeing the saved Wi-Fi networks on your MacBook is surprisingly easy as well.
- Click on the Apple logo and click on System Preferences.
- Click on the Networks icon.
- Click on Wi-Fi in the column on the left and then click on Advanced.
- The networks you have connected to earlier will be on the Preferred networks list if “Remember networks this computer has joined” has been checked.

How to Find Saved Wi-Fi Passwords on a Mac Computer
How to See Saved Wi-Fi Networks on iPhone?
Although your iPhone saves the wireless passwords for all the networks you connect it to, and it automatically connects when in range, there is no easy way to see these “old” networks and their passwords.
Sadly, finding the Wi-Fi networks you have been connected to in the past is almost impossible on your iPhone, unless it’s rooted. This is something Apple has disabled for your own safety in case you lose your iPhone.
Although it’s a bit complicated to see the saved Wi-Fi passwords on an iPhone because it requires connecting it to a MacBook, Keychain Access, and so on, apparently the latest iOS 16 has made it easy to see the Wi-Fi network password. This was not the case with the previous iOS versions.
- Unlock your iPhone (must run on iOS 16)
- Tap on the Settings icon and then on Wi-Fi
- Tap on the Wi-Fi network and then tap the info icon.
- Tap on the password. It is hidden so you will have to use Touch or face ID to unlock and reveal it.
How to See Saved Wi-Fi Passwords on an iPhone Running on iOS 16
Final Words
As you can see, seeing the Wi-Fi Networks you have connected to in the past is pretty easy on your MacBook or Windows computer, or Android phone, it is a bit complicated to do it on your iPhone.
We did our best to explain how to see the saved Wi-Fi networks on your device without being too technical. Hopefully, you will have no problems following the steps given in this article and finding the information you want.

Hey, I’m Jeremy Clifford. I hold a bachelor’s degree in information systems, and I’m a certified network specialist. I worked for several internet providers in LA, San Francisco, Sacramento, and Seattle over the past 21 years.
I worked as a customer service operator, field technician, network engineer, and network specialist. During my career in networking, I’ve come across numerous modems, gateways, routers, and other networking hardware. I’ve installed network equipment, fixed it, designed and administrated networks, etc.
Networking is my passion, and I’m eager to share everything I know with you. On this website, you can read my modem and router reviews, as well as various how-to guides designed to help you solve your network problems. I want to liberate you from the fear that most users feel when they have to deal with modem and router settings.
My favorite free-time activities are gaming, movie-watching, and cooking. I also enjoy fishing, although I’m not good at it. What I’m good at is annoying David when we are fishing together. Apparently, you’re not supposed to talk or laugh while fishing – it scares the fishes.